- v50 information can now be added to pages in the main namespace. v0.47 information can still be found in the DF2014 namespace. See here for more details on the new versioning policy.
- Use this page to report any issues related to the migration.
Quickstart guide
v50.13 · v0.47.05 This article is about the current version of DF.Note that some content may still need to be updated. |
- This is a quickstart guide for Dwarf fortress mode for those who have never played before and quickly want to jump in head-first.
- If you are looking to learn adventure mode instead, see the Adventure mode quick start guide.
- Also see Tutorials for more detailed tutorials that people have submitted.
Always remember that losing is fun! Be prepared to lose a few fortresses before you get all the way through this guide – it can be easy to accidentally kill the entire fortress while learning. But remember: losing means that next time, you'll remember how you lost. In a big way, Dwarf Fortress uses the principle of learning from one's mistakes.
If you have any feedback on this guide, please see the instructions in the feedback section.
So, you want to play Dwarf Fortress, but you have no idea what to do. That's understandable; in Dwarf Fortress you can really do anything you like. It is a huge, complex, and totally open-ended game. But in order to do anything, first you need a sustainable fortress. It turns out that this is not as hard as you might think.
As this article doesn't always contain the exact key sequences needed to do everything described, you will likely need to refer to the Fortress Mode Reference Guide and the rest of the wiki while reading this.

Common UI Concepts
While the guide contains many links, you may still need to look something up. Refer to the Fortress Mode Reference Guide or use the wiki search function. Also, don't hesitate to ask for help if you can't find answers on the wiki.
About key symbols
This wiki uses symbols that look like t or ![]() t to indicate what keys or interface buttons are used for an operation. Note that keys are case sensitive and to save space, Shift+t is shown as T. So t means "press the 't' key without the shift key" and T means "hold down shift and press the 't' key". Lowercase and uppercase keys will often perform different functions, so it is important to use the correct key. Sequences of keys will be in separate boxes, so abC means "press 'a', then press 'b', then hold shift and press 'c'"; while
t to indicate what keys or interface buttons are used for an operation. Note that keys are case sensitive and to save space, Shift+t is shown as T. So t means "press the 't' key without the shift key" and T means "hold down shift and press the 't' key". Lowercase and uppercase keys will often perform different functions, so it is important to use the correct key. Sequences of keys will be in separate boxes, so abC means "press 'a', then press 'b', then hold shift and press 'c'"; while ![]() b
b![]() T means "press 'b', then hold shift and press 'T'. A plus sign '+' between the boxes means to press them all together, so Shift+Enter means to hold shift and press 'Enter'. Other separators, such as ',' or '-', might be used but mean the same as no separator: to press the keys in sequence.
T means "press 'b', then hold shift and press 'T'. A plus sign '+' between the boxes means to press them all together, so Shift+Enter means to hold shift and press 'Enter'. Other separators, such as ',' or '-', might be used but mean the same as no separator: to press the keys in sequence.
Keybindings can be seen and changed on the Keybindings tab in the Settings menu.
| Esc or right mouse | Go back to the previous screen/menu |
| Mouse wheel | Scroll menu one line |
| Shift+mouse wheel | Scroll menu one page |
| Left mouse | Select menu option |
Esc or right mouse will almost always return to the previous screen until you get to the top level of the UI, at which point Esc will display the options menu.
Most basic game-related tasks (saving, keybindings, sound, etc.) are performed through the options menu, which can be reached with Esc from the main screen. There are usually seven available options:
- Return to Game: Exits the options menu (shortcut Esc).
- Save Game: Saves the game, unloads the fortress, and returns to the main menu. There is no "save and continue" option, but saves can be backed up and reloaded.
- Key Bindings: Allows you to change the keys that trigger nearly any function in the game. This can appear extremely confusing to use, but it is fairly simple to navigate through (as it uses the standard arrow keys, Esc and Enter). Changing keys for menus is probably a bad idea, since this guide assumes the default keybindings — however, it may occasionally be useful to change navigation keybindings on some laptops (for example, changing menus to use = instead of +).
- Export Local Image: Saves full-size images of your fortress.
- Music and Sound: Controls for volume adjustment.
- Retire the Fortress (for the time being): Do not select this option unless you know what you are doing! It retires the fortress from your control and gives control to the normal world updating process. You can later reclaim the fortress but it may not be as you left it.
- Abandon the Fortress to Ruin: Do not select this option unless you know what you are doing! It will end your fortress permanently and return to the main menu (all progress in your fortress will be lost). Your fort and most items will remain, however, so this can be useful in extreme circumstances (e.g. when you know your fortress is doomed and want to start again) – see abandon for more information).
Notably lacking is an "exit without save" option. Players who wish to quit and leave their previous save unchanged may manually kill the Dwarf Fortress process using the "die" command in DFHack, the Windows Task Manager (you might then have to end the process dumprep.exe), or the Unix "kill" command (on some systems, ctrl-\ in the terminal running DF accomplishes the same thing). Do not attempt this while saving, as your save folder may become corrupted. Alternatively, you can make a copy of your region folder in the (DF)/data/save folder (e.g. "regionXX") before saving, save the game normally, remove the "regionXX" folder and rename the copy.
World Generation
The first thing you will need to do is generate a new world. Unlike many games, the world that your game takes place in will always be procedurally randomly generated by you or someone else. There is no "default" or "standard" world.
Luckily the basic version of this process is rather simple, and doesn't usually take too long unless your computer is a bit outdated or the world's history is set to Long.
For your first game, generate a new world using the Create New World! option in the main menu with the following options:
- World Size is Medium
- History is Short
- Number of Civilizations is Medium
- Number of Sites is Medium
- Number of Beasts is Medium
- Natural Savagery is Very Low
- Mineral Occurrence is Frequent
This should help to avoid difficulties.
Pre-Embark
- Also see: Embark
Embarking is the process of choosing a site, outfitting your initial dwarves, and sending them on their way.
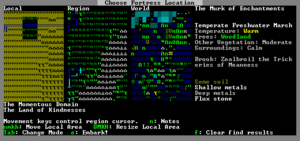
Select Start Playing from the main menu, then select Dwarf Fortress. The game will go through a few screens doing various world loading and updating activities. Then it will show the "Choose Fortress Location" screen.
The map you see on the right is the World Map which will show you the whole world. The one in the middle is the Region Map which will show you a zoomed-in view of the part of the world indicated by the cursor in the world map. The Local Map on the left will show a zoomed-in view of the part of the region indicated by the cursor in the region map. In the local map area there will be a highlighted embark region that you can move around with u m k h and resize with U M K H. This highlighted square is what will become your play area after you embark (This means that you cannot do or see anything outside of this area during your game). Use ↑ ↓ ← → to move the region and world cursors around. Hold down Shift while doing this to move more rapidly.
Choosing a Good Site
Choosing a good embark site is crucial for beginners. (Very) highly skilled players can create a functional fortress on an evil glacier, but for now, let's stick to dwarf (and newbie) friendly environments. You will want to look for certain features in your initial embark site that will make your first fort much easier to manage.
For your first game, find a site with the following properties:
- NO Aquifer (This is very important!)
- Trees: Forested or Heavily Forested (or, at the very least, sparsely forested)
- Temperature: Warm
- Surroundings: Serene, calm, or at least not any evil or savage biome.
- Clay or Soil is important to make farming easier when starting out
- Shallow Metals (That's Metals, plural, not Metal. You want more than one.)
- A River if possible
- Deep Metal(s) if possible
- Flux Stone if possible
You may want to use the find tool to help you find a site. You may find it easier to put only some of the criteria into the tool (at the very least, No Aquifer). Once the find tool has finished running, the general areas which it has found will be indicated by flashing characters on the map.
Notes about the find tool:
"Calm" is classified as Neutral, Low Savagery (see the chart here for why). The find tool will also only indicate a general area containing suitable sites, so you will still need to check the attributes manually by moving between flashing regions on the world and region maps (with the arrow keys or numpad) and by moving around on the local map (with u m k h) until you find the most suitable site.
The find tool may take a few minutes to run. When it's done, press ESC to look at the results. If the world map is just covered with red flashing Xs, it means that it couldn't find an area matching your criteria. Try again with different criteria, or make a new world. What you want to see are some flashing green Xs, which are areas that match your criteria. As you move your yellow X over those suggested sites, the info bar on the right will tell you what features are present in that general area, such as sand, soil, minerals, an aquifer, etc. Choose the one that looks best to you!
Your highlighted embark site - the moveable rectangle shown on the leftmost map - may contain multiple biomes. If so be sure to press F1, F2, etc, to take a look at all of them (Macs and laptops may require fn-F1, depending on your settings). Each may have significantly different characteristics. Note that occasionally a site with multiple biomes may contain an aquifer which isn't shown in the info bar due to it not being in the predominant biome (the one visible with F1). If your site has multiple biomes, it is very important to check all of them to avoid surprises like this.
Additionally, you can resize your embark area using U M
