- v50 information can now be added to pages in the main namespace. v0.47 information can still be found in the DF2014 namespace. See here for more details on the new versioning policy.
- Use this page to report any issues related to the migration.
Trap design
v50.12 · v0.47.05 This article is about the current version of DF.Note that some content may still need to be updated. |
- This page is one of several inter-related articles on the broader topic of defending your fortress and your dwarves. Trap design focuses on the theory and design of complex traps, mechanical systems and other automation for defending your fortress, and also on unusual uses of simple mechanic's traps. For a general overview of the threats that will challenge your fortress and things to consider when preparing a standard defense, see the defense guide. For tips on laying out your architecture to protect your military, see security design. For specific advice on how to get your soldiers prepared for any threat, see military.
- For suggestions on disposing of nobles and other unwanted residents, see unfortunate accident.
- For a basic overview of how the different machine parts work and work together, see machine component.
- For information on catching vermin-sized creatures in animal traps, see trapper.
Introduction
Simple one-tile traps* are just that – they exist only on their own tile, trigger themselves when a target walks onto that one tile, and affect only that one tile. Complex traps and automation rely on linking doors, hatches, floodgates, and bridges to levers or pressure plates, along with machinery to provide the power to run some of the more diabolical designs. When the trigger is activated, it sends a signal to the linked device. That signal is not always as simple as do it now, but it's specifically either to open or to close. By manipulating what does what and when, and what follows from that, impressive results can be achieved.
- (* specifically, the stone-fall trap, weapon trap, and cage trap.)
- To fully understand how these component objects work individually (before combining them into diabolical and complex combinations), see those main articles.
Basic traps
These are the simple traps that are placed by a mechanic. They require one mechanism but do not require levers or pressure plates. They can be a quick, easy and brutally effective "first defense" for a fledgling fortress, but they can also be combined into key parts of more complex set ups. For tips on using these basic traps effectively, see the Trap Strategies section.
Stone fall trap
- This is the easiest trap to build, so you can easily build them in large numbers. Building lots of them is an easy way to earn experience for your mechanic, and add to the depth of your fort's defenses at the same time. Surrounding intersections and stairways is a good way of handling threats that make it inside the fortress, including berserk dwarves.
Weapon trap
- The gold standard of lethal traps. This is the only simple trap that works repeatedly without reloading. They do get jammed, however. View the trap with the items in room t mode, and if there's a corpse inside the trap, it's jammed. None of the weapons on a jammed trap will function. It may be wiser to have several weapon traps with fewer weapons, rather than a smaller number of ten-weapon traps.
- Using crossbows or other projectile weapons in weapon traps avoids the problem of jamming, but they must be kept loaded with ammo. Mechanics will load them with any ammo that is not forbidden. They will load each until each type of weapon has ten rounds of ammo. Hammers seem to jam less than swords or axes, and spears seem to jam the most. Your dwarves will attempt to unjam traps unless otherwise forbidden.
Cage trap
- A very powerful type of trap. Maybe even too powerful – currently, even a wooden or glass cage can hold any creature indefinitely, even trolls and megabeasts. A cage trap never fails, although creatures with the trapavoid tag cannot be captured unless knocked unconscious or webbed first. Use cage traps as your outermost traps to catch the occasional wandering animal, angry wounded elephant or unicorn, or even zombies. Caged animals and enemies will be safely brought to any animal stockpiles you have, but may escape later if you are not careful. For more information, see captured creatures.
Linked traps
These traps require a trigger such as a pressure plate or lever. They will require at least three mechanisms, one for the trigger and two to create the link. The trigger can be located any distance from the trap, typically close for a pressure plate or far away for a lever.
For a system that repeatedly activates automatically and regularly regardless of enemies, see Repeater.
Menacing spikes
Menacing spikes or upright spears appear on the basic mechanic's Trap menu, but must be activated remotely to pop out of the ground and impale anyone standing on that tile. Vast forests of these can make any area a killing field.
While upright spike defense systems never jam, they also do not discriminate. When activated, they will inflict piercing damage on whatever is standing on the tile, whether it be friend or foe (so it's good for nobles). You can use traffic designations to help somewhat. Designate the spike trap tiles as restricted then make a longer path going around the spikes that's designated as high traffic. Pets and merchants/diplomats will probably still get skewered, though.
Trap strategies
These are some basic tricks that can be used with most any trap design, basic or complex.
Bait animals
Enemies will hunt down and kill friendly tame animals wandering outside if they have nothing better to do. Put an expendable animal on a restraint or in a 1x1 pen in some random spot outside, build a few columns around it to reduce the chance of them shooting it, and trap that area to hell and back.
Note that this is a horrible method of getting rid of cats, as they will often adopt a dwarf who will then attempt to free the cat. This may lead to the unfortunate situation of Urist McCatlover getting skewered by an ambush party while on his way to free Mr. Baitykins.
Bait furniture
Building destroyers can be baited by furniture, which they will path to and destroy, if they can. Furniture bait allows you to selectively target building destroyers, to draw them away from other aggressors or to a different trap. This can be useful when, for instance, you'd like to draw a building destroyer like a giant cave spider into a cage trap, but don't want to bother caging all of the other wildlife around it. It can also be useful for trapping monsters with special attacks that you'd rather not see go off, as the building destroyer won't use any special attacks on furniture as it would an animal. For instance, you could use bait furniture to trap a forgotten beast with deadly dust without causing it to spew more contagion.
Bait furniture can be especially effective when used with artifact quality furniture. Artifact furniture cannot be destroyed, but building destroyers will still attempt to path to it, at which point they will ineffectually attempt to destroy the furniture. This makes traps baited with artifact furniture easily reusable.
Trapping efficiently
Crosshair trapping
As the converse of building many traps everywhere, consider instead herding your enemies into a few traps. A cross-hair pattern of walls or impassable channels with an array of traps in the middle gap will increase the usage of each individual trap. This is particularly useful when capturing wildlife. You may also want a few traps near the edges, to catch the creatures that attempt to go around it.
| + | + | + | + | + | + | + | ^ | ^ | ^ | + | + | + | + | + | + | + | l | e | g | e | n | d | |||||||||||
| + | + | + | + | + | + | + | + | ▓ | + | + | + | + | + | + | + | + | ▓ | s | t | o | n | e | / | w | a | l | l | ||||||
| + | + | + | + | + | + | + | + | ▓ | + | + | + | + | + | + | + | + | ^ | t | r | a | p | ||||||||||||
| + | + | + | + | + | + | + | + | ▓ | + | + | + | + | + | + | + | + | + | f | l | o | o | r | |||||||||||
| + | + | + | + | + | + | + | + | ▓ | + | + | + | + | + | + | + | + | |||||||||||||||||
| + | + | + | + | + | + | ^ | ^ | ▓ | ^ | ^ | + | + | + | + | + | + | |||||||||||||||||
| ^ | + | + | + | + | + | ^ | ^ | ▓ | ^ | ^ | + | + | + | + | + | ^ | |||||||||||||||||
| ^ | ▓ | ▓ | ▓ | ▓ | ▓ | ▓ | ▓ | ^ | ▓ | ▓ | ▓ | ▓ | ▓ | ▓ | ▓ | ^ | |||||||||||||||||
| ^ | + | + | + | + | + | ^ | ^ | ▓ | ^ | ^ | + | + | + | + | + | ^ | |||||||||||||||||
| + | + | + | + | + | + | ^ | ^ | ▓ | ^ | ^ | + | + | + | + | + | + | |||||||||||||||||
| + | + | + | + | + | + | + | + | ▓ | + | + | + | + | + | + | + | + | |||||||||||||||||
| + | + | + | + | + | + | + | + | ▓ | + | + | + | + | + | + | + | + | |||||||||||||||||
| + | + | + | + | + | + | + | + | ▓ | + | + | + | + | + | + | + | + | |||||||||||||||||
| + | + | + | + | + | + | + | + | ▓ | + | + | + | + | + | + | + | + | |||||||||||||||||
| + | + | + | + | + | + | + | ^ | ^ | ^ | + | + | + | + | + | + | + |
Inside corner trapping
If the path where you will place your traps has bends, expect the enemy to take the most direct path – it's not guaranteed, but they will tend to hug the inside of a corner, and rarely detour to a dead-end.
| ╔ | ═ | ═ | ═ | ═ | ═ | ═ | ═ | ═ | ═ | ||||||||||||||||||||||||||||||
| ║ | ║ | ||||||||||||||||||||||||||||||||||||||
| ║ | ║ | ||||||||||||||||||||||||||||||||||||||
| ║ | ║ | U | n | l | i | k | e | l | y | p | a | t | h | ||||||||||||||||||||||||||
| ║ | ║ | ╔ | ═ | ═ | ═ | ═ | ═ | U | n | p | r | e | d | i | c | t | a | b | l | e | p | a | t | h | |||||||||||||||
| ║ | ║ | ║ | " | M | o | s | t | l | i | k | e | l | y | " | p | a | t | h | |||||||||||||||||||||
| ║ | ║ | g | ║ | g | I | n | v | a | d | e | r | ||||||||||||||||||||||||||||
| ║ | ║ | ||||||||||||||||||||||||||||||||||||||
| ║ | ║ | ||||||||||||||||||||||||||||||||||||||
| ╚ | ═ | ═ | ═ | ═ | ═ | ═ | ═ | ╝ |
Once in a straight hall, anything is possible, but placing your best (or first) traps on the inside path near "inside" corners (and de-emphasizing outside "dead-end" corners) is the best bet. If two invaders are side-by-side, they will wander, and random actions are always possible, but if you had to guess, this is the way to do it.
Pass trapping
If there are a lot of hills outside, remove most of the ramps, then trap those last few routes. The only way for creatures to get around will be to go through your traps.
░░░░░░░░░░░░░░░░░░
▲▲▲▲▲▲▲▲▲▲▲▲▲▲▲▲▲▲   Before
++++++++++++++++++

░░░░░░░░░░░░░░░░░░
+++++++^▲^++++++++   After
+++++++^^^++++++++
Ford trapping
Have a river or any kind of chasm? Construct a floor over it (not a bridge), then build traps over it. Brooks won't work for this, because everything can already walk over the top of a brook. It also won't work as well in winter on a map that freezes.
           ^^^^
           ░^^░
           ░^^░              Nobody ever said that it had
           ░^^░                to end at the river banks.
~~ ~~ ~~ ~~░^^░~~ ~~ ~~ ~~   Building walls along the side
~~ ~~ ~~ ~~░^^░~~ ~~ ~~ ~~     allows you to make it longer
~~ ~~ ~~ ~~░^^░~~ ~~ ~~ ~~     and give you room for more traps.
           ░^^░              Extra traps cover all possible
           ░^^░                entry/exit tiles.
           ░^^░
           ^^^^
Maze/Labyrinth
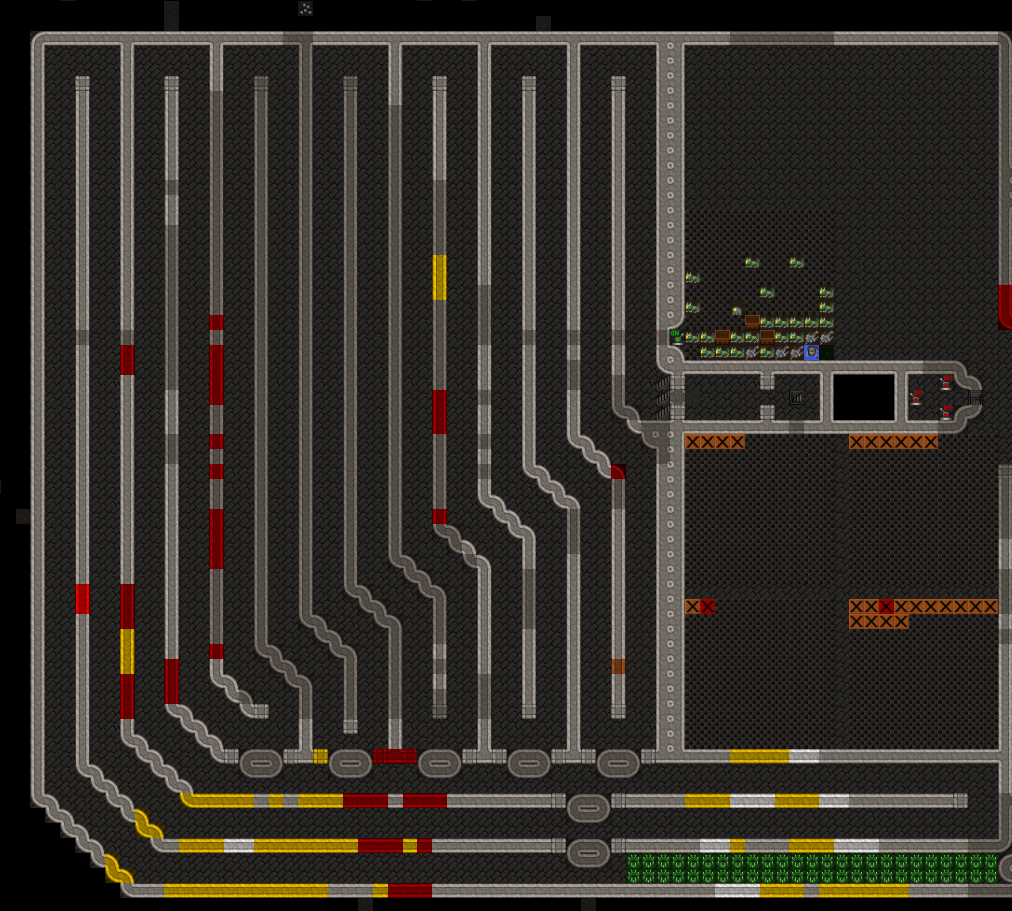
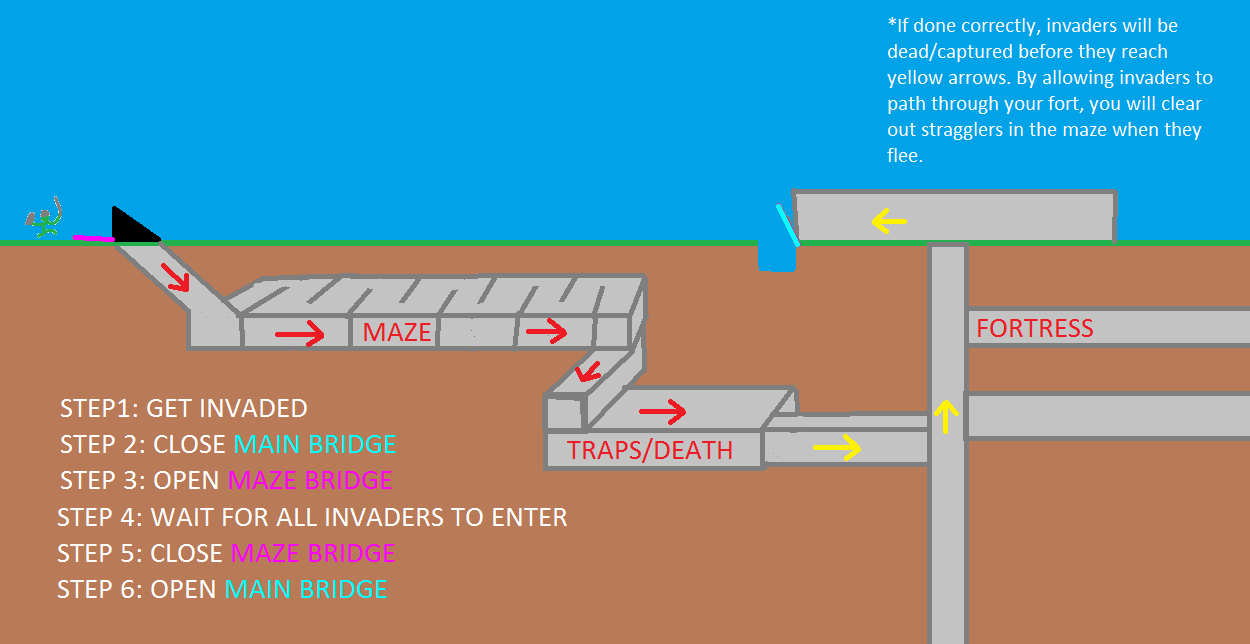
Mazes not only look cool, they are very effective traps. Essentially, you want 2 entrances to your fort. One for your dwarves and trade caravans, and another for invaders – the maze. Whenever you are under siege, close the entrance for your dwarves. This leaves a long maze that invaders must go through to path into your fort. This allows the entire invading force to be in the maze when you close off the entrance, sealing them in. With the clever use of bridges, you may divert invaders out of the maze and into your traps/military's arms at a rate you can deal with. If your map doesn't have iron, this will greatly decrease the amount of iron you'd normally lose when the invading force starts losing and flees. NOTE: Unlike real-life mazes, it's best to create yours with a single winding path from the entrance to the exit. Invaders have clairvoyance and will path directly into your fort. A roof is also necessary, as walls mean nothing if they can be climbed over. If you do put traps in the maze itself, put them near the end as invaders will flee if they start getting torn up by traps. (Example(note: bridges are down for access), MS Paint Illustration)
- I prefer putting my entrance to my maze right below the entrance to my trade depot, then put a bridge over the opening. If the bridge is down then the access to me depot, bridge raises and the entrance is now the maze. Simplifies the multistep process given in the picture. Be sure to have your maze either safe for your own dwarves to walk through or some other method to help out dwarves that are outside at the start of a siege.
Trap Designs
Bridge and drop traps
Drawbridge trap
Lowering drawbridges on invaders will crush them into nothingness. Known as the 'Dwarven Atom Smasher', bridges will destroy most things with some notable exceptions including jabberers and elephants, who will not only survive unscathed but also destroy the bridge.
Try replacing the side wall of a part of your main entrance with a drawbridge, big enough so it spans the whole hallway. Link the drawbridge to a trigger, and whenever you feel like it activate the trap. This can be done with minimal effort and used to smash invaders, unwanted immigrants, bothersome nobles, or simply to destroy your garbage.
Pit trap
A long retracting bridge in your entrance tunnel, with the pressure plate right in front of the fortress doors. The expression on the face of the point-goblin who reaches them only to watch his comrades plunge to whatever gruesome fate you have prepared for them will be a mental picture to cherish. Remember when designing this trap that bridges do not open until 100 ticks after they've been triggered.
You may also consider linking these bridges to levers for more control, just in case a goblin thief triggers the pressure plate while a caravan is on the bridge. Or, you might consider linking the bridges to a repeater.
Cave-in trap
Supports can be linked to triggers. Building a section of floor that is deliberately held up only by a trapped support allows for an intentional cave-in.
- Invaders dropped into a pit can be wounded or killed.
- Dropping a floor or wall directly onto any creature will instantly kill it, regardless of its size.
- The cave-in will also knock nearby invaders unconscious. This will stun them, and also make them susceptible to simple traps (even if they possess the TRAPAVOID token).
- Cave-ins will not reveal invisible invaders, such as ambushers unless it kills them outright, in which case their bodies become visible.
The biggest drawback of this sort of trap is the "reload" process, which can be relatively time consuming. Have a drawbridge that can seal off the work area so your mechanics and masons can reconstruct the setup in peace.
Land mines
In any suitable open area which hasn't been dug out underneath, build a support and an adjacent multi-use pressure plate set to trigger on creatures (but not citizens), link them together, then build floor tiles above the support and pressure plate. When an enemy steps on the pressure plate, the game will pause and recenter the view with the announcement "A section of the cavern has collapsed!", at which point the enemy will be crushed and its companions will be stunned or knocked unconscious by the cloud of dust (though not necessarily revealed, in the case of an ambush).
More "traditional" landmines also exist, taking advantage of a bug. This involves setting a bridge to be deconstructed, then having this order be cancelled, all done while the bridge is in the down position. The bridge will then let fluids through, which with pressurized magma makes it a potent weapon.
Chasm trap
The easiest chasm trap is just a platform connected only by a retractable bridge or grate, and supported by a support, very high up or over a very deep hole. The support is connected to a pressure plate on the platform, which is triggered by invaders.
A uselessly complicated collapsing spiral trap can take out ten goblins at a time. When finished, it looks like this:
| + | + | + | ||||||||||||||||||||||||||||||||||||
| . | . | . | . | . | . | . | . | . | . | + | + | + | ||||||||||||||||||||||||||
| . | + | + | + | + | + | + | + | + | # | + | + | + | ||||||||||||||||||||||||||
| . | + | ╔ | ═ | ═ | ═ | ═ | ═ | ═ | . | # | = | r | e | t | r | a | c | t | a | b | l | e | b | r | i | d | g | e | ||||||||||
| . | + | ║ | + | + | + | + | + | + | . | ( | o | r | g | r | a | t | e | ) | ||||||||||||||||||||
| . | + | ║ | + | ╔ | ═ | ═ | ╗ | + | . | + | = | f | l | o | o | r | ||||||||||||||||||||||
| . | + | ║ | + | ║ | A | + | ║ | + | . | |||||||||||||||||||||||||||||
| . | + | ║ | + | ╚ | ═ | ^ | ║ | + | . | . | = | o | p | e | n | s | p | a | c | e | ||||||||||||||||||
| . | + | ║ | + | + | + | + | ║ | + | . | |||||||||||||||||||||||||||||
| . | + | ╚ | ═ | ═ | ═ | ═ | ╝ | + | . | ^ | = | p | r | e | s | s | u | r | e | p | l | a | t | e | ||||||||||||||
| . | + | + | + | + | + | + | + | + | . | |||||||||||||||||||||||||||||
| . | . | . | . | . | . | . | . | . | . | A | = | b | a | i | t | a | n | i | m | a | l |
The goblins are lured in by a restrained bait animal, and can't shoot it due to the surrounding walls. Just before they reach the bait, they trigger a pressure plate that retracts the bridge and collapses the support holding up the whole spiral. Goblins, bait animal, walls and all plummet into the chasm.
Note that to prevent climbers from bypassing the pressure plate, the path between the pressure plate and the animal (at a minimum) should be covered by a floor on the z-level above. You should also avoid placing the pressure plate in a corner that can be bypassed by creatures moving diagonally.
When building, you will need to construct a span of floor underneath to place a support, as bridges do not support constructions (which is also why you want a bridge or grate as the access, so it will not hold up the trap*). You will also need to have a floor tile between your floor and solid ground or wall while constructing, as the bridge alone will not work as a base, but you can remove it once the support is in place.
Falling debris trap
Falling objects tend to cause ridiculous injury to creatures below, and what better use for worn socks than mangling intruders. Mix in some loose stone, poor-quality furniture, and any goblinite lying around, then bury your enemies under a pile of junk.
A retracting bridge makes a good trigger mechanism (connected to either a lever or pressure plate), while garbage dump zones above the bridge provide an easy means to load the trap. To reset the trap, use d b c to reclaim the garbage and d b d to have your dwarves haul the junk back to the garbage dumps above. The trap can also be fully automated via minecart.
Canceled construction deadfall
Canceling an incomplete construction immediately frees the building material. The simplest way to weaponize this knowledge is to create a one tile wide hallway that is several z-levels high, and carve down stairs into the roof from the level above. Assign your masons to create stairs in the top level of the hallway, but suspend construction on each tile after they begin. When danger threatens below, simply cancel constructions to send building material raining down on enemies below.
A more advanced design uses incomplete 8x1 bridges--each bridge will release three stones when canceled. These stones will normally be deposited on the tile where the architect was standing when the bridge was designed. A (completed) retracting bridge at the top of the hallway can provide a place for your architects to stand while loading the trap, but still allow the rocks to rain down when retracted.
This trap has the distinction of being the only overseer-triggered trap--it doesn't require dwarves to pull levers, enemies to cross pressure plates, or any sort of timing delay. With some practice, it can be used selectively to take out priority targets (elite archers, squad leaders, dangerous creatures, etc.).
Water traps
These traps drown, freeze, boil, or wash targets away. Errors in execution can be quite harmful to your fortress fun, so use with caution.
Drown and burn
A flooding room trap combined with an unextinguishable burning lignite bin. The water will evaporate on the bin's tile, causing the water from the surrounding tiles to move to it, which then get evaporated as well. The water will also push the invaders onto the fire, causing them to burn to death... in a flooding chamber.
NOTE: Traps involving large quantities of water turning into steam are as effective at killing your framerate as they are goblins. Use with caution, and have the cut-off lever at the ready.
Drowning hall
Level 0
 ░░░░░░░░░░░░░░░░░░░░░░░░░░░░   ░  – Wall
 ->++▼··················▼++->   -> – Direction of traffic
 ->++▼··················▼++->   ▼  – Down-Ramps (as visible from one level above = see ramp)
 ->++▼··················▼++->   +  – Floor
 ░░░░░░░░░░░░░░░░░░░░░░░░░░░░   · – Open space
Level -1
   ░░░░░░XX░░░░░░░░XX░░░░░░   X  – Inflow
   ░░▲++▼··▼++++++▼··▼++▲░░
   ░░▲++▼··▼++++++▼··▼++▲░░   ▲ – Up-Ramps
   ░░▲++▼··▼++++++▼··▼++▲░░
   ░░░░░░XX░░░░░░░░XX░░░░░░   ▼ – Down-Ramps
Level -2
   ░░░░░░xx░░░░░░░░xx░░░░░░   x – Outflow
   ░░░░░▲++▲░░░░░░▲++▲░░░░░
   ░░░░░▲++▲░░░░░░▲++▲░░░░░
   ░░░░░▲++▲░░░░░░▲++▲░░░░░
   ░░░░░░xx░░░░░░░░xx░░░░░░
If enemies are in the middle of Level -1, open the inflow, then the water will first trap, and then drown them. If the pit is full, close the inflow and open the outflow. You can automate this by using pressure plates, or if you want to have more fun, replace the water with magma (which would require pressure plates and floodgates to be magma-safe).
Drowning tower
This is a trap that can be built in discrete units. Each unit requires a lot of labor and protects only a small area, though in a dramatic manner. A wall of these around the map sharing a single massive water reservoir makes a very effective siege defense, as each tower component can be linked to a lever and used to wipe out a single invading squad at a time. Note: This may count as a stupid dwarf trick.
While a pressure plate in the center of this trap can trigger it and drown hidden ambushers, such an arrangement is subject to double-activation and failure. A pressure plate that only triggers once will break and the system will be incapable of self-reloading. A lever or latch is highly recommended.
Using a cross-hair pattern of walls, invaders are herded through the trap. Inside the fortress, Urist McLeverpuller does his job. Floodgates on the ground close, hatches on the ceiling open, and drowning ensues. When all enemies are dead, the lever is pulled again. The hatches close and the floodgates open, allowing a rush of water and bodies to spill out.
Schematics shown are for a stand-alone tower, though the upper level can be linked with many similar towers for a grid-like defensive system.
Level 0
 ░░X░░X░X░░X░░   ░ – Wall
 ░+++++░+++++░   + – Floor
 X+++++░+++++X   X – Floodgate
 ░+++++░+++++░   H – Hatch
 ░+++++░+++++░   - – Water reservoir
 X+++++░+++++X
 ░░░░░░+░░░░░░
 X+++++░+++++X
 ░+++++░+++++░
 ░+++++░+++++░
 X+++++░+++++X
 ░+++++░+++++░
 ░░X░░X░X░░X░░
Level 1
 ░░░░░░░░░░░░░
 ░-----------░
 ░-H--H-H--H-░
 ░-----------░
 ░-----------░
 ░-H-------H-░
 ░-----------░
 ░-H-------H-░
 ░-----------░
 ░-----------░
 ░-H--H-H--H-░
 ░-----------░
 ░░░░░░░░░░░░░
Ice trap
Water open to the sky in freezing biomes will freeze instantly, completely destroying anything caught in it. By digging a channel entrance to your fort and selectively allowing it to flood as invaders pass through, you can commit genocide with appalling efficiency. The only disadvantage to this trap is its size: because water freezes so quickly, each entry channel must have a source of non-freezing water right next to it.
Observe in action here, or a wider version here. For more information, see these detailed instructions.
Fully Automatic Ice Trap
The hallway is exposed to the elements, and water there freezes instantly. The rest of the trap is underground. When an enemy steps on the pressure plate, the hallway is flooded with water immediately. Some of the water that doesn't freeze also triggers a second pressure plate. The second pressure plate pumps magma into the room directly beneath the main hallway, which melts the ice. The water is pumped out and retracting bridges then return the water and magma to their original positions. This trap was also inspired by the Degrinchinator.
Observe: http://mkv25.net/dfma/movie-2239-automaticresettingicetrap
For more info, see this thread.
Flusher
Have a water reservoir to one side of the path the intruders should take, and a deep chasm at the other side. When invaders are on the path, just pull a lever to flush them out- or into the trap-filled corridor leading to the alligator pit.
A compact version of this can be set up with a reservoir tower and a path circling it:
Level 0
 ·····························   ░ – Wall
 ->++++++++++++++++++++++++++·   -> – Direction of traffic
 ->++++++++++++++++++++++++++·   ▼ – Down-Ramps (as visible from one level above = see ramp)
 ->++++++++++++++++++++++++++·   + – Floor
 ░XXXXXXXXXXXXXXXXXXXXXXX░+++·   · – Open space
 ░~~~~~~~~~~~~~~~~~~~~~~~X+++·   X – Floodgate OR retracting bridge
 ░~~~~~~~~~~~~~~~~~~~~~~~X+++·   ~ – Water
 ░~~~~~~~~~~~~~~~~~~~~~~~X+++·
 ░~~~~~~~~~~~~~~~~~~~~~~~X+++·
 ░XXXXXXXXXXXXXXXXXXXXXXX░+++·
 <-++++++++++++++++++++++++++·
 <-++++++++++++++++++++++++++·
 <-++++++++++++++++++++++++++·
 ·····························
Be sure that the reservoir can hold enough water to flush everything out (3 levels should be enough), that it can be automatically or easily refilled quickly, and be advised that flushing your own dwarves can be much fun. Adjust the height of the chasm depending on how much damage you want to cause to intruders or to innocent bystanders (7 levels start to do some serious damage).
Once flushed, the victims will try to find a way out (to re-invade the fortress, or to flee). Make sure there are some maintenance-free traps in their way. If you plan to collect goblinite afterwards, have a way to drain the bottom of the trap dry.
Magma and fire traps
These traps incinerate targets, or possibly encase them in obsidian. Magma does not play favorites – read up (again) on magma, and use with extreme caution. Fire traps are included in this category because magma is often the best method of starting a fire.
Magma chamber
Create an airlock using two bridges, two doors or whatever you like best. Make it a medium sized chamber, perhaps 10x10 or so. Channel out the floors around the rim, and rig up a system to pump magma into the room, or drop it from the roof. Enemies will quickly be destroyed, and with the magma in the channels, you can pump it out for future use or just leave it. The idea here is a re-usable magma trap; you can use this with a pressure plate, too. It also leaves behind any magma-proof items the invaders might have been carrying.
Variation: By placing magma-safe hatches on the ceiling and quickly activating and deactivating the trap, you can limit the use of magma. It doesn't take a lot of magma to set a goblin on fire: only 1/7 deep will do it, and using less magma means it will dry on its own. It does take a while for an enemy to burn to death, but what's better than spending the whole summer watching a room full of smoke and dying goblins?
Incinerator hall
Certain minerals such as lignite and graphite have an ignition point but no melting point, meaning that once they are set on fire they will burn for a very long time (about 9-10 months) unless exposed to water or rain. Any item made out of these materials has this property, which can be used to design horrifying fiery death traps.
Consider a hallway filled with lignite floor grates, which can be built directly on the floor and do not impede the passage of enemies. Pouring magma on any one of these grates will set it alight, and the fire will spread to all connected grates. The end result is a lot of constant smoke and a hallway that kills anything that passes through it. Consider restricting access to your dwarves or building this in a pit with a retractable bridge over top: the mere fact that a location is on fire will not stop them from walking through it. On the plus side, goblins are just as stupid.
Flamethrower bunker
Catch a creature that has a fire breath attack, such as a dragon, fire imp, fire man, or anything else. Tame it if you can, and drop it into a 3x3 square of fortifications surrounded by bridges. Drop the bridge when necessary, and watch the creature lay waste on your opponents. Note that this may cause you to rage if the beast is not hostile to invaders. Beware of enemy archer squads as well.
You may want to build the bridge and mechanisms out of dragonfire-safe materials if you are using a dragon.
You may do this with magma crabs (but first you must catch one) for a machinegun bunker, or giant cave spiders (or anything that has a web attack) for a paralyzing bunker.
Weapon traps
Traditional trap components can be used in sometimes interesting ways.
Casual impalement
One method of creating a zone of constant slaughter is to link a pressure plate in your main dining hall or main hallway to a patch of menacing spikes or spears. As your dwarves/pets mill around conversing/mating, they will constantly trigger the spike system without regard to the consequences.
Variation: Drop goblins into a holding pit with various spike traps linked to your pressure plate artfully placed around the chamber. Watch as every dining hall party begins to be measured in goblin blood.
Caravan-Safe Traps
Since traps block caravans, how can one have a depot but not have a trap-free entrance to the fortress? Simple! Caravans need 3-wide corridors, but that corridor does not need to be straight. Invaders will path straight (or as straight as they can). By knowing this, you can make trap layouts that have 3-wide corridors that intersect straight paths.
  Like so:

      Zig-Zag                               Alternating U
      T+P+T+++      T = Trap                ++++P+++++++++++++P++++
      +T+P+T++      + = Ground/floor        ++T+P+TTTTTTTTTTT+P+T++
      ++T+P+T+      E = Ramps going down    ++T+P+T+++++++++T+P+T++
      +++T+P+T        to tunnel to depot    ++T+P+T+++++++++T+P+T++
      ++++T+P+      P  = Caravan path       ++T+P+T+++++++++T+P+T++
      ++++T+P+                              ++T+P+T+++EEE+++T+P+T++
      +++T+P+T                              ++T+P+++++++++++++P+T++
      ++T+P+T+                              ++T+PPPPPPPPPPPPPPP+T++
      +T+P+T++                              ++T+++++++++++++++++T++
      T+P+T+++                              ++TTTTTTTTTTTTTTTTTTT++
      +P+T++++                              +++++++++++++++++++++++
Both designs can be repeated for maximum effect or used together (make the entrance on the U wider and put Zig-Zag traps on the corridor to the depot).
Dodge Me Trap
Passing over a catwalk of traps, invaders will find themselves dodging into your pit. Since you can seal the pit with bridges, it doesn't complicate access to your fortress while inactive. Beware of dwarves fighting on top of it when active, as they will dodge too. Using weapon traps with a lot of possible hits can make an invader dodge multiple times at once, allowing him to dodge across an open space tile, skipping the pit. This can be dealt with in some variants by the strategic placement of walls and/or by having an incredibly broad pit. Using a low quality mechanism will also force invaders to dodge, as opposed to using a high quality mechanism in the weapon trap, which will cause the weapon trap to actually land hits on the invader.
Note: since version 0.42.05, zombies no longer dodge.
Simple version:
+............+  ^ weapon trap
+............+  + floor, your fort on one side; the savage wilds on the other
+^^^^^^^^^^^^+  . Pit
+............+
+............+
Compact version:
+#########+     # retractable bridge with pit underneath
+#^^^^^^^^+
+#^#######+     + floor
+#^^^^^^^#+
+#######^#+     ^ traps
+#^^^^^^^#+
══+++═══════
Here's an example/demo Dodge Me Trap save (ver 0.42.03) built atop Magma that demonstrates how effective they can be. The save shows a 280 enemy siege reduced by 140 Trolls, Goblins, and Beak Dogs, via the following design:
╔═════════╗
╝·········╚
+^·^·^·^·^+
╗·^·^·^·^·╔
║·········║
╚═════════╝
This design places 3 wooden training spears into each weapon trap, along with a no-quality mechanism. The traps rarely, if ever, jam or require cleaning. Even after causing 140 enemies to dodge, in the demo for example, the traps never jam nor do any dwarves attempt to clean them.
Note: as of version 0.43.04, weapons wear as a result of combat – wooden training spears in traps included, and very quickly too.
Building destroyer and trapavoid traps
Door number one
If you're having trouble dealing with building destroyers that don't set off traps, consider the following design, as seen from the side:
| ═ | ═ | ═ | ═ | ╝ | ╬ | ╬ | |
| ~ | X | ^ | ▲ | ╔ | ═ | ||
| ═ | ═ | ═ | ═ | ═ | ═ | ╝ |
Put the magma ~ behind a floodgate X. In front of the floodgate, place a pressure plate ^ set to go off on magma of 0 to 0. Link the pressure plate to a retracting bridge ╬╬ that covers the exit ramp ▲ to the area. Although you can't get the creature to set off traps, when it breaks the door, magma will spill over the pressure plate, locking the creature in the hallway that is rapidly filling with magma. You could combine this with a simple levered hatch for drainage, but there's only one way to be certain: obsidianify it from orbit.
Note that the trap as pictured is too short-- in order to catch a creature, your bridge has to close before the creature can escape from the tunnel.
Artifact awe trap
| ═ | ═ | ═ | ═ | ═ |
| + | ¢ | ╬ | ╬ | |
| ═ | ═ | ═ | ═ | ═ |
This simple containment trap is designed to trap any number of building destroyers, even trapavoid building destroyers, on a single tile, after which you can do whatever you'd like with them-- bolt 'em, ice 'em, drop 'em, spike 'em, it's all good. Building destroyers are drawn by a piece of artifact-quality furniture, in this case, a hatch cover ¢. A door + prevents them from seeing further into your fort and being distracted from the enchanting beauty of your furniture. When you've captured as many creatures as you'd like on that tile, simple raise both bridges ╬-- first, the far one, then, the one near the artifact-- and you may even remove the artifact, to create a new trap elsewhere.
Other traps
Anything that can be weaponized can be turned into a trap. And anything can be weaponized.
Bioweapon trap
Some of the underground's nastier creatures are capable of breathing syndrome-bearing deadly dust. While such dust can easily spread and lead to a huge amount of fun, more masochistic players may seek ways to weaponize it. Syndrome-bearing blood may be used similarly, but placement of the trap is a great deal more difficult.
At its simplest, a bioweapon trap is a single tile of syndrome-bearing extract. It can be placed by moving an item covered in dust to the desired location via stockpiling or dumping, and then pouring a bucket of water over the item, transferring the dust from the item to the tile it sits on. A simple way to get your dwarves to pour a bucket of water over the item is via designation of a pond zone. Alternatively, one can take advantage of the natural tendency of dwarven bathtubs and simply drag contaminated items through a trench full of shallow water to create a contamination trench.
Any affected creature is likely to carry the contamination with it past the location of the bioweapon. This can be useful, if you've discovered a particularly interesting extract that you no longer have a way to generate, but it can also be dangerous to the well-being of your fortress. A pile of extract sitting in 2/7 water will not block pathing, and will simultaneously infect and wash creatures passing through it. Placement of extract in a damp trench can be difficult, as the water will tend to carry the extract on to the walls, but with persistence, it can be done. Extract/water combos like this are best placed underground to prevent freezing or evaporation. You may have difficulty preventing your dwarves from cleaning tiles affected by the extract.
The deadliness of a bioweapon depends entirely on the extract used to create it, and can range from debilitating nausea (perfect to incapacitate invaders while your military mops them up, yet unlikely to lead to serious damage to your own fort), to death by bleeding within 600 ticks (a half day). Given the proper extract, you could even create a beneficial bioweapon trap that prevents those affected from suffering pain. Footwear appears to protect, leaving any bioweapon trap much more deadly to your own dwarves than to any invader.
Bioweapon traps have the potential to be very powerful but should be considered extremely fun, as extracts are capable of multiplication and don't distinguish between friend or foe. A single bioweapon trap could easily kill all of your dwarves in a season. Bioweapons never require cleaning or resetting, but won't work on many foes.
Alternative biotraps are possible. Using a 'deadly dust' creature rather than its extract is possible, but such interactions have rather short range (2 tiles at least) and may ignore invaders passing by a bit further away. By forcing invaders to walk right next to fortification that separates the beast and invader you can ensure a syndromey greeting to your unwanted guests, but the creature will be vulnerable to enemy archers. Should you discover a creature with noxious secretions that boil at a low temperature, such a creature can be used even while caged: its secretions will affect anything nearby, but the creature that bears the syndrome remains invulnerable to attack. Good luck getting the cage where you want it!
Animal/Gladiator Traps
War animals can be a messy way of dispatching your invaders. Since most war animals aren't grazers, you can put a pasture in a room and assign a bunch of war animals without any need for maintenance. Keep in mind size, a war dog is not going to do nearly as well against a troll as a lion would. However, 5 dogs should be able to overcome it. If you don't want your animals to die, simply use cage traps to catch invaders, disarm them, then drop them into the animal arena unarmed with a pit above the room. Although this isn't a guarantee; unarmed goblins are incredibly weak. This trap has a lot more randomness involved than others, so it's more of a novelty than an effective and practical trap. Exotic animals can be much more brutal, so bonus points for catching tigers, bears,(or buying them from elves) or dragons. If you do manage to catch a dragon and tame it, you'll probably want to clear out any other animals, unless they don't mind dragon fire.
If one of your dwarves has been plagued by Vampirism, all the better. Build him/her a nice pit outfitted as barracks, throw in good weapons and armor, and watch as they train themselves nonstop up to Legendary skill in most combat abilities.
When you want to make them practice, just throw a caged prisoner in, order them to open it, and watch as they tear them to shreds.
Minecarts
A minecart, while you think about it, is just a large hunk of metal traveling at a very fast speed in a straight line. Its nature can be used for your advantage.
Minecart grinder
All you need is a straight, narrow corridor, some tracks, and a way to make a minecart gain momentum (rolling down 3 z-levels worth of ramps should be more than enough).
Using the hauling designation, assign a minecart to the top of the ramp, without giving it any departure conditions. As soon as the enemies are approaching the other side of the corridor, change the departure condition to "push" and "always". Once a dwarf comes by and pushes it, the minecart will jolt down the hallway flattening everything on its path, and may even put a dent in an attacking Megabeast. Alternatively, you may instead invest a little more time and create an automated trigger; by placing a minecart on a hatch linked to a pressure plate or lever, you can avoid the tedium and drop your minecart above your track. By dumping minecarts on either rollers or downward ramps, multiple carts can be used on the same track without any hauling routes, allowing for multishot weapons, increasing the efficiency of the trap. Rollers or impulse ramps can be used to make a cart return system, allowing for fully automatic systems.
Shotgun
Minecarts have the interesting properties of spilling their contents when they hit a solid object like another minecart at high speed. This can be used by filling minecarts with either heavy objects like stones, sharp objects like surplus weapons or simply a lot of them, then sending them down some ramps onto a target. On impact, the contents will continue their way at high speed, dealing damage to anything in the way. You know you want to fill a minecart with !!lignite blocks!! now. Here is an example.
Water/Magma gun
Minecarts submerged in Water fill themselves with liquid, which then counts as a quite heavy object. Using the shotgun effect, this allows for a weapon without need to manually load minecarts, resulting in higher rate of fire and fewer dwarves running on potentially lethal tracks. First proposed here, with an updated version here.
Numerous refinements have been proposed for loading and accelerating the minecarts. One sophisticated example that is both compact and demonstrates speedups is here.
Using Magma makes the design potentially more fun and certainly more dwarven.
Minecart thumper
When falling minecarts land on a floor, they injure creatures in the tile below.Bug:6068 Add some rollers and a very short track loop to maximize the damage potential. Since the minecart remains physically separated from its targets, it shouldn't jam or jump off track.