- v50 information can now be added to pages in the main namespace. v0.47 information can still be found in the DF2014 namespace. See here for more details on the new versioning policy.
- Use this page to report any issues related to the migration.
v0.31:Advanced world generation
| This article is about an older version of DF. |
- This article contains information on advanced world generation. For information on basic world generation, see World generation.
- See World token to more easily find information by the names used in the world_gen.txt file.
- See World rejection for information on solving problems related to worlds always being rejected.
- See Worldgen examples for example worlds.
When you want more control of what your world looks like, it's time for advanced world generation. A detailed reference with advice is provided below. This article assumes that you are already familiar with basic world generation. If you are not then please read about that first.
Advanced World Generation Screen[edit]
Once you select Design New World With Advanced Parameters from the main menu, a screen that looks something like this will appear:

This screen is relatively intuitive but some parts could use some explanation.
Parameter Sets[edit]
The list of already defined parameter sets is in the upper right corner. You can select the current set that you want to work with using the up and down directional keys.
Hitting a will add a new set to the end of the list. You can also copy an existing set to a new one allowing you to base a new set on an existing one. Using t you can change the name of the parameter set but note that this will not affect the name of the world that is generated.
Parameter sets are stored in the data/init/world_gen.txt file in the main DF directory. The F1 and F6 keys will load and save all of the parameter sets to this file. You will need to save the world gen parameters to this file before you hit Enter to generate the world.
The world_gen.txt file can also be edited with a text editor. This is particularly useful because people will often post their parameter sets on the forum or wiki in text form. (See below for more info.) The F1 key comes in handy when editing this file while the game is still running.
The tokens used in world_gen.txt are at the bottom of each parameter description. Here's the one for title.
| Token | Example | Notes |
|---|---|---|
| [TITLE: <name>] | [TITLE:MEDIUM ISLAND] | Required |
World Name[edit]
As previously mentioned, the title of the parameter set doesn't affect the name of the world. You can force a particular name for your world using n or set it back to the default random setting using N.
| Token | Example | Notes |
|---|---|---|
| [CUSTOM_NAME: <name>] | [CUSTOM_NAME:Realm of Cheese Engravings] | For a random name, simply don't use this token. |
World Dimensions[edit]
The size of the map to be generated can be selected with u i o p. Larger maps take longer to generate and may limit FPS in game.
Changing the dimensions of the world will reset the parameters because many of them have different defaults depending on the surface area available.
| Token | Example | Notes |
|---|---|---|
| [DIM:<width>:<height>] | [DIM:129:129] | Valid values are 17,33,65,129, and 257. Others may not work. |
Seed Values[edit]
The world generation process uses a PRNG (Pseudo Random Number Generator) algorithm. A PRNG will produce a sequence of numbers that "looks" random even though the actual sequence of numbers will always be the same if the PRNG is started with the same seed value. Basically this means that if you run word generation with a certain seed value on your computer, and someone else runs world generation with the same seed value on their computer, the same sequence of random numbers will be generated on both computers. The practical impact of this is that someone else can generate exactly the same world that you generated by entering the same seed value that you used.
A specific seed value can be entered with s. This will change all of the seed values to the value you enter. If you need to enter different seed values for each type of seed, use e.
In order to find out what seed values were used for the last world you generated you can look at this screen. If you want to be able to tell someone else how to generate exactly the same world that you just generated, they will need all of the seed value listed under Last Param Set.
Normally you don't enter these seed values and the world generation process comes up with seed values based on some sort of "true" random information from things like random values in uninitialized memory, the current date/time, etc. If you have entered a seed value you can revert back to all seeds being random using S.
Entering Advanced Parameters and Generating a World[edit]
Unless you're using an already defined parameter set you will probably want to edit the parameters. Select the set you want to edit using the up/down directional keys and press e. Information about each parameter is documented below.
Once you are happy with the parameters you have set, hit Esc to get back to this screen, hit F6 to save the values you just edited, and hit Enter to start. The rest of the process is the same as basic World generation.
The phases of the world generation process are (this order is not completely correct):
- Preparing elevation...
- Setting temperature...
- Running rivers...
- Forming lakes and minerals...
- Growing vegetation...
- Verifying terrain...
- Importing wildlife...
- Recounting legends...
- Placing civilizations...
- Making cave civilizations...
- Making cave pops...
- Placing other beasts...
- Placing megabeasts...
- Placing good/evil...
- Placing caves...
- Prehistory generation
- Finalizing civ mats...
- Finalizing art...
- Finalizing uniforms...
- Finalizing sites...
World Painter[edit]
- Main article World painter
The world painter tool allows you to paint features onto a map that is then used when generating a world. It is very difficult to use properly, and tends to result in endless rejected worlds, unless you loosen or remove the restrictions placed on biomes and civilizations in the advanced settings. That being said it is also a very powerful tool, and allows you to generate worlds more to your liking.
To access the world painter, hit e to start editing the advanced parameters and finally hit p to open world painter. How to use the world painter is not entirely obvious so please check out the World painter documentation to avoid frustration. (Losing may be fun, but frustration is not.)
Editing the Parameters Init File Directly[edit]
Parameter sets are stored in world_gen.txt in the \data\init folder, using world token. You can copy and paste other player's sets of parameters into your world_gen.txt to use their parameter sets, and some are provided at Pregenerated worlds. Another place to find parameter sets is the Worldgen cookbook thread on the official forums.
Advanced Parameters[edit]
To access advanced parameters, press e when at the screen for creating new worlds with parameters screen. This will bring you to an editable list of various guidelines the world-gen process will use when creating your new world.
The parameters are described below in the order that they appear in the list in the UI, not necessarily the other they appear in the configuration file. See world token for an index that will help you look things up by token name.
Seed Values[edit]
Here you can enter specific seed values for different parts of the world generation process. Different sequences of pseudorandom numbers are used for different parts, so you can use this to reproduce only the particular part of world generation from some previously generated world if you want.
Normally you will want to leave all of these set to Random unless you're specifically trying to reproduce the results of another world generation run.
| Token | Example | Notes |
|---|---|---|
| [SEED:<number>] | [SEED:31337] |
For each of these not in the config file, a random seed will be used. |
| [HISTORY_SEED:<number>] | [HISTORY_SEED:31337] | |
| [NAME_SEED:<number>] | [NAME_SEED:31337] | |
| [CREATURE_SEED:<number>] | [CREATURE_SEED:31337] |
Embark Points[edit]
This controls the number of points that you have for skills and equipment when you embark in fortress mode. Turning this value up will allow games started in this world to start with more skilled dwarves with better equipment. Normally you can do just fine by leaving this value set to default, but you might want to up it for experimental/testing purposes or to help dwarves survive in a particularly evil world.
| Token | Example | Notes |
|---|---|---|
| [EMBARK_POINTS:<number>] | [EMBARK_POINTS:1274] | Required |
End Year[edit]
This is how many years of history are generated for the world. This is basically the same as the History parameter in basic world gen, except that you can enter an exact value for number of years. See History for more info.
History is divided into "ages" which are determined by the percentage of megabeasts and semi-megabeasts killed at various points. One can attempt to make a world go through the ages more quickly by pumping up the ratio of semimegabeast to megabeast caves, the former of which are usually more killable than the regular megabeasts. This will net you more "Age of Legends", "Age of Heroes", etc.
For more information on the history aspect of the game, see Legends and Ages.
| Token | Example | Notes |
|---|---|---|
| [END_YEAR:<number>] | [END_YEAR:1050] | Required |
Population Cap After Civ Creation[edit]
This determines the maximum possible population of civilization member beings on the map. It should usually be kept the same value as the appropriate sized standard map. Turning the value up will result in larger civilizations. You can enter -1 to make population unlimited in which case populations will only be limited by factors like biome, space, number of sites, and per-civilization population caps.
Each race may have up to 100 civilizations each, and each civilization a maximum population of 10,000. This means that if you set this parameter to -1 ("No cap"), you can quickly be overrun by sites and population. Civilizations, known as entities in the raw files, have 3 or 4 basic variables that will greatly affect their final placement on the world map, in respect to this kind of unchecked growth. See Population (Entity Token) for more information on interpreting/editing the raws if you need more precise control of civilization placement.
Huge populations can cause the size of history data to explode, cause history generation to take forever, lower FPS, and generally slow down the game.
| Token | Example | Notes |
|---|---|---|
| [TOTAL_CIV_POPULATION:<number>] | [TOTAL_CIV_POPULATION:15000] | Required |
Site Cap After Civ Creation[edit]
This controls the maximum number of towns and similar sites on the entire map. Raising the number will allow for more towns, etc though the number of sites will ultimately still be limited by things like space, terrain, and population cap.
Note that this parameter controls only "civilization" sites like towns. Other sites such as lairs will be added on to this maximum. After civilizations reach this cap, they will not spread out anymore to place new cities.
By default, the raws limit each civilization site to a population of 120 regardless of the race of the civilization. Therefore, without editing the raws, the total population on the map can't go above site cap x 120.
| Token | Example | Notes |
|---|---|---|
| [SITE_CAP:<number>] | [SITE_CAP:1040] | Required |
Beast Control[edit]
These parameters don't usually matter too much, but may matter for small numbers of beasts.
Percentage of Beasts Dead for Stoppage[edit]
The world starts out with a certain number of megabeasts in existence. If this percentage of megabeasts dies during history generation, then history generation will stop early. For example if the value is 80, if history starts with 200 megabeasts and 160 of them are killed by historical events or otherwise die before End Year is reached, history generation will stop early.
Year to Begin Checking Megabeast Percentage[edit]
The percentage of dead megabeasts for stoppage will not be checked until this year is reached in history generation. This can be used to insure that a world reaches a certain year even if all of the megabeasts in the world are slain earlier.
| Token | Example | Notes |
|---|---|---|
| [BEAST_END_YEAR:<year>:<percentage or -1>] | [BEAST_END_YEAR:200:80] | Use -1 as percentage to disable. Year must still be at least 2. |
Cull Unimportant Historical Figures[edit]
Whether or not the game ignores unimportant figures in history generation. The culling is many CPU-intensive steps in history generation but it saves memory and will speed up loading/saving games a bit. This does mean that the "unimportant" figures will not appear in Legends mode or in things like dwarf engravings, but they might not appear in engravings anyway.
Unimportant figures are people or creatures who suffer early deaths, never having offspring or killing anything named during history generation. For example, residents of goblin towers may get murdered by demons at a young age. After culling unimportant figures, Legends mode would say something like the demon has killed "a creature at Eviltower in the year 102."
| Token | Example | Notes |
|---|---|---|
| [CULL_HISTORICAL_FIGURES:<0 or 1>] | [CULL_HISTORICAL_FIGURES:0] | 0 = No, 1 = Yes |
Reveal All Historical Events[edit]
Setting this to Yes will allow access to all information about the history of the world in Legends mode. If set to No, then you will have to discover historical information in adventure mode or by instructing dwarves to make engravings.[Verify]
| Token | Example | Notes |
|---|---|---|
| [REVEAL_ALL_HISTORY:<0 or 1>] | [REVEAL_ALL_HISTORY::1] | 0 = No, 1 = Yes |
Terrain Parameters[edit]
These determine how random values for terrain elevation, rainfall, temperature, drainage, volcanism, and savagery are generated. What biomes exist are then determined by how these factors overlap with each other.
Minima and Maxima[edit]
These are the absolute minimum and maximum values that can ever be generated for a particular map square characteristic. Changing these can cause the occurrence of certain biomes to become impossible, so modify these with care. Because of this problem, you may want to use Weighted Ranges instead.
By subtly tweaking the min and max values, vastly different maps can be made.
X and Y Variance[edit]
These control how wildly things like elevation and rainfall can vary between adjacent map squares. For example, if these values are set to the maximum of 3,200 for elevation then you will end up with more very low areas right next to very high areas. The number for X determines the east-west variance and the number for Y determines the north-south variance. By setting only one of these to a high value you can, for example, create horizontal or vertical bands of areas which are more similar to each other.
Generally speaking, raising both of these values will create a more random "patchwork" of many small biomes while setting both x and y values to 0 will cause every square on the map to use a single random value for the given characteristic.
For "patchwork" worlds to avoid being rejected, Maximum Number of Subregions will probably need to be increased from the default.
Elevation[edit]
This controls the range of terrain elevations that can occur in the world.
Usually you just want to leave the min/max values alone. Raising the minimum elevation can, for example, make it impossible for oceans to exist. This does not directly control the number of available Z-levels at a particular site, though high maximum values may contribute to peaks which can raise the number of above ground Z-levels. In other words, a maximum elevation of 400 and minimum of 1 does not mean you get 400 Z-levels but it might increase the number of Z-levels somewhat in some regions compared to others.
Raising the variance will result in a more bumpy uneven landscape.
Some biomes/features that are impacted by elevation:
- A high minimum (above 99) means no oceans as they need elevations below 100.
- A low maximum (below 300) means no mountains as mountains need elevations above 300.
- River start locations need a minimum elevation of 300. Therefore, a world with a maximum elevation of 299 everywhere prevents river generation, but rivers can still occur if maximum elevation is set to 300.
- Mountain peaks can only form in squares with an elevation of 400.
Rainfall[edit]
Controls the amount of rainfall in each map square/area. Setting the minimum too high or the maximum too low can make the formation of certain biomes impossible. Rainfall causes it to Rain more in a given area, which can have various effects.
Also makes more rivers appear on the world map.
Note that if orographic precipitation and rain shadows is on then mountains will cause additional variance in rainfall, so (for example) rainfall below the specified minimum can occur in the shadow of a mountain. If you want the minimum and maximum for this parameter to be absolutely respected you must turn off the orographic precipitation option.
Temperature[edit]
These parameters control how hot or cold various areas will be. If you lower the minimum and maximum values, the world will be colder overall, for example. As with the others, changing these values too much could make it impossible for certain biomes to exist. See Climate for more info.
Temperature appears to always be a vertical gradient of some sort no matter how these parameters are set, but if the values are lower then the gradient could be from "cold" to "colder" rather than "cold" to "warm" for example.
So, the value from the temperature rolling process is not the absolute temperature value the region will get, but rather local variation. The "base" temperature for an area is derived from its latitude (and maybe elevation[Verify]), and then the random value determined by these parameters are applied to it to make it vary a bit. The local variation is fairly small compared to the base temperature, which appears to be hard coded.
Drainage[edit]
Changing drainage parameters will change the way water-affected biomes are formed. Low drainage will contribute to the formation of lakes, rivers, and swamps. High drainage will cause water to sink into the ground rather than sit on the surface, which is important for forming hills.
Lower drainage values have been reported to contribute to the formation of thicker soil layers though it is currently unknown exactly how other factors (such as elevation or perhaps rain) impact soil formation.
Volcanism[edit]
Volcanism controls the occurrence of Igneous Layers, and the formation of volcanoes. For a volcano to form, a square must have a volcanism value of 100 so reducing the maximum from 100 will make volcanoes impossible. Raising the minimum will increase the rarity of non-igneous layers.
Setting minimum to high value is not a good way to produce multiple volcanoes as you are likely to get a "Volcanism not evenly distributed" rejection. Instead use the Minimum Number of Volcanoes parameter and possibly adjust the weighted ranges for volcanism as described below.
Savagery[edit]
These parameters control the level of savagery on the map. Raising the minimum savagery too high may make it impossible for certain races to exist, and similarly lowering the maximum too far can make it impossible for certain creatures to exist. The largest chance of having unusable maps comes from too high of a savagery value.
Configuration Tokens[edit]
| Token | Example | Notes |
|---|---|---|
| [ELEVATION:<min>:<max>:<x variance>:<y variance>] | [ELEVATION:1:400:401:401] | Range: 0 to 400 Maximum of 400 required for mountain peaks. Variance range: 0-3200 |
| [RAINFALL:<min>:<max>:<x variance>:<y variance>] | [RAINFALL:0:100:200:200] | Range: 0 to 100 Variance range: 0-3200 |
| [TEMPERATURE:<min>:<max>:<x variance>:<y variance>] | [TEMPERATURE:25:75:200:200] | Range: -1000 to 1000 Variance range: 0-3200 |
| [DRAINAGE:<min>:<max>:<x variance>:<y variance>] | [DRAINAGE:0:100:200:200] | Range: 0 to 100 Variance range: 0-3200 |
| [VOLCANISM:<min>:<max>:<x variance>:<y variance>] | [VOLCANISM:1:100:200:200] | Range: 0 to 100 Maximum of 100 required for volcanoes. Variance range: 0-3200 |
| [SAVAGERY:<min>:<max>:<x variance>:<y variance>] | [SAVAGERY:1:100:200:200] | Range: 0 to 100 Variance range: 0-3200 |
Terrain Mesh Sizes and Weights[edit]
These parameters make it possible to influence the number of squares in a particular range without making conditions outside of that range impossible. For example, you can make it possible for many more low elevation squares to exist without making it impossible for high elevations to form. Changing these parameters is often preferable to simply changing the min/max values.

Mesh Size[edit]
Mesh size determines how "finely grained" weighted ranges will be applied. Setting this to Ignore will cause the weighted range settings to be ignored for that terrain characteristic.
Mesh Size affects the smoothing brush in the world painter.
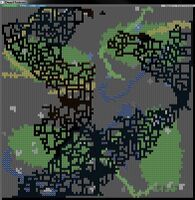
Weighted Ranges[edit]
If mesh size is set to something other than Ignore, these weights will be applied at the granularity of the selected mesh size for purposes of generating random values in each range. This allows random number generation to be non-linear for the given terrain characteristic.
For example, if the Elevation Weighted Range parameters were set to (starting with the 0-20 range) 60:10:10:10:10 (these values do not have to add up to any particular number) then about 60% of the map squares (on average) will have an elevation in the range of 0-20, and the other ranges will be represented by around 10% of the map squares each. The exact distribution is still left up to chance though on average it will be close to this specification.
The way the process appears to work is that the map is divided into a "wireframe mesh" where the lines are Mesh Size number of tiles apart. Each intersection of the "wires" is randomly assigned an elevation (or whatever) and then the tiles between these points are smoothed out. See the image on the right for an example.
Weighted ranges do not make rejection checks, although they can be responsible for many rejections if you neglect to adjust or disable some of the Minimum Number of Mid/Low/High Characteristic Squares for example.
Configuration Tokens[edit]
| Token | Example | Notes |
|---|---|---|
| [ELEVATION_FREQUENCY:<mesh>:<0-20 weight>:<20-40 weight>:<40-60 weight>:<60-80 weight>:<80-100 weight>] | [ELEVATION_FREQUENCY:2:1:2:3:4:5] | Valid mesh values:
1 = Ignore 2 = 2x2 3 = 4x4 4 = 8x8 5 = 16x16 6 = 32x32 (limited by world size) |
| [RAIN_FREQUENCY:<mesh>:<0-20 weight>:<20-40 weight>:<40-60 weight>:<60-80 weight>:<80-100 weight>] | [RAIN_FREQUENCY:3:1:2:3:4:5] | |
| [DRAINAGE_FREQUENCY:<mesh>:<0-20 weight>:<20-40 weight>:<40-60 weight>:<60-80 weight>:<80-100 weight>] | [DRAINAGE_FREQUENCY:4:1:2:3:4:5] | |
| [TEMPERATURE_FREQUENCY:<mesh>:<0-20 weight>:<20-40 weight>:<40-60 weight>:<60-80 weight>:<80-100 weight>] | [TEMPERATURE_FREQUENCY:1:1:1:1:1:1] | |
| [SAVAGERY_FREQUENCY:<mesh>:<0-20 weight>:<20-40 weight>:<40-60 weight>:<60-80 weight>:<80-100 weight>] | [SAVAGERY_FREQUENCY:5:1:2:3:4:5] | |
| [VOLCANISM_FREQUENCY:<mesh>:<0-20 weight>:<20-40 weight>:<40-60 weight>:<60-80 weight>:<80-100 weight>] | [VOLCANISM_FREQUENCY:1:1:1:1:1:1] |
Minimum Mountain Peak Number[edit]
This will cause the world to be rejected if fewer than this many peaks (based on elevation) are present on the map. Elevations of 400 must be possible for mountain peaks to occur. If set to zero then worlds will not be rejected based on number of peaks.
You may need to adjust elevation parameters, such as the highest weighted range, in order to get the desired number of elevation 400 squares needed for larger numbers of peaks. Like volcanoes, mountain peaks can make embark zones more interesting but other than that they don't appear to "do" anything special. Reportedly they do increase the highest Z-level above ground in all embark zones in the same region even if the selected embark zone does not include the peak.
| Token | Example | Notes |
|---|---|---|
| [PEAK_NUMBER_MIN:<number>] | [PEAK_NUMBER_MIN:20] | Elevations of 400 must occur for peaks to form. |
Minimum Partial Edge Oceans[edit]
This will cause a world to be rejected unless there are at least this many oceans touching an edge of the map. If set to zero then worlds will not be rejected based on this criterion. Setting both this parameter and Minimum Complete Edge Oceans to values that total more than 4 when added together may cause all worlds to be rejected as you can't have both a partial and complete edge ocean on a given edge.[Verify]
| Token | Example | Notes |
|---|---|---|
| [PARTIAL_OCEAN_EDGE_MIN:<number>] | [PARTIAL_OCEAN_EDGE_MIN:2] | Maximum of 4 |
Minimum Complete Edge Oceans[edit]
This will cause a world to be rejected unless there are at least this many oceans which completely cover an edge of the map. Since a square map only has 4 edges, the maximum value possible is 4. If set to zero then worlds will not be rejected based on this criterion but still might end up with complete edge oceans by chance.
Note that the ability for this many edge oceans to exist will be limited by elevation. Therefore to actually create large oceans you will probably need to change things like the Elevation Mesh Size and Weighted Ranges to increase the number and distribution of very low elevation squares on the map.
Given appropriate weight, range, and variance values for things like elevation, a setting of:
- 1 results in a world that seems like a chunk of coastline. One edge of the map will be completely underwater and there will be ocean taking up much of the map on that side. Think the east or west coast of the United States, the north coast of Canada, or southern Europe. If your edge ocean happens to pick your world's frozen side most of it will be glacier.
- 2 results in another coastline along with the first one. The map could end up looking something like Panama if the oceans pick opposite sides of the map.
- 3 results in a peninsula, like Florida in the US. There will be oceans surrounding 3 sides of the map, and land touching only one side of the map.
- 4 results in one or more island(s) depending on things like elevation variance and weights. Regardless of whether you get one island or multiple islands, the entire map will be surrounded by water.
Unfortunately there's no easy way to control which oceans end up on which edges, except perhaps setting X and Y variance to different values.
Edge oceans will take up part of the other edges too. For example a full edge ocean on the east side will have part of the north and south sides underwater, but that does not add to the partial edge oceans count.
| Token | Example | Notes |
|---|---|---|
| [COMPLETE_OCEAN_EDGE_MIN:<number>] | [COMPLETE_OCEAN_EDGE_MIN:0] | Maximum of 4 |
Minimum Volcano Number[edit]
Worlds with less than this number of volcanoes will be rejected. Note that this will not just create this many volcanoes at random; there must be at least this many squares with a Volcanism of 100. Therefore adjusting Weighted Range for 80-100 to some higher value is recommended if you want to facilitate a large number of volcanoes. In addition, Maximum Volcanism must be set to 100 or squares with volcanism of 100 will be impossible making volcanoes impossible.
| Token | Example | Notes |
|---|---|---|
| [VOLCANO_MIN:<number>] | [VOLCANO_MIN:15] | Volcanoes require a volcanism of 100 to occur. |
Mineral Scarcity[edit]
Controls the frequency at which minerals occur. Setting this value lower will increase the amount of ore present on a map, the number of different types of ore, and the number/types of gems. The default value will result in a maximum of 2-4 metal ores per map (assuming you choose a good embark location) which may be limiting until the economy is fully implemented and desired metals can be traded for.
According to research by Shandra on v0.31.25, this is the relationship between the value of this setting and the approximate number of gems and ore:

This is for the same 8x8 embark region in a world which is otherwise the same except for the mineral scarcity parameter. See this forum thread for detailed information on peoples' experiments and possible changes to newer versions.
| Token | Example | Notes |
|---|---|---|
| [MINERAL_SCARCITY:<number>] | [MINERAL_SCARCITY:2500] | Range: 100 to 100,000
setting to lower than 500 may create a lot of rejected worlds cause not enough rivers(confirmation needed) |
Max Megabeast Caves[edit]
This is the maximum number of caves that will be inhabited by megabeasts. Even though the parameter uses the word "caves" it appears to impact the number of sites (lairs) of different types.[Verify] If there are more megabeasts than "caves", megabeasts will suffer from a housing shortage and you may end up with things like 10 dragons sharing a lair. Which could make for a Fun world.
| Token | Example | Notes |
|---|---|---|
| [MEGABEAST_CAP:<number>] | [MEGABEAST_CAP:75] | Number of caves/labyrinths/lairs, not beasts. |
Max Semi-Megabeast Caves[edit]
The maximum number of caves that will be inhabited by semi-megabeasts. If there are more semi-megabeasts than caves, semi-megabeasts will be forced to cohabitate and you may end up with 10 minotaurs in one labyrinth (for example).
| Token | Example | Notes |
|---|---|---|
| [SEMIMEGABEAST_CAP:<number>] | [SEMIMEGABEAST_CAP:150] | Number of caves/labyrinths/lairs, not beasts. |
Titan Parameters[edit]
Number[edit]
This controls the number of megabeasts and semi-megabeasts that exist at the beginning of history. Note that they can get killed or die later due to events during history generation. The number of forgotten beasts is unaffected by this parameter.
Note: One can generate more historical ages by pumping up the amount of semimegabeasts, who are usually more killable than the regular megabeasts.
| Token | Example | Notes |
|---|---|---|
| [TITAN_NUMBER:<number>] | [TITAN_NUMBER:33] | 0 is a valid number |
Attack Population Requirement[edit]
Megabeasts will begin to attack your fort once at least this many dwarves inhabit it, regardless of whether any other attack criteria have been met. This number defaults to 80 which isn't usually too difficult to deal with.
Exported Wealth Requirement[edit]
Megabeasts will begin to attack your fort once you have exported at least this many dwarfbucks worth of merchandise, regardless of whether or not any other criteria have been met. This parameter defaults to None (disabled).
Created Wealth Requirement[edit]
Megabeasts will begin to attack your fort once the fort's total wealth has reached this many dwarfbucks in value. This happens regardless of whether any of the other criteria, such as population, have been met. Therefore even with 1 dwarf a fort could be attacked if the fort were worth at least this value.
| Token | Example | Notes |
|---|---|---|
| [TITAN_ATTACK_TRIGGER:<population>:<exp wealth>:<created wealth>] | [TITAN_ATTACK_TRIGGER:80:0:100000] | 0 = None (disabled). Only one requirement must be met for an attack. |
Number of Demon Types[edit]
Demons are similar to titans and forgotten beasts in that they are procedurally generated, but unlike titans they are not unique. Thus many different types of demons will exist in the world but there will be many members of each type. Setting this to zero means no demons will exist, limiting the amount of fun you can have.
| Token | Example | Notes |
|---|---|---|
| [DEMON_NUMBER:<number>] | [DEMON_NUMBER:52] | 0 to 1000 |
Number of Night Creature Types[edit]
The number of different night creatures that will exist in the world. Setting this to zero means that the world will have no night creatures.
A setting of zero also means that there will be no Bogeymen in adventure mode, though any modded creatures with the [NIGHT_CREATURE:BOGEYMAN] tag will still exist.
| Token | Example | Notes |
|---|---|---|
| [NIGHT_CREATURE_NUMBER:<number>] | [NIGHT_CREATURE_NUMBER:52] | 0 to 1000 |
Desired Good/Evil Square Counts[edit]
These values change the amount of good or evil tiles on the map, depending on the size of the region they are being considered for.
Though the exact size of small, medium, and large are unknown, the counts used here will always be restricted to regions of the given size no matter how large the number. Also, the count is more of a goal than a minimum or maximum. As a result you can end up with many more or many fewer than the requested number of squares in some situations.
In particular, if you have something like case where only 3 large regions exists in a world, and you request "1 evil square" in large regions, you will end up with one of the large regions being entirely evil. So any non-zero value in one of these settings essentially means "force at least one region of this size to be all good/evil."
Note that the "evilness" of evil biomes is also impacted by savagery.
Certain civilizations can not exist in good and/or evil squares, so too many of one or the other may limit the size of certain types of civilizations. Dwarves, for example, need non-aligned biomes.
| Token | Example | Notes |
|---|---|---|
| [GOOD_SQ_COUNTS:<small region>:<med region>:<lg region>] | [GOOD_SQ_COUNTS:100:1000:2000] | Set count to zero to disable for that region size. |
| [EVIL_SQ_COUNTS:<small region>:<med region>:<lg region>] | [EVIL_SQ_COUNTS:100:1000:2000] |
Minimum Biome Square Counts[edit]
These numbers control whether or not a world will be rejected based on a lack of different biomes. Raising these numbers will not automatically generate the given number of squares of the given biome! For a biome to exist, certain conditions like elevation and rainfall must exist.
These parameters simply filter out worlds that (for example) randomly fail to have enough high elevation squares to support a given number of mountains, etc. Some settings may cause worlds to always be rejected. For example, if for some reason the maximum elevation parameter is set to a value below what will support mountain biomes, it will be impossible to satisfy a non-zero requirement for mountain squares. The same principle goes for other conditions and biomes such as low elevations and oceans, etc.
Certain civilizations require different biomes to exist (such as dwarves and mountains), so eliminating certain biomes will make it impossible for certain civilizations to form.
These parameters often result in infinite world rejection problems. See World rejection for information on solving problems related to worlds always being rejected due to one or more of these parameters.
0 means no minimum for rejection. Setting to 0 does not guarantee 0 squares of that biome.
Biome Type Requirement Table[edit]
Terrain requirements for various biomes are described below.[Verify] Note that some of the exact ranges are unknown.
| Biome | Terrain Requirement | |||
|---|---|---|---|---|
| Elevation | Rainfall | Temperature | Drainage | |
| Swamp/Marsh | 100-299 | 33-100 | Non-Freezing | 0-32 |
| Desert/Badland | 100-299 | 0-10(?) | non-freezing | N/A (1) |
| Forest | 100-299 | 66-100 | non-freezing | 66-100 |
| Mountains | 300-400 | N/A | N/A | N/A |
| Ocean | 0-99 | N/A | N/A | N/A |
| Glacier | 100-299 | N/A | Freezing | 80(?)-100 |
| Tundra | 100-299 | N/A | Freezing | 0-66 |
| Grassland | 100-299 | 0-66 | Non-Freezing | 0-66 |
| Hills | 100-299 | 0-66 | Non-Freezing | 66-100 |
(1) might affect the desert subtype, though - needs to be verified; low drainage seems to correlate with sand deserts
Minimum Initial Square Count[edit]
This is the minimum number of squares of the given biome that must exist before things like erosion take place.
One thing to keep in mind is the maximum number of squares on a map of a given size. If the total number of squares on a map is lower than the sum of all square count parameters then you will get infinite world rejection.
To determine the number of squares on a map, just multiply the dimensions. In practice these parameters will need to sum to lower than the maximum because some space is needed for "slack".
| Map Size | Number of Squares |
|---|---|
| 17x17 | 289 |
| 33x33 | 1089 |
| 65x65 | 4225 |
| 129x129 | 16614 |
| 257x257 | 66049 |
Minimum Initial Region Count[edit]
This is the minimum number of regions of contiguous biome squares that must exist before other processes such as erosion take place.
Minimum Final Region Count[edit]
This many regions of the given biome must exist after erosion and similar phases of generation have been completed.
| Token | Example |
|---|---|
| [REGION_COUNTS:SWAMP:<init sq>:<init rg>:<final rg>] | [REGION_COUNTS:SWAMP:1032:7:6] |
| [REGION_COUNTS:DESERT:<init sq>:<init rg>:<final rg>] | [REGION_COUNTS:DESERT:1032:7:6] |
| [REGION_COUNTS:FOREST:<init sq>:<init rg>:<final rg>] | [REGION_COUNTS:FOREST:4128:13:12] |
| [REGION_COUNTS:MOUNTAINS:<init sq>:<init rg>:<final rg>] | [REGION_COUNTS:MOUNTAINS:8256:9:9] |
| [REGION_COUNTS:OCEAN:<init sq>:<init rg>:<final rg>] | [REGION_COUNTS:OCEAN:8256:7:6] |
| [REGION_COUNTS:GLACIER:<init sq>:<init rg>:<final rg>] | [REGION_COUNTS:GLACIER:0:0:0] |
| [REGION_COUNTS:TUNDRA:<init sq>:<init rg>:<final rg>] | [REGION_COUNTS:TUNDRA:0:0:0] |
| [REGION_COUNTS:GRASSLAND:<init sq>:<init rg>:<final rg>] | [REGION_COUNTS:GRASSLAND:8256:13:12] |
| [REGION_COUNTS:HILLS:<init sq>:<init rg>:<final rg>] | [REGION_COUNTS:HILLS:8256:13:12] |
Erosion Cycle Count[edit]
Tells the world-generator how long the world has to erode its tall peaks down to mountainsides during the 'running rivers...' stage of world creation. The higher this number, the less jagged the world will be, and the more wide the major rivers will be. If you use the maximum number, your mountains will dissolve before your eyes into plains which can lead to rejections if there aren't enough mountains to use for river start points and dwarven civilization origin points.
| Token | Example | Notes |
|---|---|---|
| [EROSION_CYCLE_COUNT:<number>] | [EROSION_CYCLE_COUNT:250] | Range: 0 to 1000 |
Minimum/Desired River Start Locations[edit]
This is the minimum number of riverheads that must exist before and after erosion takes place. Worlds will be rejected if they fail to meet these numbers. As with minimum biome counts, raising this number doesn't automatically create this many riverheads. Other conditions like terrain and rainfall must exist for rivers to form.
Extremely high pre-erosion values speed erosion greatly, while low post erosion values are useful for limiting rejects due to lack of river origin points. One can try the 800 value to get more lakes.
| Token | Example | Notes |
|---|---|---|
| [RIVER_MINS:<min pre-erosion>:<des post-erosion>] | [RIVER_MINS:200:400] | Range: 0 to 800 |
Periodically Erode Extreme Cliffs[edit]
If enabled, makes every impassable rock wall into a series of ramps. Some prefer to pump up erosion to about 250, and turn the "Desired pre-erosion river count" to 0 for good erosion and no extra canyons.
Normally this is set to Yes (1).
| Token | Example | Notes |
|---|---|---|
| [PERIODICALLY_ERODE_EXTREMES:<1 or 0>] | [PERIODICALLY_ERODE_EXTREMES:1] | 1/0 = Yes/No |
Do Orographic Precipitation and Rain Shadows[edit]
Toggle that allows terrain height to affect rainfall. For example, moist air coming from the ocean blows over the land. As the terrain gets higher, it forces the moist air up, causing it to rain on the seaward side of a mountain. Eventually, all the rain has fallen if the mountain is tall enough. So, when the breeze goes over the top, there's no moisture left to fall on the other side, creating a rain-shadow. This should create a tendency for more extreme rainfall in regions, creating more forests, deserts, marshlands, and grasslands. Turning it off should result in more controllable, less complex rainfall conditions based on rainfall parameters as it adds a random element which can distort or otherwise mess up the climates on a pregenerated map.
This should be disabled if you're importing a map or using a preset map file that has weather.
| Token | Example | Notes |
|---|---|---|
| [OROGRAPHIC_PRECIPITATION:<1 or 0>] | [OROGRAPHIC_PRECIPITATION:1] | 1/0 = Yes/No |
Maximum Number of Subregions[edit]
This is the number of separate biomes (the flashing regions you see on embark when you hit F1, F2, etc when there's more than one biome on the embark location) that are allowed to exist on the entire map.
Setting this to very low values will result in numerous rejections depending on variance parameters. If variance values are set to high numbers, many small biomes will be created causing rejection if this parameter value is not increased beyond the default.
Increasing the value of this tag is often a must when generating "patchwork" worlds with lots of biome variance, but simply increasing it without increasing variance parameters will not guarantee more biomes.
| Token | Example | Notes |
|---|---|---|
| [SUBREGION_MAX:<number>] | [SUBREGION_MAX:2750] | Range: 1 to 5000 |
Cavern Parameters[edit]
Caverns are the hollow areas underground which dwarves tend to encounter when they're digging around.
Cavern Layer Number[edit]
This parameter determines how many cavern systems will be generated, not including the Magma layer or the Bottom layer. Defaults to three. Setting it to lower values could help FPS.
Warning: If this is 0 then you will not have caverns on your map. Note that disabling caverns will make it impossible to grow any underground plants because none will exist for your civilization to cultivate. (Underground plants will not be available on embark.)
| Token | Example | Notes |
|---|---|---|
| [CAVERN_LAYER_COUNT:<number>] | [CAVERN_LAYER_COUNT:3] | Range: 0 to 3 |
Cavern Layout Parameters[edit]
Open caverns and dense passageways are not mutually exclusive. When both are raised, bizarre results can occur, such as layers showing a combination of open caverns, a cluster of network passages, and natural walls sprinkling the inside of an otherwise open cavern. Reference
If you want the largest open spaces possible, then decrease the density and increase the openness. If you want a labyrinth of passageways, lower the openness and raise the passage density.
Another interesting note about the cavern layers is that the seed and number of demon types affect the layout of the caverns.
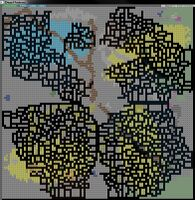
Cavern slice with Openness of 0 and Density of 100
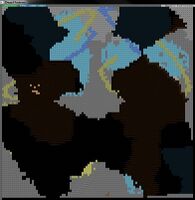
Cavern slice with Openness of 100 and Density of 0
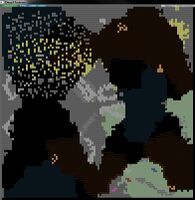
Cavern slice with Openness of 100 and Density of 100
Cavern slice with Openness of 50 and Density of 50


Layer Openness Min/Max[edit]
Dictates the size of cavern passages. When Passage Density (see below) is set to minimum (0), caverns will be open expanses. Raising the maximum will increase the size of the caverns.
| Token | Example | Notes |
|---|---|---|
| [CAVERN_LAYER_OPENNESS_MIN:<number>] | [CAVERN_LAYER_OPENNESS_MIN:0] | Range: 0 to 100 |
| [CAVERN_LAYER_OPENNESS_MAX:<number>] | [CAVERN_LAYER_OPENNESS_MAX:100] |
Layer Passage Density Min/Max[edit]
This determines how many passages form the cavern. If openness (see above) is set to minimum and density increased then you will get a maze like network of small criss-crossing passages. Raising the values further increases the number of the maze-like passages.
Caverns will be large, open spaces at 0, and comprised of many small vertical shafts of rock at 100. Setting both values to be the same results in a uniform look for the caverns.[Verify]
| Token | Example | Notes |
|---|---|---|
| [CAVERN_LAYER_PASSAGE_DENSITY_MIN:<number>] | [CAVERN_LAYER_PASSAGE_DENSITY_MIN:0] | Range: 0 to 100 |
| [CAVERN_LAYER_PASSAGE_DENSITY_MAX:<number>] | [CAVERN_LAYER_PASSAGE_DENSITY_MAX:100] |
See this forum thread for more information on openness and density including many more images.
Layer Water min\max[edit]
Determines how many caverns will have water at the bottom. Note that, even at 100, there will be some amount of ground in caverns, but each cavern 'bubble' will contain some amount of water.
At 0, there will be no water in your caverns. This may impact future underground plant growth, although maps will still start with underground flora.[Verify]
| Token | Example | Notes |
|---|---|---|
| [CAVERN_LAYER_WATER_MIN:<number>] | [CAVERN_LAYER_WATER_MIN:0] | Range: 0 to 100 |
| [CAVERN_LAYER_WATER_MAX:<number>] | [CAVERN_LAYER_WATER_MAX:100] |
Magma Layer[edit]
This parameter controls whether the magma sea exists.
Setting 1/Yes causes the magma layer to exist, value 0/No prevents it. Appears not have impact on volcanoes, nor vulcanism, so even if 0/No there will still be embark locations with magma. If a volcano exists, it appears to always tap the magma sea, but the magma sea will not be revealed by revealing the volcano.
| Token | Example |
|---|---|
| [HAVE_BOTTOM_LAYER_1:<1 or 0>] | [HAVE_BOTTOM_LAYER_1:1] |
Bottom Layer[edit]
Determines if the space below the magma sea exists. If Yes the "HFS" layer is always present. Normally you want to leave this set to Yes for maximum fun.
If enabled, this will force the magma layer above it. (Unknown whether this has any impact on occurrence of HFS "temple".)[Verify]
| Token | Example |
|---|---|
| [HAVE_BOTTOM_LAYER_2:<1 or 0>] | [HAVE_BOTTOM_LAYER_2:1] |
Z Levels (Depth) Settings[edit]
These parameters control the "thickness" of various "layers" on the map. Note that a "layer" in this case does not refer to one Z-level, but refers to a number of related Z-levels such as "levels above ground".
The following table assumes that you have 3 cavern layers. The Levels Above Layer settings control how many Z-Levels are above each layer. A layer may itself consist of multiple Z-Levels (and almost always does).
| Setting Name | Token | Description |
|---|---|---|
| Above Ground | [LEVELS_ABOVE_GROUND:<number>] | The number of Z-Levels of air above the highest surface level. Has no impact on how many Z-levels deep the surface layer is. |
| Above layer 1 | [LEVELS_ABOVE_LAYER_1:<number>] | Z-Levels of stone above the first cavern layer. Making this higher will guarantee at least this many levels to build your fortress, but will have no impact on how many z-levels thick the surface layer is. Also, the top of a cavern may be higher than the rest of a cavern, so in practice there will be more "solid" levels than this above the cavern.
As for version 0.31.25 this setting is inaccurate. The actual number of z-levels may vary in a range of approx. ±5, which may result in non-existence of any solid z-levels between a surface layer and first cavern layer. |
| Above Layer 2 | [LEVELS_ABOVE_LAYER_2:<number>] | Z-levels of earth between very top of second cavern and very bottom of first cavern. |
| Above Layer 3 | [LEVELS_ABOVE_LAYER_3:<number>] | Z-levels of earth between very top of third cavern and very bottom of second cavern. |
| Above Layer 4 | [LEVELS_ABOVE_LAYER_4:<number>] | Z-Levels of earth between very highest magma and very bottom of third cavern. Spoiler Hidden (select invisible text to read): Making this high will give a large area for HFS veins, so that it never touches caverns, giving more to mine if it was impacting the cavern previously. |
| Above Layer 5 | [LEVELS_ABOVE_LAYER_5:<number>] | Uncertain. May control the number of levels of "Semi Molten Rock" between HFS and Magma, may control number of levels of magma, may impact both. In experimentation, the overall depth of all magma sea and semi-molten rock levels appears to increase, but not consistent enough to say for certain. Only valid if Magma Layer present. Spoiler Hidden:Often the HFS vein will only extend as high as the highest magma, making this the only guaranteed way to increase amount of HFS to mine, but unfortunately also creating enormous useless semi-molten z-levels |
| At Bottom | [LEVELS_AT_BOTTOM:<number>] | Appears to be number of levels of HFS chamber. Only valid if Bottom Layer present. Often has no impact. Values larger than default results in strange things. |
Some implications:
- The number of surface layers (e.g. soil), at this time, can not be controlled. For example, on a map with 1 layer of Peat, then a layer of Silt, then a layer of Obsidian, there is no control to let you increase either one to be, say, 20 z-levels. (though you may get lucky with the Obsidian).
- There can be multiple stone layers between the cavern and the surface. So increasing Levels Above Layer 1 may give you more Conglomerate, or more Granite, and you have no control over which stone layer spans those Z-Levels.
- The layers shown on embark span across the cavern layers in an unknown and inconsistent way. Sometimes those 10 different layers of stone are evenly distributed over your 400 z-level deep map, sometimes the first 9 get 1 z-level each and the last gets the other 391 levels. No way to control found yet.
- The HFS temple, if present, will always extend into the rock layers, and appears to always make contact with the bottom cave. Large values for levels above layer 5 and layer 4 can result in enormous temples, but the number of levels at the top (the part with undead) appears to be unaffected.
- Unconfirmed whether number of levels between caverns has any impact on cavern height. There will be connecting ramps and/or shafts between cavern layers no matter how many levels are between them.
- Very Important: These values appear to apply across a whole 16x16 Region, not just embark areas. That means that if a 16x16 region is completely flat, but has one tall mountain in one far corner, even if you set Levels Above Ground low (e.g. 2 z-levels) you still have all the empty air of the highest mountain in every embark tile (e.g. 200 z-levels). Also can happen to the semi-molten layer, and can lead to unexpected behavior.
- Very large values can cause strange things to happen. Even more true for small values.
Cave Parameters[edit]
Caves are sort of like caverns except that they have a passage to the surface and are generally much smaller. Caves can connect to caverns if they are sufficiently deep.
Minimum/Maximum Natural Cave Size[edit]
These parameters appear to control the length and depth of caves.
| Token | Example | Notes |
|---|---|---|
| [CAVE_MIN_SIZE:<number>] | [CAVE_MIN_SIZE:5] | Range: 1 to 500 |
| [CAVE_MAX_SIZE:<number>] | [CAVE_MAX_SIZE:25] |
Number of (Non-)Mountain Caves[edit]
These are the numbers of mountain and non-mountain caves that will be placed. These parameters will cause this number of caves to be placed, but rejections may occur if a world has an insufficient number of mountain or non-mountain squares to place the caves in.
| Token | Example | Notes |
|---|---|---|
| [MOUNTAIN_CAVE_MIN:<number>] | [MOUNTAIN_CAVE_MIN:100] | Range: 1 to 800 |
| [NON_MOUNTAIN_CAVE_MIN:<number>] | [NON_MOUNTAIN_CAVE_MIN:200] |
Make Caves Visible[edit]
If set to no (default) then the location of caves will not be marked on the map. If set to yes, caves will appear on the map as • symbols so that they may be sought out or avoided as desired.
| Token | Example | Notes |
|---|---|---|
| [ALL_CAVES_VISIBLE:<1 or 0>] | [ALL_CAVES_VISIBLE:0] | 1/0 = Yes/No |
Allow Init Options to Show Tunnels[edit]
This parameter doesn't do anything in v0.31.[Verify] In older versions, tunnels could be built between dwarven settlements and these could appear on the map similarly to roads.
| Token | Example | Notes |
|---|---|---|
| [SHOW_EMBARK_TUNNEL:<0-2>] | [SHOW_EMBARK_TUNNEL:2] | 0 = No 1 = Only in Finder 2 = Always |
Number of Civilizations[edit]
This number of civilizations will be placed on the map before history generation begins. These civilizations may later die out due to historical events.
Note that a high value here can cause lots of map rejections, particularly on smaller maps as there simply isn't enough room or regions to put them all in.
| Token | Example | Notes |
|---|---|---|
| [TOTAL_CIV_NUMBER:<number>] | [TOTAL_CIV_NUMBER:40] | Range: 0 to 300 |
Playable Civilization Required[edit]
If this is set to yes (default) then worlds will be rejected if no civilization with CIV_CONTROLLABLE can be placed. In an unmodded game, only the dwarves have this token.
If set to no, the result may be a world that cannot be played in Fortress Mode.
| Token | Example | Notes |
|---|---|---|
| [PLAYABLE_CIVILIZATION_REQUIRED:<1 or 0>] | [PLAYABLE_CIVILIZATION_REQUIRED:1] | 1/0 = Yes/No |
Minimum Number of Mid/Low/High Characteristic Squares[edit]
Sets the minimum possible number of squares of certain ranges of each of the region qualities, such as elevation, rain, drainage, volcanism, savagery, and temperature. These need to be changed to reflect your regional meshes and weights. These are responsible for a HUGE number of map rejections. These values can all be set to 0 for much fewer map rejections, particularly in the case of more wacky, non-standard maps.
These values will cause worlds to be rejected unless at least the given number of squares of the given type are randomly generated. Setting these values too high could result in worlds always being rejected if other parameters such as the maximum/minimums for elevation, etc, don't allow enough of those squares to get generated.
| Token | Example | Notes |
|---|---|---|
| [ELEVATION_RANGES:<low sq>:<mid sq>:<high sq>] | [ELEVATION_RANGES:8256:16512:8256] | Minimum number of squares that must have low, medium, and high amounts of the given attribute. 0 = No minimum |
| [RAIN_RANGES:<low sq>:<mid sq>:<high sq>] | [RAIN_RANGES:8256:16512:8256] | |
| [DRAINAGE_RANGES:<low sq>:<mid sq>:<high sq>] | [DRAINAGE_RANGES:8256:16512:8256] | |
| [SAVAGERY_RANGES:<low sq>:<mid sq>:<high sq>] | [SAVAGERY_RANGES:8256:16512:8256] | |
| [VOLCANISM_RANGES:<low sq>:<mid sq>:<high sq>] | [VOLCANISM_RANGES:8256:16512:8256] |
"The World Generator is having trouble placing..."[edit]
- Main article World rejection
If you are having the common problem of your generated worlds always being rejected by the world generator, see Solving World Rejection Problems as it contains many detailed suggestions on how to troubleshoot and solve these issues.
Default Worldgen Parameters[edit]
There is no single default for each parameter. Several advanced world generation profiles come with the game by default. See Default world_gen.txt to take a look at this file.
Parameter Set Examples[edit]
If you're trying to do something specific then the Worldgen examples might be helpful. These are complete parameter sets that can be copied directly into your world_gen.txt file and customized as desired. If they have nothing for you try Worldgen Tricks, for known tricks and tips on making a world just right for you.
For many many more examples see:
Worlds | |
|---|---|