- v50 information can now be added to pages in the main namespace. v0.47 information can still be found in the DF2014 namespace. See here for more details on the new versioning policy.
- Use this page to report any issues related to the migration.
User:Uristocrat/ROUPP
Resettable One-Use Pressure Plates
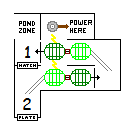
While ordinary one-use plates are easy to use, they deconstruct immediately after triggering and destroy all but one of the mechanisms used. Sometimes, it's desirable to have a system that triggers once, then waits to be reset manually. For example, you might have a pressure plate that seals off your entrance and floods it with magma, but you don't want the flood to stop or the drawbridges to open like it would for a resetting pressure plate, but you also don't want to rebuild and reconnect the one-use pressure plate after every siege when half the parts are submerged in magma. This is when you should use a more complex setup like the one shown in the picture to the right.
Suppose you want to use a pressure plate to seal off your main entrance. You build the setup shown, being sure to construct the lower pumps before the upper pumps and the gear assembly on top after both pumps are done. Then connect the plate in room 2 to the drawbridges that seal the entrance and hook a resetting, enemy triggered plate from your main hallway to the hatch in room 1. The resetting pressure plate in room 2 should be set to trigger whenever any water is on it. You also connect a Template:L to the Template:L above the pumps, which becomes your reset lever, and pull the lever to disengage the gear once its set up. You also connect that gear to a power source with at least 25 Template:L. Lastly, you fill area 1 with 7/7 water (to prevent evaporation) by channeling through the floor and designating a Template:L above it. After it's full, remove the pond zone and build a floor over it for good measure. During construction, you will need scaffolding just like what you use for a Template:L. This setup uses the same trick of channeling through the floor and building the lower pump first to allow them to share their power source. Remember to forbid the access doors when you're done setting everything up.
You can Template:L this from any source, but if your map gives 40 wind power you can just use a Template:L. Build a Template:L right above where it says "power here" and then build a Template:L directly below it. Putting a windmill directly on top of a gear you disengage can cause the windmill to collapse, so don't try that unless it says the windmill has a stable foundation. You may also want to construct a wall around your windmill to prevent a Template:L from smashing it.
Be careful to dig so that the water can't freeze! If you're using windmills, this will be near the surface. You have to make sure that there's a roof over the channel that leads down to the pressure plate, or that tile will become part of the outdoors, and subject to freezing.
Now, whenever your pressure plate is triggered, the hatch will immediately open and dump the water from 1 onto the plate at 2, holding that plate down until you use your reset lever to activate the pump and put the water back on top of the hatch. Don't forget to turn the pumps off after all the water has moved, or it will continue to reset itself until the pumps are stopped. You can eliminate that minor problem by hooking the pressure plates in the Toggle System to the gear assembly on top of the pumps instead of a lever.
