- v50 information can now be added to pages in the main namespace. v0.47 information can still be found in the DF2014 namespace. See here for more details on the new versioning policy.
- Use this page to report any issues related to the migration.
Difference between revisions of "User:Soundandfury/DF Designer"
Soundandfury (talk | contribs) m (0.11.1, minor change to keys) |
Soundandfury (talk | contribs) m (→The Basics: damn zis crazy formatting) |
||
| Line 54: | Line 54: | ||
===The Basics=== | ===The Basics=== | ||
| − | DF Designer has two modes, ''Edit'' (top-down slice) and ''Isometric'' (view only). You can switch between these modes with the keys {{key|e}} and {{key|i}} respectively, or toggle with {{key| }} ( | + | DF Designer has two modes, ''Edit'' (top-down slice) and ''Isometric'' (view only). You can switch between these modes with the keys {{key|e}} and {{key|i}} respectively, or toggle with {{key| }} (spacebar). |
You do your actual building in Edit mode. To edit a tile in any way, you move your cursor over it (you should see a little yellow box around the tile you're currently hovering over), and then left-click. You can also click-and-drag, thus allowing you to designate several tiles. To choose /what/ to build, press one of the designation keys (press {{key|h}} for a listing). You can see which tool is currently selected from the icon below the map (although some of the images aren't done yet, so you just get a placeholder). | You do your actual building in Edit mode. To edit a tile in any way, you move your cursor over it (you should see a little yellow box around the tile you're currently hovering over), and then left-click. You can also click-and-drag, thus allowing you to designate several tiles. To choose /what/ to build, press one of the designation keys (press {{key|h}} for a listing). You can see which tool is currently selected from the icon below the map (although some of the images aren't done yet, so you just get a placeholder). | ||
Revision as of 15:31, 7 February 2010
DF Designer, by soundnfury, is a fort layout and building planning tool. It enables you to work out your designs before you start to build, and even see how they look in 3-D. It's written in C with SDL, and is basically a Linux project right now. However, there is a Windows port (see below). The source code is freely available under the GPL. Since DF Designer does not 'talk to' Dwarf Fortress, it is version-independent.
Port (of 0.11.1) for Windows users Note: The Windows port is not 'officially' supported; updates may lag. The DLL-mismatch issues have hopefully been fixed now.
User's Manual
aka, "How the hell do I work this thing?"
System Requirements
DFD uses about 7MB of RAM for the default map size; the maximum map size takes 2GB.
The Isometric view is executed on CPU (not GPU) so might be slow on older or low-end machines.
The Minimap will really crawl on large maps.
Compiling (Linux)
You will (probably) need libsdl1.2-dev, SDL_image, and SDL_ttf. Working out precisely what is needed, and where to put it, is left as an exercise for the reader ;)
Then, run make. If there's an error about symbolic links, make should ignore that and so can you.
For Windows
In the Windows build, the libraries are provided as DLLs. It ought to work right out of the box; if it doesn't, get out your C compiler and fix it yourself :D (There were some DLL Hell issues for a while, but I think they're fixed... for now...)
Running
To start DF Designer, run './designer' or double-click on the executable (symlink). Command-line options:
| -n, --no-confirm | Don't pop up confirmation windows for non-undoable actions. |
| -h, --no-help | Don't run the key-help through the console at startup (can still get key-help by pressing h) |
| -x=number | X-Size of world (default=96, max=2048) |
| -y=number | Y-Size of world (default=96, max=2048) |
| -z=number | Z-Size of world (default=24, max=256) |
| -z0=number | Ground Z-level (default=13) |
The Basics
DF Designer has two modes, Edit (top-down slice) and Isometric (view only). You can switch between these modes with the keys e and i respectively, or toggle with (spacebar).
You do your actual building in Edit mode. To edit a tile in any way, you move your cursor over it (you should see a little yellow box around the tile you're currently hovering over), and then left-click. You can also click-and-drag, thus allowing you to designate several tiles. To choose /what/ to build, press one of the designation keys (press h for a listing). You can see which tool is currently selected from the icon below the map (although some of the images aren't done yet, so you just get a placeholder).
In more detail
To find out which key does what, press h, and some help will scroll up that fancy console on the left.
You can designate rectangular areas by right-clicking twice. Beware, though, because you can't undo (yet).
You can also do designations by pressing Ctrl- * where * is any designation key. So, for example, Ctrl-b places a bed, as well as selecting bed as the current tool; b on its own would just select bed, and not actually place one until you left-clicked.
Load and Save with l and s. Suggested extension, ".dfd", though it's up to you.
Edit has two submodes, COLOURS and DF-TILES, two methods of displaying what's in each tile. Select them with : (colon) and @ (at) respectively.
DF Designer doesn't implement anything near the full ontology of buildings and constructions in DF; however, as the versions go by, it should increase. 'Objects' - beds, chairs, tables, and other stuff - don't appear in Isometric mode right now, because I haven't done any models or anything like that for them yet.
"Shadowing" is DF Designer's way of showing you what's on nearby levels, in Edit--COLOURS mode; fainter versions of the z-levels above and below are superimposed upon the current level. You can toggle shadowing by pressing m.
"Semislice" allows you to choose whether the slice in Isometric mode cuts above or below the floors. You can toggle semislice by pressing m. You might notice that shadowing and semislice both use the same key. In fact, they are controlled together; whenever one is turned on, the other is turned off. Since only one has any effect at once (they affect different modes), this saves a letter on the keyboard (which is just as well as we're going to run out soon at this rate).
There's a minimap for working with big maps (you scroll around with the cursor keys); to see the minimap you have to turn off the console - press 0 (zero).
That's basically it. You might wonder what the rules are for placing things on top of other things, and whether what was there before stays there; answer: it's all ad-hoc. Just try stuff; after all, you can always get back to what you had before (though if you've put lots of work in, you might want to save first, because there's no 'undo' feature yet).
Export Floor Map
Pressing x will export a floor map. Note: Remember not to export the floor map over the top of the map save; use a different filename! (Suggestion: append '.txt' for the floor map). DF Designer doesn't have a function to import from floor-maps; you don't want to lose your map save, right?
Cunning features of the floor map include condensing of series of identical Z-levels.
Screenshots
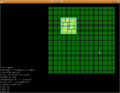
Editing mode in DFD 0.5
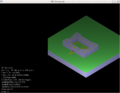
Isometric (View) mode in DFD 0.5

DF-TILES editing mode in DFD 0.11


