- v50 information can now be added to pages in the main namespace. v0.47 information can still be found in the DF2014 namespace. See here for more details on the new versioning policy.
- Use this page to report any issues related to the migration.
Difference between revisions of "Exploratory mining"
Mikerenfro (talk | contribs) m (Testing alignment) |
Mikerenfro (talk | contribs) m (→3×3 blocks) |
||
| Line 123: | Line 123: | ||
=== 3×3 blocks === | === 3×3 blocks === | ||
| − | <div style="float: left; overflow: | + | <div style="float: left; overflow: auto; padding-right: 2em;"> |
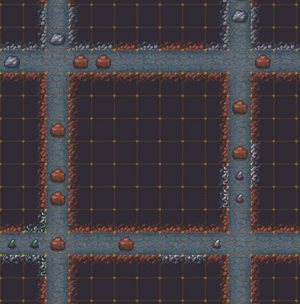
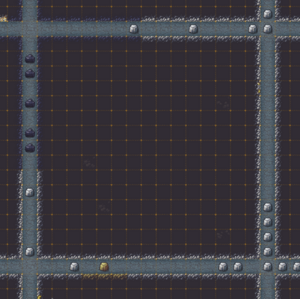
[[File:Exploratory-mining-block-pattern-3x3.png|thumb|Exploratory mining example: 3x3 block pattern]] | [[File:Exploratory-mining-block-pattern-3x3.png|thumb|Exploratory mining example: 3x3 block pattern]] | ||
</div> | </div> | ||
Revision as of 03:53, 30 January 2023
| This article was migrated from DF2014:Exploratory mining and may be inaccurate for the current version of DF (v53.11). See this page for more information. |
v53.11 · v0.47.05 This article is about the current version of DF.Note that some content may still need to be updated. |
- This article is about exploring rock layers while digging through them; if you're looking for tips for exploring already-discovered caverns, check Caverns#Methods of Exploration
Once you've had enough fun to have a basic fortress working, it becomes necessary to dig down in search of ores, gems, water, etc. Exploratory mining attempts to dig out as little as possible, in order to see as much as possible, using clever digging patterns.
Goals
The main goal of exploratory mining is to find something which lies in the stone layers, be they raw materials such as ores, gems and other useful stones, or special features such as caverns and magma. A secondary goal for exploratory mining is to increase the count of visible subterranean tiles, which is one cap on the eligibility for strange moods. While minerals are quite common, reducing the need for extensive exploratory mining, one might still want to search for rare gems, some of which appear in small or even single-tile clusters. Another might want access to the caverns as soon and as easily as possible, for instance to get access to subterranean water or to set up an underground tree farm.
Either way, applying a good exploratory mining method will ensure you will find what you want as soon as possible, and without missing anything.
Dangers
Potential dangers include:
- Hostile creatures which inhabit underground areas
- Large pools of liquid (water, magma)
- Fun
- FPS death from pathing and item count
Strategies
All of the interesting stuff is below you when you start - digging straight down may be the fastest (though not the safest) way to find points of interest.
Those interested in *safely* exploring the depths may wish to create a level every so often where the stairway is broken so you can create barriers (like doors or lever-controlled floodgates) or garrison military squads to deal with any discovered hostiles.
It is also recommended to isolate your exploratory mines from your fortress proper, to allow the mines to be closed off and removed from pathing calculations.
Exploratory Patterns
Patterns are represented by a unit tile. This unit tile is repeated throughout the area intended for excavation to create the desired pattern. Each pattern is analyzed with the above factors in mind. Note that single-floor patterns can be enhanced to explore one additional z-level by replacing mining designations with either channel or ramp designations; doing so effectively doubles their efficiency. Designating "down stairs" instead will reveal one additional tile directly below each tile mined.
Hollow
All tiles are excavated.
- Labor: 100% of the tiles are excavated.
- Target: Any size. If it exists in the layer, it will be found.
- Visibility: 100% of the tiles are visible, obviously.
- Reusability: Approaches zero, except for mass storage. Any design other than a large hall requires reconstruction.
- Bottom line: Easy to designate, but miners tend to be a bit chaotic in their approach to the task. Hollowing wastes labor like there's no tomorrow, but integrates extraction into the exploratory mining process. Use only if you have a lot of labor to spare, or need huge amounts of stone and don't mind the reconstruction required to make the hollow area habitable. Some research has shown that large open areas are particularly costly for pathing calculations.
- Enhancement: Hollow with "down stairs" designations and the entire level below will be revealed but untouched. This can allow you to plan your layout to take best advantage of the ores and clusters to create high-value rooms.
Rows
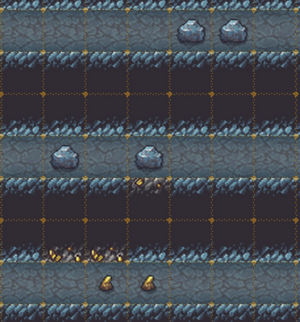
Larger "tunnel" patterns are suggested to be dug in multiples of "3" to allow for later complete revealing with minimum effort. |
Ladder Rows
- Labor: 25% of the tiles are excavated (1 in 4).
- Target: Any size. Clusters as small as a single tile are revealed.
- Visibility: 100%.
- Reusability: Moderate. Alternating corridors can be mined out to create 5 tile wide rooms of any length... if the extra doors aren't a concern.
- Bottom line: A little more tedious to designate, but the increased re-usability and efficiency make this an attractive alternative.
- Note: The dfhack command 'digexp ladder' will automatically apply this pattern.
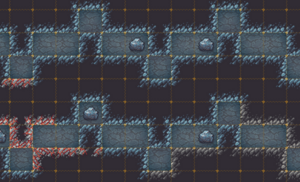
Diagonal every 5
- Labor: 20% of the tiles are excavated (1 per 5).
- Target: Any size. Clusters as small as a single tile are revealed.
- Visibility: 100%.
- Reusability: With a bit of imagination you can build nice 3x3 rooms
- Bottom line: This method is the most efficient single-level pattern with 100% visibility. This one doesn't use other levels to move from one spot to another but is annoying to designate manually.
- Note: The dfhack command 'digexp diag5' will automatically apply this pattern.
A variation would put diagonals every 10 or 20, laying the groundwork to fill them in later for higher visibility if desired.
Mine shafts, grid of every 3 tiles
| ░ | ░ | ░ | ░ | ░ | ░ | ░ | ░ | ░ |
| ░ | X | ░ | ░ | X | ░ | ░ | X | ░ |
| ░ | ░ | ░ | ░ | ░ | ░ | ░ | ░ | ░ |
| ░ | ░ | ░ | ░ | ░ | ░ | ░ | ░ | ░ |
| ░ | X | ░ | ░ | X | ░ | ░ | X | ░ |
| ░ | ░ | ░ | ░ | ░ | ░ | ░ | ░ | ░ |
- Labor: 11.1% of the tiles are excavated (1/9).
- Target: Any size. Clusters as small as a single tile are revealed.
- Visibility: 100%.
- Reusability: It's easy to make into square rooms of various sizes, the stairways can be removed and used as doorways, or just carved out as part of the rooms.
- Bottom line: You'll need to clear part of one layer to get the shafts started up or down (use one of the other methods to cover the area), but for one shaft at a time this method is, tile for tile, the most efficient for those with 100% visibility, and has a great reuse value. In practice, however, if you have more than one shaft being dug at one time, up/down-mining can cause miners to jump around between shafts, wasting time.
- It takes a lot of keypressing to designate, although you can save some effort by designating every third row across the entire width and height of the area to be excavated and then removing the designations (d-x) on all but every third column. Additionally, a Linux script for digging the entire mine can be found here: https://docs.google.com/document/d/1qWyeq27C4DJwjOclEhPATgUlhtNEXrxnGcuNHx-M_ZU/edit?usp=sharing.
For a discussion on optimizing dig times with mineshafts, see mineshaft stitching.
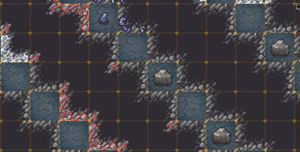
Diagonal ramps
The pattern as shown is 1 up-ramp every 7 tiles vertically, or 1/14 horizontally, though this could be turned 90 degrees. The downramps are shown, but are only designated as up ramps on the level below. This pattern can also use channel designations in place of ramps to mine in a downward direction. (Be sure you know how ramps work before trying this one!)
| ░ | ░ | ▼ | ░ | ░ | ░ | ░ | ░ | ░ | ░ | ░ | ░ | ░ | ▲ | ░ | ░ | ▼ | ░ | ░ | ░ | ░ | ░ | ░ | ░ | ░ | ░ | ░ | ▲ |
| ░ | ░ | ░ | ░ | ░ | ░ | ░ | ░ | ░ | ▲ | ░ | ░ | ▼ | ░ | ░ | ░ | ░ | ░ | ░ | ░ | ░ | ░ | ░ | ▲ | ░ | ░ | ▼ | ░ |
| ░ | ░ | ░ | ░ | ░ | ▲ | ░ | ░ | ▼ | ░ | ░ | ░ | ░ | ░ | ░ | ░ | ░ | ░ | ░ | ▲ | ░ | ░ | ▼ | ░ | ░ | ░ | ░ | ░ |
| ░ | ▲ | ░ | ░ | ▼ | ░ | ░ | ░ | ░ | ░ | ░ | ░ | ░ | ░ | ░ | ▲ | ░ | ░ | ▼ | ░ | ░ | ░ | ░ | ░ | ░ | ░ | ░ | ░ |
| ▼ | ░ | ░ | ░ | ░ | ░ | ░ | ░ | ░ | ░ | ░ | ▲ | ░ | ░ | ▼ | ░ | ░ | ░ | ░ | ░ | ░ | ░ | ░ | ░ | ░ | ▲ | ░ | ░ |
| ░ | ░ | ░ | ░ | ░ | ░ | ░ | ▲ | ░ | ░ | ▼ | ░ | ░ | ░ | ░ | ░ | ░ | ░ | ░ | ░ | ░ | ▲ | ░ | ░ | ▼ | ░ | ░ | ░ |
| ░ | ░ | ░ | ▲ | ░ | ░ | ▼ | ░ | ░ | ░ | ░ | ░ | ░ | ░ | ░ | ░ | ░ | ▲ | ░ | ░ | ▼ | ░ | ░ | ░ | ░ | ░ | ░ | ░ |
| ░ | ░ | ▼ | ░ | ░ | ░ | ░ | ░ | ░ | ░ | ░ | ░ | ░ | ▲ | ░ | ░ | ▼ | ░ | ░ | ░ | ░ | ░ | ░ | ░ | ░ | ░ | ░ | ▲ |
- Labor: 7.1% of the tiles are designated to dig (1/14), but 14.3% are excavated (1/7).
- Target: Any size. Clusters as small as a single tile are revealed.
- Visibility: 100%.
- Reusability: Moderate. 3x3 spaces cannot be created until at least one up-ramp is removed or a down-ramp floored over. Ramps are less convenient than stairs for many purposes (for example, digging out the wrong tiles around a ramp can make it unusable).
- Bottom line: Combines the advantages of diagonal and vertical digging, along with the benefit of ramps and channels excavating two tiles at the same time. The most efficient method of all, but difficult to designate and somewhat inconvenient (especially around the edges of the map). Awkward to stitch together.
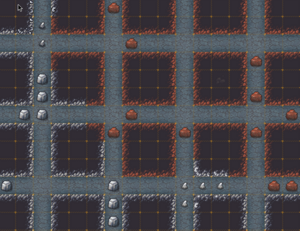
3×3 blocks
- Labor: 7/16 (~44%) of the tiles are excavated.
- Target: Veins and clusters (except for single-tile)
- Visibility: 15/16 (~94%) of the tiles are visible.
- Reusability: Amusingly low, but it can be converted into a grid of connected 5×5 rooms, if you center each room on a crossroad.
7×7 blocks
- Labor: 15/64 (~23%) of the tiles are excavated.
- Target: Veins and up, as the large 5X5 space left in each unit tile can easily conceal a small cluster. Small clusters will be found perhaps half the time.
- Visibility: 39/64 (~61%) of the tiles are visible.
- Reusability: Medium. The 7×7 blocks can easily be converted into 5×5 rooms, suitable for individual rooms, storage or workshops. Optionally, it can be converted into a grid of connected 7×7 rooms, if you center each room on a crossroad; or similarly into a grid of 3x3 rooms, good for workshops, etc. Easily converted into a more thorough 3×3 block patten by digging through the large blocks.
- Bottom line: This is a low-labor method great for vein-hunting. The low labor cost puts you in a position to invest more and get better coverage if desired.
If you think you may wish to later use the "rows" method (above) for 100% visibility, this could be based on a spacing of 6, 9, or 12. Wider spacing starts to risk missing even veins.
15×15 blocks
- Labor: 31/256 (~12%) of the tiles are excavated.
- Target: Large clusters are guaranteed, and unless you have particularly bad luck you should also find all veins, but there is no guarantee. Veins would only rarely be hidden in the large 13×13 space left. The large 13×13 space left in each unit tile can easily conceal quite a lot.
- Visibility: 87/256 (34%) of the tiles are visible.
- Reusability: High. A 15×15 block of solid rock is extremely versatile when it comes to interior design. It's easily converted into a 7×7 block design, which may be further converted into a 3×3 block design.
- Bottom line: This method is preferable when you are low on labor. It can easily accommodate parts of your fort, or serve as the precursor for a more thorough search. A 12×12 or 18×18 version are also valid options, with obvious (dis)advantages.
Mine Shafts on a 6-, 9-, 12-, or 15-grid
- Labor: from under 3% (1/36) for the 6-grid to less than 0.5% for the 15-grid (1/225).
- Target: Large clusters and up (as above) and underground features.
- Visibility: from 25% for the 6-grid to 4% for the 15-grid.
- Reusability: High. Any area often needs a set of stairs (or more than one) leading up/down, and these would be the start of them.
- Bottom line: This method should be used when you are looking for caverns, or getting a feel for the various rock layers, or just hoping to get lucky with little effort. Grids larger than 15 may start to miss even large features such as large clusters, but can be used for identifying stone layers, and can always be filled back in later with shafts on a tighter grid.
With any grid pattern, a (much) wider version could be used to start and to locate specific stone layers/areas, and then filled in later in a tighter pattern where you want if you're not lucky the first pass. If you plan to use the 3-grid pattern (for a 100% tile reveal) later, create your grid with intervals that are a multiple of "3". If you are only looking for veins, features or just don't care, then do as you will and play it by ear later.
Mountain Top Removal Excavation
When the fortress is large enough, nearly every dwarf is standing idle, you have plenty of picks, and just want to mine it all (Environmentalist Hippies can go to HFS!), complete excavation may be in order. The risk of cave-in or stranded dwarves prevents simply designating an entire mountain Channel, but mining the whole thing can be done with minimum player effort.
- Designate up-down stairs on the entire area to excavate, on every z-level. Designate the lowest level up-stairs, and leave a single tile one z-level above undesignated.
- Let the dwarves mine it.
- If any walls are attached to the outermost edge of the excavation area, designate all of the edge stairs Channel to remove them (dwarves will mine them from the neighboring stairs).
- Designate the lowest z-level for Remove Up Stairs. Leave one to prevent cave-in!
- Build a support under the unmined tile (remember step #1?). Remove the last up stair, once everyone is out of the stairs above.
- Link a lever far away, keep away all the
suicidal idiotsdwarves and pull it.
After a long wait, the entire block of stairs will collapse, leaving the entire area safely excavated. The lever can now be removed, and all goodies from an entire mountain can be collected.
Note that, by exposing the mined tiles to sunlight, they no longer count towards the cap for strange moods.
Cavern Discovery
Each 48x48 embark tile has its own patch of cavern floor, and this patch is most easily discovered by digging through the middle of the embark tile. Dig a vertical shaft 24 tiles diagonally in from the corner of your embark, and repeat as necessary for each corner of the embark. A 2x2 site will be completely covered by these four shafts, and a 3x3 site will require five more shafts (i.e. a total of nine) to explore every embark tile.
A default worldgen will create a mixture of large and small cavern spaces, and these spaces may be either open or filled with rock columns. Small spaces can be missed entirely by a 1x1 shaft, and rock-filled ones can have their stone needles deftly threaded by your miners.
