- v50 information can now be added to pages in the main namespace. v0.47 information can still be found in the DF2014 namespace. See here for more details on the new versioning policy.
- Use this page to report any issues related to the migration.
User:Mixtrak/Strategy/part 3
NB: In this section, we talk about ensuring the basic security and self-sufficiency of your fortress. This is the longest section, because you simultaneously need to learn about fortress design, resource management, stone, wood, food, furnaces, stockpiles, workshops, and so on. The material is presented in themes based around particular industries, not necessarily in the order they should be pursued, so read the whole guide to get a sense of how your dwarves should be allocating their time. Don't worry, other sections should all be more brief!
Ah, excellent! Everything's securely inside, behind a stout wagon-wood barrier, so it's time for a leisurely exploration of the dwarven cheese-making industry, no?
No.
Unfortunately, wooden hatches will stop neither troll, nor kobold thief, nor perhaps even a moderately determined badger. And in fact, we're swiftly outgrowing doors of any material. Level II building destroyers like minotaurs enjoy nothing more than a good stone door which they can gleefully grind to powder and snort, shortly before doing the same to your dwarves. There is a simple way to make your fortress pretty well impenetrable, but first it's going to require some workshops, and that means it's time to talk about…
The Fortress Pattern[edit]
Digging a bunch of rooms higgledy-piggledy can cause serious headaches later on, and there are actually a lot of considerations when digging a fortress. Allow me to explain:
- Did you know that cave-ins will punch through floors if there's a space immediately below? That means that alternating excavated floors with solid rock is fairly sensible. Cave-ins suck. Unstoppable cave-ins suck a lot harder.
- Did you also know that pathfinding is a lot more efficient when there's a small number of paths from A to B? That means that, although highly interconnected patterns might be efficient in terms of minimising detours, they slow your framerate a lot. A branching design with minimal loops and a lot of dead ends might make things a little slower for your dwarves, but they speed the game up considerably for the player. In any case, intelligent placement of infrastructure can help minimise hauling time for your dwarves.
- Do you also know what your layout needs are going to be when you have fifty dwarves? A hundred? Two hundred, and a pile of freeloading booze-guzzlers in your taverns? Neither do I. That means a modular approach is desirable, which can be repeatedly adapted to multiple use-cases as your needs change, and also avoids the work of coming up with a new floorplan for every little section of the fortress.
- Did you also know that, eventually, you will probably have good reasons for piping water, magma, and power to and from unpredictable locations in your fort? Leaving a lot of space for this kind of plumbing is also sensible.
- And finally, if there's one resource any embark has in abundance, it's depth. A good fortress floorplan makes more use of the z-axis than any other.
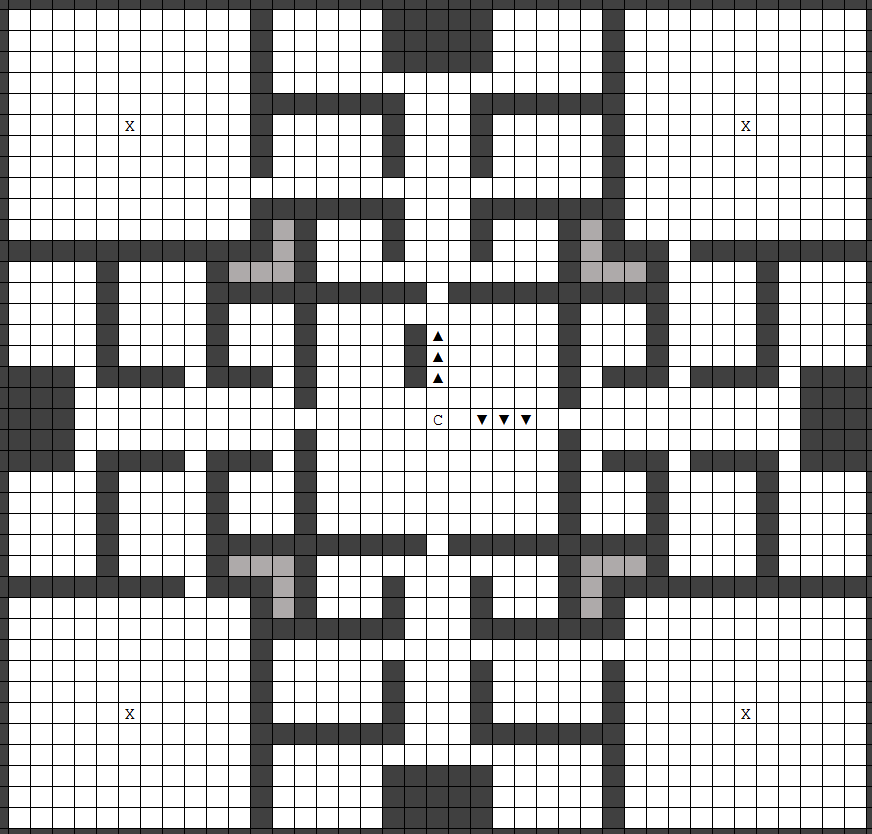
Having considered all these attributes and tried a few zany layouts (did you know hexagons are the most efficient of the self-tesselatory shapes, in terms of space and edge/vertex connectivity?!), I've arrived at the following blueprint. It's pretty efficient, secure, flexible, tileable and shouldn't require extensive remodelling. It might seem complicated at first (you should have seen the beehive fort), but I'll explain the purpose of each feature and once you understand it, it's easier to work with.
As you already know, it's based around a central spiral ramp, and the storage room you've created is right at the centre. Here's what the rest of it is doing:
- In this main level, there are a few large, 11 x 11 rooms with smaller storage attached, which makes it easy to create "districts" devoted to a particular industries and organised processing chains.
- The lighter-grey tiles in the gaps between rooms are actually plumbing ducts, so remember where they go but don't mine them out just now. We'll soon divert some water from the river for farms, wells, hospitals, and so forth.
- The X in the middle of each large corner room indicates up/down stairs. Yes, this design extends to the level above and below, and yes, it's alright to use stairs as long as you don't stack a pile of them on top of one another.
- There are a mixture of large, medium and small rooms which can be allocated in any way you please (bedrooms, stockpiles, workshops, public spaces etc.).
- The corridors extending from the central room in the cardinal directions can be extended beyond the edges of the outermost rooms and then the design can be horizontally tiled, though for now you should focus on tiling it vertically since this is going to be more path-efficient (and doesn't create loops, which are absent from the singly-stacked configuration).
- The corridors are nice and wide so your dwarves don't have to climb over one another (which slows them down) or frequently find their path blocked by another dwarf and try to re-route (which slows the game down).
- It's also fairly secure, because each section can be quarantined by lockable doors (and eventually raising bridges).
- Thanks to the generous gaps above and below, there's also provision for Cleaning#Dwarven Bathtubs - more on these later.
(Before you dive in, be aware that while your miners are doing this the rest of your dwarves shouldn't be standing idle. I have jobs for them in the next sections, so read ahead before unpausing…)
The lowest-oversight way to proceed is to go ahead and designate that pattern, then unpause and let your miners get to work. If you haven't got stone on this level, then it's probably easiest to keep digging until you hit some, then lay out this pattern on the stone layer. As the miners dig, they'll unearth a few interesting gems and bits of ore, but for now, just leave them where they fall. Due to some quirks of Miner#Mining behaviour, you'll actually get individual rooms completed more quickly if you only designate a few at a time. Personally, I'd rather sit on a minotaur's horn than designate tiny areas so frequently, but maybe at least do one of the large corner rooms in this fashion.
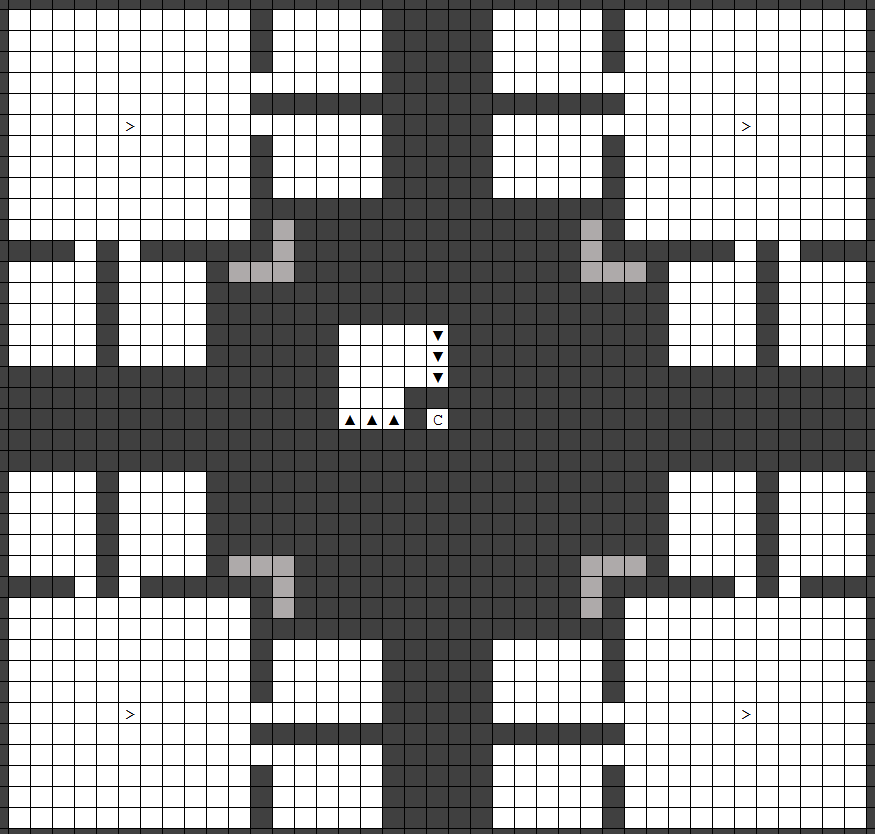
Once the miners have finished this layer, go ahead and mine out the follow pattern on the levels above and below:
That's the upper level, immediately above the middle layer you just dug out. The pattern won't quite be identical in the upper and lower layers: in the corner rooms, obviously, on the upper level you'll designate down-stairs, and on the lower level you'll designate up-stairs. Also your spiral ramp may happen to be in a different orientation to mine - it doesn't matter, as long as it lines up with the levels above and below!
Once that three-level design has been dug out, simply tile it vertically, with a gap between units. For example, if we denote G as a gap layer (spiral ramp only), M as the middle layer where we began, and U and L as the upper and lower floors we just talked about, then vertically the pattern should go G-U-M-L-G-U-M-L-G… and so forth. Keep your miners going in this manner until they hit the first layer of caverns. Those constitute another part of this guide, but for nowmy advice is seal them off and never speak of them again. They are very dangerous! If you get to this stage you can keep your miners busy chasing veins of ores and gems.
So, while your miners are digging away, what about the rest of your frontiersdwarves? First, let's talk about securing that entrance. We're going to need stone blocks for walls and a roof around the entrance, and only raising bridges will stop building destroyers in their tracks, for which we'll need mechanisms. In addition, dragons can burn down stone bridges and mechanisms, so you'll use one of your iron ingots for the bridge, and make the other into a fire-proof mechanism. As long as you're quick enough with the drawbridge lever, that'll keep out everything except ghosts. But there's a bit of a chain of production that needs to happen to get all that in place.
The stone industry[edit]
The first and easiest thing is the stone industry (but this is a long section). Your miners will soon be producing more stone than you can handle, so when one of the larger rooms in the mid-layer is finished, build a some relevant workshops and surround them with a stone stockpile. My preferred layout is as follows:
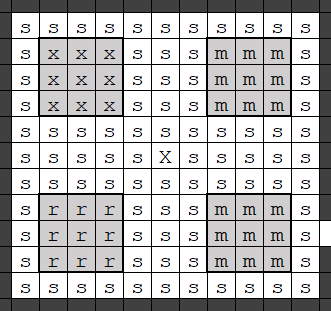
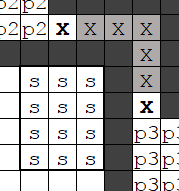
This diagram shows the upper-left quadrant of the middle layer.
s = stone stockpile
m = mason's workshop (yes, two - there's a good reason to add extra masons soon)
b = block stockpile
x = mechanic's workshop
r = craftsdwarf's workshop
Designate the 11 x 11 stone stockpile first, then make 3 x 3 cutouts for the workshops. Exactly which workshop goes in which 3 x 3 space doesn't particularly matter, but otherwise it's laid out this way for several reasons. Placing the stone stockpile right next to the workshops which use it saves the poor bastards from lugging it all over the map, which can take forever - set the stockpile to "give" to these four workshops, so they only use stone from the stockpile. Lugging stone to stockpiles is faster, because you will now go into stockpile options and assign it three wheelbarrows. Even so, your craftsdwarves will often use up the stone faster than it can be hauled, so a large stone stockpile gives you decent reserves.
A Subtle Appreciation of Stone[edit]
There's a few more changes you need to make (stockpile management is complex). First, not all stones are appropriate for crafting in these workshops. Have a look at all the different types of Stone your miners have encountered, and individually look them up on the wiki. In addition, read The Non-Dwarf's Guide to Rock. In this stockpile, you should only enable stones which are present on your map and which don't fall into the following categories (here begins an educational but brief detour into the subject of satisfying dwarven preferences):
- Ore: later, we'll smelt these into metal bars
- Economic stone: this category includes Flux stones such as marble (required for making steel) and fuel sources such as lignite
- Stone which is used to make Gypsum plaster
- "Other Stone" which is too heavy and inefficient to haul: cinnabar, pitchblende and cobaltite. Later, we can use these as ammo in catapults and stone-fall traps
- Stones which are otherwise unremarkable (again, under "Other Stone") but which should be reserved for when you have highly-skilled craftsdwarves better able to satisfy your citizens' Preferences, by two criteria:
- Any stone can be a dwarf's favourite, but some are quite rare. Anything in the table at Stone#Other Stone is somewhat rare (not forming entire layers); stones which lack a "V" or a "L" in the "Found in" column are particularly rare.
- Similarly, stones which are both (somewhat) rare and have a rare colour, since dwarves can also have a favourite colour. This category includes:
- Dark red: Bauxite (large clusters). Colour substitutes include kaolinite (but better to use that for porcelain), hematite (much more valuable smelted into iron!) and, for some items, blood thorn wood (only found in the deepest cavern layer)
- Red: Petrified wood and realgar, present as small clusters. Colour substitutes include cinnabar (moderately abundant in veins but impractically dense for general use) and, for some items, goblin-cap wood (though only found in the very dangerous second and third levels of caverns)
- Green: Olivine (large clusters) and serpentine (small clusters within olivine). Since these are the same colour, best to use the more abundant olivine for satisfying colour preferences and save serpentine for the more specific material preferences. Colour substitutes include malachite (more valuable as an ore of copper) and green glass (particularly if you have sand on the map, and even more so when you get magma power)
- Dark Blue: Kimberlite (veins). Colour substitute for some items is nether-cap wood, but only available in the 3rd cavern layer
- Blue: Cobaltite (veins). Too heavy for general use but literally the only straight-blue material in the game.
- Purple: Pitchblende (too heavy for general use anyway) and rutile (both small clusters). Colour substitutes include black bronze, which is more valuable and not otherwise very useful, so actually better for satisfying colour preferences, and glumprong wood (only found in evil regions so, apart perhaps from trade, you shouldn't be going anywhere near the stuff)
- Finally, jet (large clusters). Jet is the lightest stone in the game, so it's best saved for making lightweight stone pots which will be faster to haul about. If you're lucky enough to find it, you can make a dedicated stockpile somewhere which gives to a dedicated craftsdwarves' workshop and only make your stone pots from this workshop. There's a speed benefit to using the jet as soon as you find it, but you may also wish to use heavier materials for now and save your jet for more skilled craftsdwarves which will be able to do the material justice. More mature fortresses with ordinary Clay (not fire clay) on the map have an alternative, which is to make earthenware pots (essentially the same weight); these are more costly to produce, however, since you need a potter, a glazer, some glazing material, a pottery kiln, and one unit of fuel each for firing the clay and glazing the pot.
Finally, after setting the stockpile options to allow only the stones which are both present on your map and not reserved for any of the uses described above, open the z-menu, go to "Stone" and disable all "Other Stone" except the ones allowed in your stockpile.
This seems like an awful lot to think about and a lot of work, I know, but trust me. For one thing, this is important education in game mechanics - Dwarf Fortress is a game of detail, and although it’s a lot to take in at once you're going to need to get this fine-grained sooner or later. Secondly, we can better understand and control the complex interplay of materials, stockpiles, workshops, products, and individual dwarven quirks by making each area as specific as possible and therefore as simple as possible. That means, as a general principle, it's a lot more work to go through all the menus and individually disallow things you aren't currently using; better to disallow as much as possible and then individually allow things as they become available/needed. Another reason this approach works well is because of the sheer amount of z-space you have to play with in Dwarf Fortress. When you come across a new resource or bring a new part of your industry online, there's no reason not to set up a dedicated area.
The Many Uses of Rocks[edit]
Alright, back to the diagram. The other stockpile is for blocks, which I prefer to have close to the central spiral for faster deployment. They get a smaller pile than stone because, although we need a lot, they can be stacked fairly efficiently in bins. Again, go into the stockpile settings and turn off everything except the blocks made of the stones allowed in your stone stockpile.
For the other products of these workshops, we'll use the layers above and below. On each of those layers we'll have 1 x large space and 4 x medium spaces to work with (so 2 + 8). In addition, there's a medium room in the middle layer across the corridor from the blocks, and two more at the end of that corridor But what should go where? There's a confusing diversity of products from the mason's and (in particular) the craftsdwarf's workshops. Again, our principle should be to disallow everything, and the allow only what we have and need right now (or in the near future). Taking that into consideration, here is my recommended allocation. In this list, "f" denotes a furniture stockpile, and "g" a finished goods stockpile.
- Large spaces above and below:
- f1: Mechanisms
- f2: Large pots
- Medium spaces above and below:
- f3: Less-used barriers (hatch cover, grate, floodgate)
- f4: (semi-)Functional furniture (armour stand, weapon stand, quern, millstone, traction benches)
- f5: Storage (cabinets and coffers i.e. "boxes and bags" in the menu)
- f6: Dining (tables & chairs i.e. "thrones" in the menu)
- f7: Decorations/memorials (statues, slabs, coffins)
- g1: Toys
- g2: Musical instruments
- g3: Crafts for trade goods (figurines, amulets, scepters, crowns, rings, earrings, bracelets)
- Off the hall:
- f8: Doors
- g4: Mugs i.e. "goblets" in the menu
- g5: Tools, which includes nest boxes for now, and eventually bookshelves and hives
Aside from the general locations (large 11 x 11 rooms vs. adjoining medium rooms vs. medium rooms off the corridor), it doesn't particularly matter exactly which goes where.
These stockpiles cover all the products of the mason's workshop, the mechanic's workshop, and all the stone items you should be producing from a craftsdwarf's workshop in the short-medium term. There's one section of the "Finished goods" stockpile in particular which is a bit of a grab-bag of various classes of objects: Tools. For now, we deal with it by avoiding the manufacture of anything except a nest box or two. Later, I discuss easy ways of managing this heterogeneous category by ensuring that different tools are made from different materials. Finally, in each of the finished goods and furniture stockpiles, you should disallow all materials other than the stone(s) permitted in your stone stockpile. Make sure you still allow all quality levels (both core and total), though!
Efficient placement of workshops and stockpiles is crucial because your list of jobs will usually far exceed your available dwarf-power. Logical and highly-specific compartmentalisation of industry process-chains is also essential to understand and control what is being produced from what, and where things are being stored. you should read about this.
Don't immediately queue up a bunch of jobs, because we'll need to wait until the stone stockpile is fairly well-stocked if we're to avoid running out and the ensuing job cancellations. But once it's pretty full, here's your list of production priorities:
- Mason's workshop: four thrones and four tables makes enough dining sets to prevent your dwarves getting uppity about having to eat standing up (the prima donnas). Then make a stone hatch cover to replace the wooden one over your entrance, and set stone blocks on repeat. You can never have too many stone blocks, and we'll need a lot to build workshops and a more secure fortress entrance
- Your mechanic's workshop should likewise have mechanisms set on repeat. We'll need a fair few for various devices (bridges, wells, grates, floodgates) and the levers to operate them. Stop if your mechanism stockpile gets full, though - that should be plenty.
- The craftsdwarves' workshops should make about seven stone mugs (which your dwarves find preferable to dunking their beards directly into a tub of booze, the bourgeoisie swine), a nest box or two for your blue peahen to lay eggs, and then have stone pots set on repeat - you'll need quite a lot of these. We're substituting them as far as possible for barrels, because your supply of wood is more limited than stone. Weight-wise, a stone pot weighs 1/4 as much as a barrel of the same material and has the same capacity; this makes (heavier but abundant) stone an attractive material for containers compared to (lighter but less abundant) wood. Monitor your pots stockpile - you should maintain a good buffer supply. When it fills up, however, you may as well make other goods to start anticipating future fortress needs: queue up a few more goblets, some instrument parts, some toys (für die kinder, die kleine kinder), and then put rock crafts on repeat. Those will use up excess stone and give you something to trade when the first caravan arrives - just be sure to suspend these jobs whenever they're holding up some other task.
Having tasks set to repeat is not something to be done lightly. Every item has significant hidden costs - haulage time, storage space, framerate - so in general it's better to try to roughly estimate needed quantities and add only a small buffer. I've made an exception for stone blocks because we're going to need hundreds in short order, and thousands not long thereafter, so there's no reason to cancel that particular repeated job. And rock crafts are space-efficient, use up an incredibly abundant resource, and can be traded for far more useful and rare items. At any point, however, if your craftsdwarves are being kept busy in their workshops but you want them to do something else, just suspend the workshop jobs until they've finished the other work.
What will we need all those stone blocks for? Well, I'll show you:
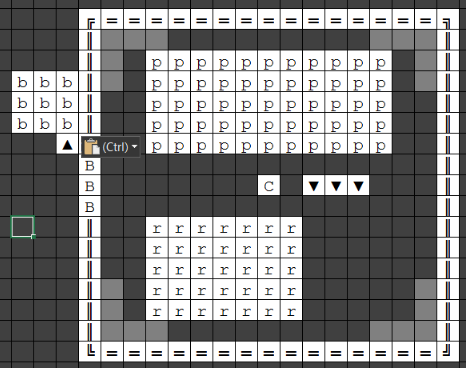
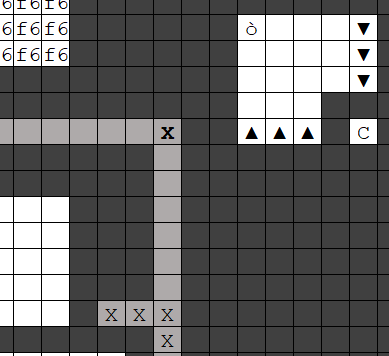
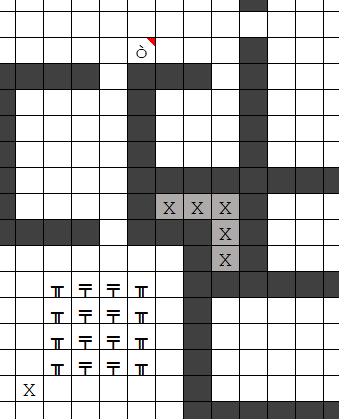
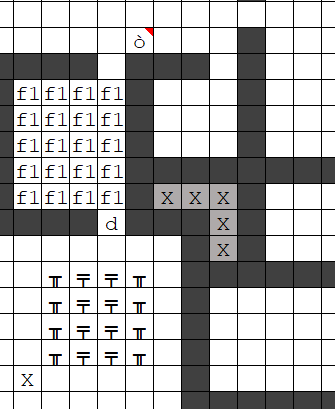
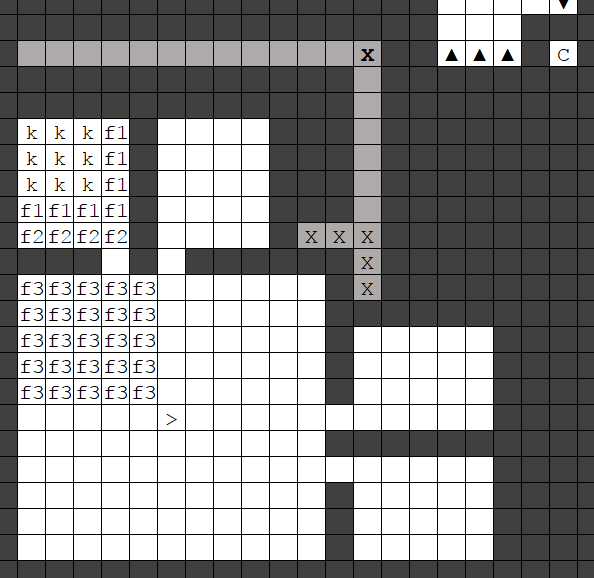
That, you may remember, is the surface entrance to your fortress (remember, the light grey tiles are just a reminder about where plumbing might be installed) , but with a few new features. First, designate another blocks stockpile (denoted by "b" in the diagram), and remember to give it the same settings as the previous blocks stockpile. In addition, set this one to take from the one inside. Construction will proceed much faster with a local stockpile (this strategy of using helpfully-placed "feeder" stockpiles, which you should have read about in the links above, is extremely versatile and effective, and you'll see it a lot).
The other new features are made from these stone blocks, and should be constructed as your mason makes them available. First, it's surrounded by a wall (the double lines) . The B stands for "Bridge", which I'll get to in the next section, so leave it empty for now. But once the wall is done, build the ramp just next to the opening where the bridge is going to go. Finally, roof over the whole area - but there's no need to construct floors directly over the walls themselves, only the open spaces. You'll need somewhere north of 300 blocks for this entire structure (I haven't done the precise arithmetic). Fortunately, one piece of stone makes four blocks.
This fact is behind one of the arguments against using stone blocks: you'll soon have an over-abundance of stone, so using the raw stone will help de-clutter your fortress. The other argument is defence. If I'm understanding climbing correctly, it's impossible to climb walls made from smoothed natural stone, but block walls can be climbed. By all means, if you find these arguments persuasive, simply use natural stone in your building projects, or perhaps at strategic defensive points. Personally, in the early game I find the need for materials is greater than the supply of stone - so making blocks stretches it further - and the much lighter weight of stone blocks is important due to the limited supply of hauling labour, so I'd still recommend making all your constructions and workshops from stone blocks. In addition, climbing invaders can be easily excluded by adding a slight overhang, and anyway the roof makes this structure completely airtight.
Our entrance is nearly secure. Once we build the bridge, we can tell any invader…
You Shall Not Pass[edit]
Building the Bridge itself is actually pretty easy. Follow the menu options to make a bridge which is three tiles long (so wagons can fit through), one tile wide, and raises to the east. Place it in the gap and choose "iron bar" as the building material. You architect/mason will come along and design the thing, but building it requires the Metalsmith labour. I recommend temporarily activating this for your mechanic/stonecrafter, then disabling it once the bridge is done.
Bridges are operated by levers, so build one from a stone mechanism. Where? Well, when danger threatens, you'll want plenty of dwarves nearby so the lever gets pulled as quickly as possible (as the Titan strides towards your fortress you will be screaming at them to hurry up) - so place it in the map centre tile, in the middle of the spiral ramp, in your middle fortress layer (the first layer you dug out, with all the mason's workshops). There will still be a stockpile tile here, since this is the room where we dumped everything from the wagon, so just remove that single stockpile tile in order to build the lever there. Now, you're eventually going to accumulate a fair few levers throughout the fortress, and it's surprisingly easy to forget what they do. Place a note on this lever tile saying something like "Main fortress entrance bridge".
We now need to connect the lever to the bridge, which requires two mechanisms. A stone mechanism is fine for the lever side of the connection, but not for the bridge side, because it'll melt under dragonfire, rendering your bridge inoperable. We need to make an iron mechanism from the other iron bar we brought along at embark. This requires a few temporary labours, for which I'd recommend (again) your mechanic/stonecrafter.
First, enable wood burning and metal crafting. Then, in any spare room or rooms (doesn't matter where - these are temporary structures) build a metalsmith's forge (which will require your anvil) and a wood furnace. Make two units of charcoal in the wood furnace - you still should have a couple of logs lying around from your wagon - then make two iron mechanisms at the metalsmith's forge, which will consume the charcoal and two of your iron bars. Deconstruct the two workshops and then turn off wood burning and metal crafting on your mechanic/stonecrafter.
Finally, link the lever to the bridge, making sure that the iron mechanism is selected for installation in the bridge, and a stone mechanism is used for the lever! I know, I know, you made two iron mechanisms, but that second one will be needed for something else…
Congratulations! Now when danger threatens, you can raise the bridge and nothing (except ghosts) will be able to get into your fortress. There's still a long way to go security-wise, but you're doing well so far.
Wood industry[edit]
The first step in setting up a wood industry will be fairly obvious should you tax your faculties even a little: cutting down trees. For starters, you'll want to cut down at least thirty or so. With any luck, you should find these within a reasonable distance of your fortress entrance, but may have to send your woodcutter further afield. In fact, you may wish to spare any fruit or nut trees close to the fortress entrance, since this makes your herbalist's job quicker and safer. Obviously this makes woodcutting one of the most dangerous professions in the fort, so make it a habit to frequently monitor the (U)nits menu for threats.
When designating, set the designation as priority 6 (higher numbers are actually lower priority jobs). Your woodcutter is also your carpenter, and at the default priority of 4 will tend to spend all their time felling the trees you designated and none actually using the products. This way, when there are logs available and carpentry jobs to be done, they will get done. You can therefore designate a fairly large area of trees all at once - say, a 66 x 66 square centred on your fortress entrance - and when you've built up a fair stockpile of wood just queue up your carpentry needs. Your woodcutter should then switch over to carpentry jobs until the jobs or the logs run out.
What carpentry jobs? Well, right now, you'll need a few barrels, wheelbarrows, beds and (plenty of) storage bins. Soon, however, you'll want buckets, splints and crutches, and cages; then there's charcoal and ash, siege equipment, pump components and more…
Unlike stone, there are not many special kinds of wood you need to worry about at this point in the game. One consideration is to reserve the unusually dense bloodthorn and glumprong for ballista arrows, so disable those from the wood stockpile. And nether-cap wood has the strange property of maintaining a constant freezing temperature (exactly ten thousand degrees Urist), which obviously can be helpful around magma or for fire-proofing your booze stockpile, but there's no shortage of other magma-safe materials so I wouldn't bother disabling this. For now, in any case, you're unlikely to have access to these woods, since glumprongs grow in evil areas (and you didn't embark there, right?) an the other two are found in the deep caverns.
That said, you may be lucky enough to have access to one of the three particularly low-density species; feather tree, candlenut, or kapok. If so, it's probably worth setting up a dedicated stockpile and workshop (drawing on the lessons from setting up the stone industry) to manufacture bins and barrels and take advantage of the increased hauling speeds. Some more common trees like willow are about 65 % of the average weight of other woods, but to my mind that's not worth setting up a whole separate facility. There's one caveat: usually you can get lightweight logs by trade (especially feather tree wood from the elves), so if you really want maximum hauling efficiency then you can set up a lightweight wood facility now and make containers as and when it becomes available, trading away your heavier containers as you generate enough surplus.
Wood industry layout[edit]
Assuming you're not setting up a separate lightweight-wood facility, the wood industry layout should be very similar to the stone industry. Make a large wood stockpile in one of the empty 11 x 11 rooms in the middle layer (it doesn't matter which one). Set it to refuse glumprong and bloodthorn as well as any of the other woods you wish to reserve for special uses as described above. Remove four equally-spaced 3 x 3 cutouts around the edges, one tile from the walls, same as you did with the stone stockpile, and in those spaces build a wood furnace, a carpenter's workshop, a craftsdwarf's workshop, and a bowyer's workshop (it doesn't really matter where, but the carpenter's workshop and wood furnace are going to be used the most so maybe place these closer to the entrance). Note that the wood furnace and bowyer's workshops won't actually get constructed until you have some dwarves with those labours enable. All in good time. Set the wood stockpile to give to each of these four workshops.
Some players will recommend setting up a feeder stockpile for wood near your timber-felling area, but personally I don't see the point. Your dwarves will schlep all the way outside to pick up a log, travel a few tiles to drop it in a stockpile and then… what, go all the way back inside, empty-handed, to find another job? Seems less efficient to me. However, any future stockpiles within the fortress (such as near the siege workshop) should be set to "take from links only" and take from this wood stockpile (except for the "reserved" uses discussed above, which obviously should have their own supply chains).
For right now, your main wood product is going to be storage bins and cages, but eventually you'll need to start cranking out charcoal to support the metal industry. Along the way, there are plenty of other items needed in small to moderate batches, so we'll make space for those as well. Again, we have the two large rooms for stockpiles surrounded by eight medium rooms, and four medium rooms in the hallway. With that in mind, here's the recommended setup:
Large rooms:
- f1: Bins
- a1: Cages (animal stockpile)
Medium rooms:
- w1: Crossbows (weapon/trap components stockpile)
- g1: Splints & crutches
- g2: Wheelbarrows & stepladders
- r1: Shields (armour stockpile)
- w2: Corkscrews
- f2: Pipe sections
- f3: Beds
- b1: Ash bars (bars and blocks stockpile)
Medium rooms off the hallway:
- b2: Charcoal bars
- f4: Barrels
- f5: Buckets
- Nil (dormitory)
As before, make sure you disallow all item and material types except the ones you want (for wheelbarrows and stepladders, enable "tools"; to keep these separate from other tool stockpiles, we won't be making any other wooden tools). Additionally, for the animal stockpile, disallow all creatures and empty animal traps (so only empty cages are allowed). We'll make separate stockpiles for caged creatures and animal traps later.
Priorities for wood usage[edit]
Once the industry is laid out, what should your carpenter be producing? First, make three wheelbarrows for the stone stockpile, to ensure your stone industry hums along. You don't have to assign them to a stockpile or anything - once they become available, your dwarves will haul them to the stone stockpile and start using them. You can either remember to make more wheelbarrows every time you make a new stone stockpile (unreliable), or periodically check your supply of wooden tools (wheelbarrows and stepladders, in the finished goods stockpile listed above) to make sure you have a few in surplus.
Next, make about twelve beds (yes, that's a few extra) so your princess-and-pea dwarves don't get precious about having to sleep on the floor. Install (build) them along the walls of the unused medium room off the corridor, and then use the building menu (q) to create a dormitory. Your dwarves will sleep here until they get bedrooms of their very own, and even then it can come in handy to accommodate large migrant waves when you haven't prepared enough bedrooms in advance.
Next, queue up about ten barrels. Stone pots are more weight-efficient for general hauling, but barrels are absolutely required for (for example) dyer's shops and asheries, so it's good to have a few lying around. In the stockpile menu, set a reserve of about ten barrels; this will set them aside for those purposes - or brewing. That means if your supply of stone pots runs low (as it often does in the early fort), your barrels may still all get used for brewing, and you'll need to construct extra when you build an ashery or dyer's shop anyway, but any dwarf would agree that at least they went to a good cause.
Make about ten bins for immediate storage. We'll make more later, but will get a few other odds and ends out of the way first. Next, if you have any fruit or nut trees on the map (and most nice embarks do), make a couple of stepladders for your herbalist to take a-gathering. A few splints, crutches, and buckets will also (inevitably, unfortunately) come in handy for treating injuries and moving water around. Finally, set bins and cages on repeat until those stockpiles are full, and monitor the levels. A fortress requires a staggering quantity of storage bins, and cage traps are so ridiculously effective that for this guide - again, making things easy for ourselves - they'll constitute the majority of our defences until we have a sufficiently formidable military.
After that, it's tempting to prepare hundreds of beds and shields ahead of time for when your fortress needs them, but I think at this point it's more important to get as many logs on the ground as possible, so send your woodcutter/carpenter on a non-stop tree massacre. Since trees are renewable, you shouldn't harbour any concerns about extirpating all the apple trees and missing out on delicious cider (and there should be enough other plants for your herbalist to gather that you won't be reliant on fruit and nuts from trees). Plenty of time for that later - the elves haven't heard of your fortress yet, so make the most of it…
Victuals[edit]
Dwarves have hearty appetites for food and (especially) booze. Let's talk rationing: dwarves require about two units of Food and five of Alcohol per season, and the default embark loadout gives you 60 units of alcohol (60 / 5 / 7 = 1.7143 seasons) and 45 units of food (45 / 2/ 7 = 3.2143 seasons). Clearly, it's best not to tarry setting up a food industry.
Sure as Eggs[edit]
Fortunately, although there's a significant lag before farms will produce goods, we can begin producing food and booze immediately thanks to our herbalist and our trusty egg-layers. And remember, if things go pear-shaped and you do happen to encounter a severe food shortage, you shouldn't hesitate to butcher your pack animals. That's not difficult, but not covered here.
The victuals industry will occupy another quadrant of our three-layer setup. First, in one of the medium rooms off the corridor, make a pasture and assign your blue peafowl, then build enough nest box(es) for the female(s). The returns on animal breeding compound so you may as well start right away, but that means you'll need to prevent your dwarves harvesting the eggs and let them hatch. Get your mason to build a door, place it in the doorway to the nesting room, and toggle the door's "keep tightly closed" option to on, so your peafowl can't escape. Then, once they and the next boxes are all inside, toggle "forbid passage" to on, so your dwarves can't get through. The eggs will incubate safely away from the hungry hands of you dwarves, and eventually you'll have a clutch of new peafowl. Un-forbid the door, build enough new nest boxes to accommodate the new females, rinse and repeat. When you're ready to switch from breeding into egg production, then just un-forbid the door and your dwarves will harvest the eggs as they are laid, and before they have a chance to hatch. Peachicks grow to adulthood (and full size) after only a year, at which point the females will begin laying and you can butcher all but one of the males. A handful of laying females - five or so - should provide more than enough eggs to supplement your diet, but if you wish to expand your flock even further then you may need a larger room, so the animals don't get overcrowded and start attacking one another.
Watering the Farms[edit]
While there's a dizzying array of outdoor Crops, our indoor farms are much simpler and easier to understand, so we'll start there. Farms are also incredibly productive and located safely indoors, but unlike gathering wild plants, they require a little infrastructure and time - best to start right away.
You may be lucky enough to have quite a few soil layers below the minimum depth I recommended digging the fortress, in which case setting up farms is a doddle - simply build some farm plots on the dirt tiles, and you're ready to go (I'll show you a recommended layout soon). However, it may have been necessary to build your fortress levels below the soil horizon, and you can't farm on rock. Fortunately, we can pipe in some water to muddy the floor and prepare it for cultivation. Since you're going to need a secure supply of fresh water anyway, it's prudent to set it up early on.
There are two main considerations when piping fresh water into your fortress: flooding and security. We will deal with both by a combination of floodgates and bridges, but it's probably a good idea to go read up about Pressure. The project starts near your river (in which category I include brooks) - you did embark on a map with a river, didn't you? If not, you have two (possibly three) choices: pipe in water from murky pools on the surface (in which case you should read about Water#Contamination), pump it up from the first layer of the caverns (but be bloody careful), or melt ice (if you have it). Those are beyond the scope of this guide, but good luck!
Flooding of the fortress is a concern, but easy enough to control with floodgates. The second obvious risk of piping water into your fortress is creating a security vulnerability. Grates are handy because they can prevent the passage of creatures without obstructing your water supply (and can be operated remotely with mechanisms), so we'll use one of those, but none of these (unless you're lucky enough to get an artefact-quality set of grates) will prevent building destroyers smashing their way through. Once again, we'll use an iron bridge to control access in case of marauding dragons. It would seem nonsensical for a dragon to shimmy down your plumping and try to torch a bridge while immersed in water, but Dwarf Fortress doesn't always make sense. Veteran players tend to develop something best described as "rational paranoia", and you, too, should cultivate it assiduously. Once the iron bridge is in place, I'd recommend leaving it raised by default until you need a top-up (or, later, when we set up a secure fishing hole).
In this design, the iron bridge is the external barrier, located close to the river so it can both protect the other infrastructure and (if necessary) shut off flow from the river for maintenance or remodelling. Your nearest river tile may be right near the edge of the map - your dwarves should still have enough time to close it before invaders can dive in, but if you have any doubts then by all means create a backup iron bridge somewhere in the pipes further from the edges. I haven't allowed for this in the embark iron requirements, however, so you'll need to smelt some.
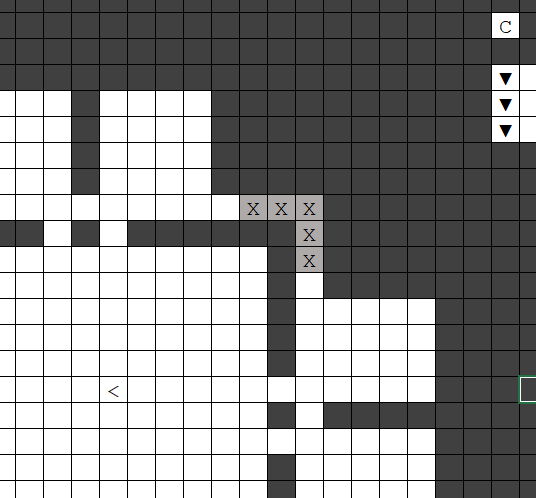
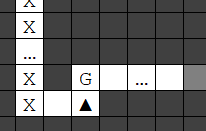
Let's start digging the pipes from the inside of the fortress. On the lower level of the quadrant where you wish to place the food industry, connect the medium-sized rooms to one another and the plumbing shaft, and dig out the plumping shaft using up/down stairs like so:
We're using the lower level for farming because there's no drainage, so we can easily cover the floor with water.
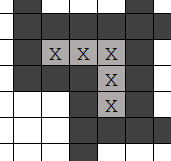
Water can happily flow through stairs, and by using those to excavate the pipes, your dwarves can use dry plumbing shafts for access to the levels above and below if necessary - such as right now, as your miners continue digging upwards through the next level (the middle fortress layer; note there's no connection yet to any of the surrounding rooms):
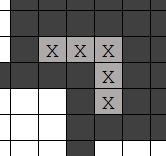
And the next (upper fortress layer):
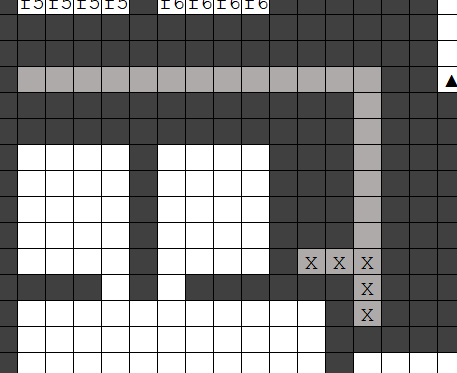
Now, using regular mining designations (i.e. not stairs), extend the plumbing shaft from the inner corner to the edge of your fortress blueprint on this level (and wave hello as we go past our old friend the stone industry, barely visible along the top edge):
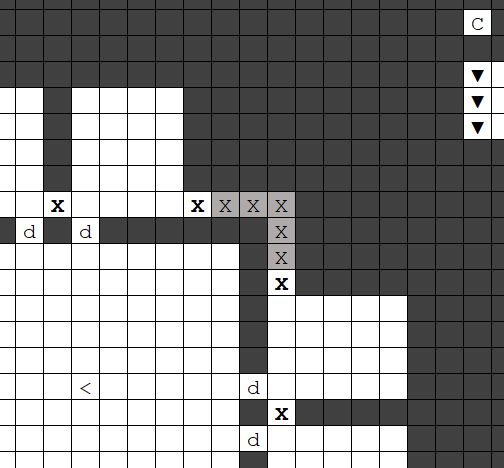
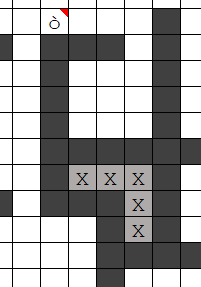
That's the internals done. But before we connect it up to the river, you should install a master floodgate (essentially the "mains water tap" to the whole fortress) and some farm floodgates. Confusingly, in Dwarf Fortress floodgates are denoted by "X" - the same character used for up.down stairs. To differentiate them, in these diagrams the floodgates will be shown in boldface text. Get your mason to make five stone floodgates for these, and make sure you have plenty (around twenty) of stone mechanisms on hand for levers and linkage.
The mains tap goes here, with an accompanying lever in the central spiral ramp, so build them and connect them up:
Remember to bring up the Notes menu and write a note on the new lever to the effect of "Internal fortress water mains floodgate".
Also note that floodgates are installed in the closed position; this may trap your miners until the lever can be connected and flipped. That's not a concern, since they'll soon dig themselves out at the other end anyway.
The farm floodgates go on the lower level, in the connections between medium-sized rooms and with the plumbing shaft. In addition, get your mason to build 4 stone doors (d) for these rooms:
To make things easier to remember, it might seem reasonable to place the lever right next to the floodgates.
Under no circumstances should you do this.
Flowing water pushes dwarves around and can get deep very quickly; it's very possible that they won't be able to fight the torrents of water to pull the lever again and shut off the flow, which risks flooding your fortress. We've installed a mains tap upstream, which gives us a backup, but it's still very easy to flood an entire level while you're distracted. It's best to place floodgate levers where they can still be accessed in case of flooding. With that in mind, put the lever for the farm floodgate in the corridor on the level above (i.e. the middle fortress layer), connect up the four floodgates, and label it appropriately:
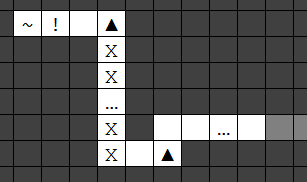
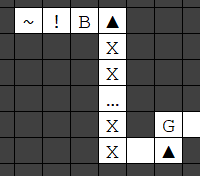
Now you're ready to dig the external component. I'll use a side-view diagram to show this:
In this diagram, the light-grey tiles are the last bit of internal piping you dug (in the upper fortress layer) before installing those floodgates just now, so this is a continuation of that shaft. The ~ is the nearest river tile to your fortress entrance, ! is the tile you absolutely do not - DO NOT - wish to channel until everything is in place, … indicates that your fortress location may require this section to be expanded (and indeed you may need to divert the shaft sideways as well), the X are up/down stairs, and the up arrows are to be designated as up-ramps. It's absolutely critical that the empty space nearest the river (immediately to the right of the !) is located neither orthogonally nor diagonally adjacent to any water tile, otherwise it will be flooded.
Your miners should be able to exit the shaft now. Get your mason to make a grate and install it as a floor grate on the tile above the internal ramp, denoted as G in this diagram:
This grate will admit water but exclude items and (non-building-destroyer) creatures. It has to be a floor grate as there's a bug where flowing water will occasionally push creatures through wall grates. Connect it to a new lever next to the fortress water mains floodgate lever, and remember to leave a new note.
Next, build a single-tile iron bridge between the ! and the up-ramp which retracts to the east:
Connect it to a new lever next to the grate lever, and remember to use your last iron mechanism for the bridge-side component. Create a new label to the effect of "river supply iron bridge".
Congratulations! You are ready to pipe some water to your fort. Set the four doors to "Keep tightly closed" and "Forbid passage" (after you've made sure nobody is stuck inside), open all the floodgates (the bridge should already be built in the extended position) and make sure the floor grate is closed so your woodcutter isn't tempted to use the shaft as a shortcut.
Once your dwarves have all vacated the shaft, you can channel out the ! tile (by designating the tile above, remember?) to send river-water pouring into your fortress and into your farm rooms. While they're filling up, you should pave over the two holes in the surface of the shaft by constructing stone block floors - one above the !, and the other above the up-ramp two tiles to the right.
Keep an eye on the water Water#Depth on this lower (farm) level. Water in Dwarf Fortress is actually fairly viscous and slow-flowing, so you may have a couple of tiles of 2/7 near the shaft but still have plenty of dry tiles in the corners of the rooms. Our goal is to get 1/7 water to touch every tile in the medium rooms on this level while minimising the number of 2/7 depth tiles, which never evaporate (fortunately, we have the large 11 x 11 room in the middle as overflow in case this happens). Once there are a total of about 10 tiles still dry in the medium rooms, close the floodgates by pulling the lever and using the n button to make it high-priority ("Do task now!"). By the time your dwarves get around to this, it's likely that the rooms will be covered in 1/7 water and probably have a few 2/7 tiles. To get rid of these and allow the water to start evaporating, simply remove the doors to allow the water to spread. At this point, I'd also recommend shutting off the mains water floodgate and raising the bridge, for safety.
Congratulations! You now have arable stone. More importantly for the longer-term, you have a secure supply of clean water, and the plumbing to get it where it needs to go. This is essential for any fortress, but can be tricky to engineer so most players leave it until it's too late. We're eventually going to do a lot more with reservoirs, waterfalls, fishing holes, wells, hospitals, bathtubs and swimming schools, but that's quite enough plumbing for now.
Plants are complicated[edit]
Eggs were the easiest part of the food industry - plants are rather more complex. One simple and important distinction is between the plants you can grow indoors (the seeds you embarked with) and those your herbalist will be gathering from outside, because we're going to treat the two categories rather differently.
Raw plants can be processed in many ways - cooked, brewed, milled, extracted and so on - and have different uses at each stage - not just food and drink, but also trade and textiles. Our immediate needs, of course, are food and drink, and we'll use that lens to cut through the complexity for your early fort. The following arms of the food industry are too fiddly and not urgent:
- Milling, while eventually very important, requires a fair bit of labour and a supply of empty bags
- Some seeds can be milled into a paste (e.g. rock nuts) and then (olives can skip straight to this next step) pressed to yield Oil, which can be cooked or made into soap, and a dry cake, which can be cooked. This requires milling, in addition to jugs and screw presses and associated labours, so we'll skip it for now.
- Some plants can be processed into thread for the textile industry or slurry for the paper industry. That will crop up (heh) later in this guide.
- Valley herbs can be processed into golden salve, which is a useless but high-value trade commodity, providing you have glass vials available. You don't, and that doesn't matter; cook them instead.
- Quarry bushes can be processed to bag, yielding rock nuts and cookable quarry bush leaves. This requires bags, so we'll defer this - we'll simply plant our rock nuts and harvest the quarry bushes, which will accumulate in our stockpiles until we don't have any rock nuts left to plant or quarry bushes to harvest. No biggie.
That being the case, we are interested only in the following use cases, which possibly overlap for each crop:
- Direct eating of the raw plant, which (usually) produces seeds. Examples: plump helmets, apple
- Brewing of the raw plant, which (usually) produces seeds. Examples: plump helmets, millet, pig tails
- Cooking of the raw plant, which destroys seeds. Do this for all the outdoor (gathered) plants, but not for any of your indoor (farmed) crops, or you may run out of seeds!
- Planting of the seeds - only for indoor plants
- Cooking of the seeds - only for outdoor (gathered) plants!
- Special case: sweet pods can produce a large amount of cooking ingredients by being processed into "dwarven syrup". This is buggy, but we have a simple workaround which will also allow us to cook booze.
Dirt farmer[edit]
There's a vast diversity of outdoor plants you might encounter, so for starters we're going to focus on the six indoor, farmed plants. The following table lists the plants, their growing season, and what we will be using them for (for much more info, see the tables on the Crop page).
| Plant | Growing season | Early-fort uses |
|---|---|---|
| Dimple cups | All seasons | Nothing: plant all seeds, wait for textile industry |
| Pig tails | Summer & autumn | Brew dwarven ale |
| Cave wheat | Summer & autumn | Brew into dwarven beer |
| Sweet pods | Spring & summer | Brew into dwarven rum; process to barrel as dwarven syrup |
| Quarry bushes | Spring, summer & autumn | Nothing; plant all seeds and wait for textile industry |
| Plump helmets | All seasons | Brewing into dwarven wine (and occasionally eating raw) |
Go to the z-menu and select "Kitchen" to make sure none of these crops are allowed to be cooked, and all are permitted for brewing.
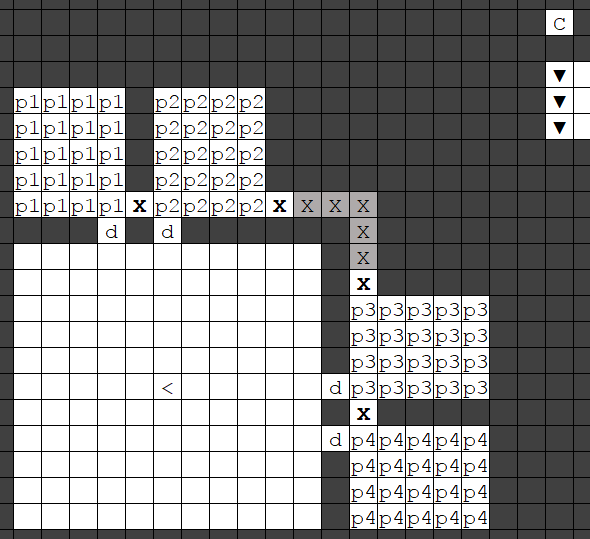
Time to start setting up your farming area. In the muddied medium rooms, build four 4 x 5 plots (you may need to wait for the water to evaporate) like so:
We're going to have a different seasonal rotation in each one.
| Plot | Summer | Autumn | Winter | Spring |
|---|---|---|---|---|
| P1 | Pig tail | Pig tail | Dimple cups | Sweet pod |
| P2 | Pig tail | Cave wheat | Dimple cups | Quarry bush |
| P3 | Pig tail | Pig tail | Plump helmets | Sweet pod |
| P4 | Pig tail | Cave wheat | Plump helmets | Quarry bush |
You want extra pig tails for the textile and paper industries later on. This growing pattern won't need much tinkering with as the fortress expands - we'll just be able to use the plants in different ways.
In the inside corner of the large 11 x 11 room, designate a 3 x 4 food stockpile and restrict it to just allow the seeds for these six plants.
Don't forget to turn off the special option "Prepared food" by pressing u from the stockpile's options, and also set the max barrel in this stockpile to zero. Seeds are stored in bags, which can be stored in barrels, but that's pretty unnecessary for these plants. The population of seeds for a given species is capped at 200 per fortress, and you can store 100 seeds in a single bag; that means, for the six underground crops, you'll only ever need a maximum of twelve bags, hence the 3 x 4 stockpile size.
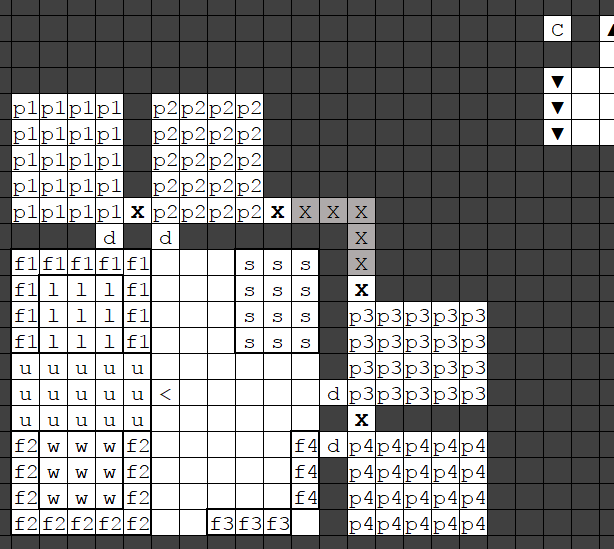
The rest of the large room on this level will be dedicated to processing these underground crops. That means we'll need a stockpile for the plants, a brewery, a farmer's workshop (for manufacturing dwarven syrup) and a stockpile for barrels and large pots. We'll also leave some space for future milling operations. The setup looks like this:
- w: Farmer's workshop
- l: Still
- u: Furniture stockpile, set to only accept wooden and stone barrels and pots, and taking from the stone pot stockpile and the wooden barrel stockpile. This stockpile also gives to the farmer's workshop and the still.
- f1: Food stockpile set to accept only the brewable underground crops (sweet pods, plump helmets, cave wheat and pig tails) and giving to the still. Remember to turn off prepared meals!
- f2: Food stockpile, set to accept only sweet pods, with max barrel set to zero. This stockpile should be set to "take from links only", and take from f1, and give to both the still and the farmer's workshop. This way, it serves as a kind of "sweet pod-ometer"; when sweet pods are low, this stockpile will not be full. This configuration also prevents sweet pods effectively being "reserved" for dwarven syrup when you need them for brewing. Remember to turn off prepared meals!
- f3: Food stockpile set to only accept quarry bushes (turn off prepared meals).
- f4: Food stockpile set to only accept dimple cups (prepared meals… off…)
I know I go on about remembering to turn off prepared meals, but seriously. I always forget. That's your last warning.
Now, at minimum, your dwarves have something to eat (plump helmets) and drink (brewery products). But it's important to have a balanced diet…
The Foremost of Halls[edit]
Before you send your herbalist out traipsing the grassy fields, gathering posies, we need somewhere to store all those plants. In addition, some of them won't be edible, but will need cooking, so you'll build a kitchen. Finally, your dwarves will want somewhere to sit and eat comfortably, which means a dining hall.
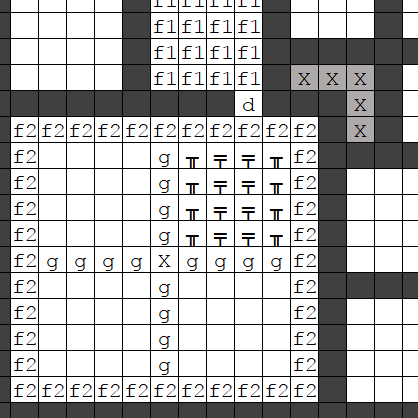
Let's start with the dining hall. Pretty straightforward - use the large 11 x 11 room in the middle fortress layer, above the farms. Your mason should have made four tables and chairs by now - arrange them, pairing one table orthogonally adjacent to one chair, any way you wish. I like the classic long-bench design, like so:
Ah. Reminds me of the great mead-hall Heorot, where generous Hrothgar distributed rings and feasts to the sea-Geats.
Place a door at the entrance (get your mason to make one if you don't have any spare) and we'll use one of the tables to designate it as a Dining room. Make sure the room fills the whole 11 x 11 area. Set the "Meeting hall" option to "Yes", so your dwarves have somewhere to socialise, including your expedition leader hosting the caravan diplomats.
Your dwarves will fetch a mid-season snack, take a seat, and chow down, so let's place the meals nearby. Make a food stockpile (f1) in the medium room before the corridor, and disallow everything except prepared meals:
Unlike when enjoying a leisurely sit-down meal, parched dwarves tend to be a bit more desperate. They'll simply fetch a mug, dunk it in the nearest barrel of swill, and quaff where they stand. That's a shame, because a dining hall can (and should) be one of the nicest rooms in the fortress, which makes your dwarves happy - they won't be nearly as cheered when skulling swill in whatever dingy broom closet serves as your booze stockpile. The eminently sensible solution, of course, is to place your booze and mugs) in the dining room.
Make a large food stockpile which covers the entire 11 x 11 dining room, then cut away all but a 1-tile border, and set it only to allow drinks. Then make a finished goods stockpile (allowing only mugs of stone, with max bins set to zero, and set to take from the mug stockpile) which covers the remaining 9 x 9 area. Then cut away the corner squares so there's only a 1-tile wide plus-shape remaining, like so:
There. Now there's space for another three long benches, bringing the hall's total capacity to 32. Since your dwarves don't all eat and drink at once, that will be enough for a good while. Fill it with tables and chairs whenever your mason has a spare moment. This will also be your main booze stockpile for now, so monitor the levels frequently and try to keep it topped up.
Our other requirement is a kitchen. Before we do that, however, we need to set things up for your herbalist.
Eat Your Greens[edit]
Raw food is all well and good, but Cook#Prepared Meals are better, though they require at least one solid ingredient. Looking at the list of indoor crops, then, a clear limitation emerges - excluding seeds (which we need for farming) and processing plants to bags (including milling), plump helmets are the only solid cookable indoor crop. However, we don't want to cook them at this stage, because the seeds will be destroyed and we risk running out of our only edible farm crop. Eggs will provide a fair supply of solid ingredients, but at first we're preventing our dwarves from harvesting them so we can grow our flock.
Our herbalist is here to save the day. On a nice embark, there should be plenty of wild plants to gather (including fruit and nuts from trees) which are either directly edible or cookable. Others can be brewed, which produces seeds as a by-product; since we're not interested in planting an above-ground farm just at this moment, we can also cook these seeds. That should provide plenty of solid ingredients for prepared meals.
Setting up food stockpiles gets very complicated once you need to deal with all the outdoor plants. Again, we're going to follow the principle of exclusion: turn off all plants, and then re-enable only the ones present on your map. Unfortunately this is a little tedious. I'd recommend designating plant-gathering over a large area surrounding your fort (say, 66 x 66, at priority level 5 or 6) and then looking at every plant thus highlighted. Examine every plant and consult the wiki. Anything which can be brewed, enable that in the feeder stockpile for your still. Anything which cannot be brewed should be cookable and/or edible raw - write these down. You'll need the list soon. Then, examine all the trees on the map (or at least near the fortress) and, again, look them up on the wiki. Anything which is brewable, enable its products in the still feeder stockpile, and anything which is not brewable but is cookable or edible raw, add it to your list.
There's just one further consideration: a small bug which means liquid ingredients are rarely used in cooking. This drastically reduces the total amount of material available for prepared meals, so for this and other reasons it's worth implementing the slightly awkward workaround. This exploits the fact that, although cooks prefer solid ingredients, they even more strongly prefer ingredients in barrels. The solution is to create a no-barrel stockpile for your solid ingredients.
We'll use one of the medium rooms upstairs from the dining hall. In the corner, make a kitchen and around the edges make a single-tile ring of food stockpiles (f1) set to only accept dwarven syrup. In the remaining four tiles of the room, make another food stockpile allowing only booze (f2), and set to take from the main booze stockpile in the dining hall (again, monitor levels to make sure you don't cook all your booze). Next, in the large 11 x 11 room, in the corner nearest the kitchen, make another 5 x 5 food stockpile (f3) accepting only a) eggs b) everything on your list of outdoor plants which can be cooked and/or eaten but not brewed, and c) all outdoor plant seeds and nuts (for once it's easiest just to turn off the seeds for the indoor plants); and set max barrel for this stockpile to zero. The final layout should look like this:
Set all three stockpiles to give to the kitchen.
The final step is to create a feeder stockpile for solid, cookable food items, which gives to the no-barrel stockpile. Make another 5 x 5 food stockpile (f4) in another corner of the 11 x 11 room, set only to accept the same items as the stockpile for cookable solid foods. Don't change the default max barrel setting. Set this to give to the no-barrel stockpile.
In this setup, brewing is prioritised, i.e. anything which can be brewed is never cooked directly, although its alcohol product can be. There are several reasons for this. First, dwarves drink more than they eat, so in terms of sheer quantity you'll need more raw materials for brewing. Second, you can cook with booze anyway, as long as you have at least one solid ingredient, so booze can be easily converted into prepared meals but it's not possible to go in the other direction. Thirdly, satisfying booze preferences is straightforward so it's important to prioritise keeping a good diversity of booze on-hand; on the other hand, making dwarves happy with food is tricky. It seems that dwarves don't value the quality of meals so much unless it happens to contain one of their preferred ingredients; since (as far as I know) they simply grab the nearest edible item, the odds of a meal happening to contain their preferred food is quite low. That means there's not a very reliable return on making sure that all possible ingredients are made available for cooking.
Great! You should already have designated plant-gathering jobs over a decent area of the surface near your entrance. In addition, add a large fruit-picking zone nearby, and watch your herbalist get to work. Don't trade away any stepladders which are in use, because the first thing you hear about it will be your herbalist dying of thirst while stuck up a tree. The final thing to do is go into the z-menu and, under "kitchen", make sure everything which can be brewed is permitted only for brewing, none of the indoor crops or seeds are permitted for cooking, but everything else (outdoor non-brewable plants and outdoor seeds) is permitted for cooking. You'll need to update this as your herbalists harvest additional plant varieties.
Before we wrap up, there's a few more things to say about the food industry. First, experienced farmers and herbalists harvest larger stacks of plants, which yields enormous efficiency returns as those stacks are funnelled through the brewing and cooking chains. For this reason, in the workshop orders it's advisable to set "only farmers harvest" to maximise their skill gain. If you find crops are dying on the vine, turn this off again. Second, prepared meals can become ridiculously valuable as your cook levels up, and make a great trade commodity if you have a surplus. There's no reason to leave raw ingredients hanging around - as long as it's not going to run your booze supply dangerously low, you may as well set "cook lavish meal" on repeat (simple meals give your cook more experience but are less efficient to haul). Thirdly, hungry dwarves will grab the nearest edible item - you want this to be a prepared meal and not an apple. We put the stockpile of prepared meals in the medium room of the corridor leading to the dining hall, so they're in front of all the raw ingredients and will be chosen by hungry dwarves no matter where they are in your fortress. There's one exception, which is dwarves already inside the dining room, which may have raw edible ingredients closer to hand. This isn't the end of the world, but it's another good reason to keep cooking all your raw ingredients to prepared meals as quickly as possible. Another simple solution is, on the middle staircase tile simply to make a 1-tile food stockpile which only accepts prepared meals and takes from the main prepared meal stockpile. If a dwarf happens to be having a drink in the dining room booze stockpile, and suddenly gets a hankering for some grub, the nearest edible item will always be a prepared meal. Unfortunately there's not a lot you can do for the brewer and cook when they're working close to raw ingredients. Whenever you make a stockpile for raw edibles elsewhere in the fort, remember to put a small stockpile of prepared meals "in front".
Putting it all together[edit]
Whew! That about covers it. It's a hugely complex system to try to get to grips with all at once. Giving an exact order of actions is difficult, but here's my recommendation for priorities:
- Secure the entrance with the walls, roof and bridge
- Install clean/secure water supply and begin farming
- Make still and start brewing
- Start gathering plants
- Carpentry
- Kitchen
However, whenever you find dwarves standing idle, make sure you put them to work on the next item.
Your fort is pretty well secure and self-sufficient at this point. Next, we'll talk about some basic amenities to keep your dwarves happy and healthy, further beefing your defences and securing indoor supplies of food and wood, trading, and the complex joys of allocating labours as your fortress attracts migrants. Such fun.
