- v50 information can now be added to pages in the main namespace. v0.47 information can still be found in the DF2014 namespace. See here for more details on the new versioning policy.
- Use this page to report any issues related to the migration.
Difference between revisions of "User:Mixtrak/Strategy/part 2"
(Created first version of page.) |
(Major revision, including fortress redesign and more detailed instructions for defence) |
||
| Line 1: | Line 1: | ||
| − | So you've chosen your civilisation, your site, and your embark loadout. You've arrived, and are ready to strike the earth. What should you do first? | + | So you've chosen your civilisation, your site, and your embark loadout. You've arrived (and paused the game), and are ready to strike the earth. What should you do first? |
Get the hell inside. | Get the hell inside. | ||
| − | Well, first ''make'' an inside, then get the hell in there. Dwarf Fortress is one of those games where anything can happen, and it has no concept of "fair". It's perfectly possible to arrive at a nice-looking location and for all your dwarves to be almost immediately slaughtered. The danger could be wild beasts, bandits, the undead, hostile civilisations, monsters, you name it. Fortunately, none of them can dig. | + | Well, first ''make'' an [[Defense guide#Inside vs. outside|inside]], then get the hell in there. Dwarf Fortress is one of those games where anything can happen, and it has no concept of "fair". It's perfectly possible to arrive at a nice-looking location and for all your dwarves to be almost immediately slaughtered. The danger could be wild beasts, bandits, the undead, hostile civilisations, monsters, [[Defense guide#Threats|you name it]]. Fortunately, none of them can dig. Now's a good time to skim the rest of that [[Defense guide]], too. |
| − | ==Checking for | + | ==Checking for threats== |
| − | + | The earliest (potentially immediate) source of fun is dangerous wild animals, so the first order of business is [[Quickstart guide#Surveying the Area|check your surroundings]] for threats. Don't unpause! On a nice embark the animals will be reassuringly mundane, though some of the [[Tiger|predators]] and [[Rhinoceros|larger species]] are still quite willing and able to send your fortress to an early grave, and others will [[Steals items|pilfer]] your supplies given the chance. In savage surrounds, you should particularly beware [[Giant kea|giant versions of usually-harmless critters]]. If in doubt, check the wiki to assess the threat level. | |
| − | + | Keeping tabs on the wildlife isn't much of an overhead, so you should make a regular habit of checking what's on the prowl under "Other" in the [[Unit list]]. Only one species of wild animal will [[Creature#Spawning|appear]] on your map at a time, usually in small groups, and hang around for quite a while (of the order of months). Eventually, they'll wander off the edge and be replaced by something potentially much [[Ambusher#Caveats|worse]]. In addition, if there's nothing currently roaming the surface, don't become complacent: rest assured, ''something'' will turn up before long. | |
| − | + | If you have just arrived and there's already something scary on the map, you basically have three options: | |
| − | + | # Monitor the threat but just focus on getting underground: this works for animals which are unlikely to cause big problems, either because they aren't very aggressive, aren't very dangerous, or aren't likely to wander into proximity. It can be a sensible gamble, especially if you tweak this guide a little to get things underground even faster (e.g. using the entrance ramps as stockpiles as soon as they're ready). | |
| + | # [[Attack]]: if the animals are likely to injure a lone dwarf but will be easily outmatched when you gang up on them, consider just dealing with them immediately. But remember, your dwarves will usually flee from attackers unless you recruit them to an active [[Squad]], in which case - in typically self-contradictory dwarfish fashion - even utterly green recruits will dauntlessly pursue any and all aggressors until no longer capable of doing so. In doing so, it's common for them to bite off more than they can chew. So be warned: once they get scent of an enemy, you have essentially no control over your citizens, either due to craven cowardice or unquenchable bloodlust. Generally this is not a good approach - for your founding seven, most animals are either safely ignored or too dangerous to take on (given that even minor injuries can be lethal or crippling in the absence of a hospital), with not a lot in the middle. Low-level threats are usually best monitored and dealt with reactively, and as for high-level threats… | ||
| + | # Run away: run like hell to the opposite edge of the map and dig your entrance over there. If the threat is this serious, you'll probably have to leave at least some of your supplies behind, which is extremely awkward and not to be done lightly, but if a comprehensive massacre seems likely this ''can'' save your bacon. Just be sure to prioritise grabbing your picks, some food and booze, and your axe (which can be achieved by placing the appropriate stockpiles far from the threat), otherwise survival is ''very'' unlikely. | ||
| − | + | To decide among these options, conduct a threat assessment based on the animal's number, aggressiveness, mobility and proximity (i.e. probability of hostile encounter), fighting abilities and size. Be guided by the wiki entry on the animal in question and - of course - a healthy dose of paranoia. There's a little more info about how to deal with threats at the end of this page. | |
| − | + | ==Setting orders== | |
| − | + | Before we unpause, there are a few forward-thinking things to do. | |
| − | [[ | + | * Designate your wagon for removal, so you can use its logs. This is a job for your carpenter, so don't go distracting them with any tree-felling jobs or anything. |
| + | * Turn off your miners' hauling labours - mining is going to be their highest priority for some time to come. | ||
| + | * Change some [[Standing orders]]: | ||
| + | ** Only farmers {{K|h}}arvest, so they level up faster | ||
| + | ** No {{K|m}}ix food, for easier tracking of supplies | ||
| + | ** In the {{K|r}efuse section, dwarves should gather refuse from {{K|o}}utside, including {{K|v}}ermin remains. This creates a little extra work but keeping refuse tidied away reduces the [[Undead]] risk | ||
| + | ** Going back out with {{K|Esc}} and then into the {{K|F}}orbid section, dwarves should claim used ammunition ({{K|p}}) and other death i{{K|t}}ems. We want useful items and corpses squared away, and will ensure the surface is not be accessible during moments of danger anyway | ||
| + | ** Finally, the {{K|W}}orkshop orders: no auto {{K|l}}oom, no auto collect {{K|w}}ebs. We want some thread left un-loomed for sutures, and collecting webs from the caverns is too dangerous. It will become feasible to change these options back later. | ||
| − | + | ==Finding the entrance== | |
| − | + | Still not ready to unpause, sorry. | |
| − | + | When your wagon gets deconstructed your supplies will just be left strewn about, which is not very satisfactory, not least because food rots when it's not in a food stockpile. The miners will take a while to dig underground storage, so for now you'll stockpile everything outside the entrance. Of course, that means we now need to plan the entrance. | |
| − | + | It makes sense to put the fortress entrance in the middle of the map, because then a) you're equidistant to all the resources the map has to offer, and b) your entrance is maximally distant from every map edge, where threats originate. Dig an entrance close to the map edge and a were-moose might be knocking down your door before you can say "Oh, shit…" | |
| − | + | How to find the middle? The default size for an embark map is 136 tiles on a side, which makes 192 on the diagonal. So, starting with the most north west (i.e. top right) tile as tile number 1, count diagonally towards the centre of the map (to the south-east) until you reach the 96th tile (if you prefer to count in straight lines, Euclid tells us it's the 68th tile from each map edge). In the bottom-right corner of that tile, where it meets the vertices of three other tiles, is the middle of the map's latitude/longitude coordinates; that is, the centre of the x (east-west) and y (north-south) axes. We're going to call it the xy-origin, and it's in the corner between four tiles because the maps are squares with even-numbered side lengths: if the sides were an odd number of tiles, the xy-origin would be a single tile. There's an xy-origin on every [[Z-level]], at the corner where these four tiles meet, so it forms a vertical axis running up through the middle of each layer, and we'll plan the fort around that. In addition, since the surface layer is z-level zero, the xy-origin on the surface is also the xyz-origin (you could also call it the global origin or map centroid), which is a single point (exists only on a single layer) and not a line. | |
| − | + | Once you've found the four tiles which surround the map centroid, we can dig the entrance. Beginning at the south-east tile of the centroid (represented as a <tt>C</tt> in the following diagram), count two more tiles to the east, and designate a channel on that tile, like so: | |
| − | + | [[File: 1_entrance_tile.png]] | |
| − | |||
| − | + | As a side note, it's fairly simple to adapt this fortress design to tunnelling straight into the side of a slope, but read ahead first to make sure you understand the principles. | |
| − | + | For now, that single channel tile defines what is inside and what is outside your fortress (Even as the fortress matures, it will make like an iceberg and be >90% below the surface). A narrow entrance causes a little congestion, but is easier to seal up, which is our current priority. Making a completely secure entrance will come later, because it requires mechanics and other things we might not have time for. For now, we just need to get underground and batten down the hatches as best we can. | |
| − | + | ==Zones and stockpiles== | |
| − | + | We unpause in the next section, promise! | |
| − | + | Now we have some coordinates by which to orient ourselves, we need to designate a few [[Stockpile]]s and [[Activity zone]]s nearby. | |
| − | + | First, find the flowing water tile nearest the map centroid (as instructed earlier, you should have embarked with a river or brook) and, on the single bank tile ''adjacent'' to the water tile, designate a [[Activity zone#Water source|water source]]. Until you install a well, this is the only clean water you have available. | |
| − | [[ | + | There are a couple more zones to create here on the surface. Your [[Grazer]]s will need a pasture zone so they don't starve without [[Grass]]. Create a [[Pasture]] zone as shown in the following diagram, and assign your sheep and wagon-hauling beasts of burden to this zone. If your map doesn't have grass in the middle here, place the pasture over the nearest grassy area. |
| − | + | [[File: 2_grazing_pasture.png]] | |
| − | + | ||
| + | Yes, it overlaps with the fortress entrance, but that won't be a problem because pastures and creatures don't block movement. This size should be plenty big enough to prevent over-grazing, which can be a concern. Your animals will generally stay within its boundaries, though occasionally will wander (or get spooked) and need to be dragged back. Later, we'll move our livestock inside for safety. | ||
| + | |||
| + | There's one more activity zone to designate: a meeting area, where idle dwarves and animals without pastures will tend to congregate. Obviously we'd rather this was near the entrance, so they can quickly bolt to safety if needed. The easiest thing to do is just add "Meeting area" to the zone settings of your grazing pasture. Since we don't have many animals and your dwarves won't be idle much, there should be enough room to avoid over-crowding, which can cause animals to lash out. | ||
| + | |||
| + | Now it's time for a few [[Stockpile]]s. Don't worry if a few trees get in the way - the stockpiles should be large enough to spare a few tiles, and we'll cut them down and re-designate the stockpiles soon enough. | ||
| + | |||
| + | First, you'll want a good-sized wood stockpile. In this diagram, the wood stockpile overlaps with the map centroid, so remember where that is: | ||
| + | |||
| + | [[File: 3_wood_stockpile.png]] | ||
| + | |||
| + | |||
| + | Next, we'll make a corpse stockpile, placed like so: | ||
| + | |||
| + | [[File: 4_corpse_stockpile.png]] | ||
| + | |||
| + | |||
| + | In addition, go into the corpse stockpile settings and enable the [[Refuse]] category. However, only ''some'' refuse is useless: turn off all refuse options, then turn on "Item Types", "Corpses" and "Body Parts". Under "Item Times", disable "Fresh Raw Hide", because this can be turned into leather and belongs near your tannery. | ||
| + | |||
| + | Garbage management is important. Items in refuse stockpiles slowly decay and disappear, which will keep useless body parts and enemy corpses from hanging around forever. It needs to be on the surface, because dead matter stored underground will [[Miasma|rot]], which makes your dwarves unhappy. Finally, this stockpile will also serve as a collection-point for the corpses of citizens in case we don't have any coffins prepared for immediate burial, and for slaughtered animals if we aren't able to butcher them all at once. Better to collect them somewhere nearby. Later, we'll secure the refuse stockpile against the threat of [[Necromancer]]s. | ||
| + | |||
| + | Finally, we want a stockpile for all the supplies from our wagon. Create a food stockpile, and place it like so: | ||
| + | |||
| + | [[File: 5_food_stockpile.png]] | ||
| + | |||
| + | |||
| + | Then go into the settings and enable "Furniture/Siege Ammo", "Finished Goods", "Weapons/Trap Comps", and "Cloth". This will be plenty of room for all the goods from your wagon, plus a few extra items we'll generate before our underground storage is ready. | ||
| + | |||
| + | ==Striking the earth== | ||
| + | |||
| + | Alright, time to actually tell your miners what you want the fortress to look like. The design is quite complicated, but starts by digging down nice and deep. | ||
| + | |||
| + | Generally, it's a good strategy to leave a large buffer zone of un-mined layers between the surface and your fort, for several reasons. In the layer immediately under the surface, tree roots penetrate the soil and felled trees leave gaps which are security vulnerabilities. You can patch them up but eventually the whole roof of soil will get replaced with paving, and that means no more trees or plants for you to harvest. Also, undermining murky pools and rivers results in annoying announcements and designation cancellations. You can override these, but if you get forgetful later on you risk accidentally puncturing the roof and flooding your fortress. But the final, and most important reason, is flexibility. If you want to dig a moat around your fortress entrance - and we will - having a buffer of un-mined layers avoids extensive fortress remodelling. | ||
| + | |||
| + | The cost, of course, is time. Right now, your miners are at their least experienced, and progress through stone will be frustratingly slow. But unless - for example - there's a [[Giant lion]] bearing down on you ''right now'', I think the benefits outweigh the costs. | ||
| + | |||
| + | The layer below your entrance should look like this: | ||
| + | |||
| + | [[File: 6_ramp_1.png]] | ||
| + | |||
| + | |||
| + | Note that the centroid is not excavated. Also, you don't have to explicitly designate the up-ramps: they will appear when the channel in the z-level above is completed. | ||
| + | |||
| + | The next z-level down should look like this: | ||
| + | |||
| + | [[File: 7_ramp_2.png]] | ||
| + | |||
| + | |||
| + | And the next like this: | ||
| + | |||
| + | [[File: 8_ramp_3.png]] | ||
| + | |||
| + | |||
| + | Noticing a pattern? We're creating a spiral ramp around the xy-origin. Continue the spiral down to z-level number -10 (i.e. 10 levels below the surface). | ||
| + | |||
| + | This might seem like a lot more work than just digging a straight shaft from up/down stairs, but it has advantages: | ||
| + | |||
| + | * Trade wagons can get down the ramp into the safety of your fortress | ||
* Falling dwarves fall right ''through'' stairs, but not ramps | * Falling dwarves fall right ''through'' stairs, but not ramps | ||
| − | * The spiral design ensures that there's no consecutive layers of mined tiles on top of one another, which means | + | * The spiral design ensures that there's no consecutive layers of mined tiles on top of one another, which means any accidental [[Cave-in]]s won't punch a hole right down to the bottom of the shaft |
| − | * Plenty of room for dwarves to move around | + | * Plenty of room for dwarves to move around one another |
| − | + | Again, a little extra digging now will save you time and remodelling in the long run. A stitch in time, as they say. | |
| − | Once you' | + | Once you've reached z-level -10, the designation is somewhat different: |
| − | [[File: | + | [[File: 9_central_stockpile.png]] |
| − | |||
| − | + | Again, remember not to designate any mining actions on the up-ramp tiles - they'll appear when [[Channel]]led from above. In addition, don't mine the three tiles directly behind the up-ramps, which are needed as supports for the [[Ramp]]s to work. We are, however, going to mine the tiles around the xy-origin. | |
| + | |||
| + | As promised, you can unpause now. As an important aside, it's crucial to pause whenever you're ready to schedule more tasks, need to plan or think about something, and just generally whenever there's something you, as overseer, could be doing. As time in dwarf fortress marches on, the probability of a nasty visitor approaches 1, so try to always have a clear idea of your priorities and keep your dwarves busy. | ||
==Getting to work== | ==Getting to work== | ||
| − | Your miners should dig | + | When you unpause, your carpenter will begin deconstructing the wagon, and the others will begin dragging the appropriate animals to the pasture. Once the wagon is turned back into wagon wood, all your items will be strewn about. The miners will pick up their picks and start digging, while everyone else will start hauling items to the "everything stockpile" we designated to the right of the entrance. Your dogs, cat and peahens will make their way to the meeting area/pasture all by themselves. At the earliest opportunity, your woodcutter will pick up their axe and then resume hauling. |
| + | |||
| + | Once the wagon has been deconstructed, immediately use one of the wooden logs to build a carpenter's workshop abutting the wood stockpile. When your carpenter has made this, order up a wooden hatch cover, and when it's finished, install it over the single channel tile which is the entrance to your fortress. Congratulations! You now have a lockable front door, though it won't hold up to thieves or building destroyers. | ||
| + | |||
| + | Your miners should dig the first layer out (z-level -1) pretty quickly, since it is probably in soil. Once that is done, create a pasture and assign the war dogs to it like so: | ||
| + | |||
| + | [[File: 10_wardog_pasture.png]] | ||
| + | |||
| + | |||
| + | Your war dogs will hang around here to sniff out and see off any sneaking thieves, and they won't block access for trade wagons, which can (somehow) just roll right over the top. | ||
| + | |||
| + | If you have a particularly deep soil horizon or your wagon was particularly far from the map centroid, your miners may finish their work before everything is hauled to the surface stockpile. If so, skip to the next section. If not, a little busy-work will give you a head start: | ||
| + | |||
| + | * Designate all trees within a radius of about 11-21 tiles of the entrance for felling, and queue up wooden bins and barrels on repeat at the carpenter's workshop | ||
| + | * Designate all plants within the same radius for plant-gathering, so your herbalist can begin stockpiling supplies | ||
| + | |||
| + | However, don't get carried away, because your miners shouldn't take ''that'' long. A few idle dwarves are nothing to fear at this stage. In particular, don't designate massive areas because unfortunately dwarves aren't smart enough prioritise work from the inside out, and gravitate to the far corners. You can do this manually from the designation menu but it's overkill at this stage. | ||
| + | |||
| + | ==Getting inside== | ||
| + | |||
| + | Soon enough, your miners should be finished with the large storage room on level -10. Make a 10 x 10 stockpile here which accepts food, furniture, finished goods, and cloth, and set it to "take" from the rightmost stockpile on the surface (we've excluded weapons from this underground stockpile because your picks and axes are now all safely in dwarven hands). | ||
| + | |||
| + | In addition, overlay this 10 x 10 storage room with a 10 x 10 zone. Make it a meeting zone and a [[Temple]] dedicated to no particular deity. In the surface zone which is a combination pasture/meeting zone, remove the meeting zone option. Your idle animals and dwarves will now hang out here, safely underground, and your dwarves have somewhere to pray or meditate when they feel the urge. | ||
| + | |||
| + | Cancel any tree-felling, carpentry or plant-gathering jobs and designations until everything is inside, and even temporarily re-enable hauling labours on your miners. Once everything is inside, disable hauling on your miners once again. | ||
| + | |||
| + | Congratulations, you made it - your dwarves and most of their possessions are now behind a lockable door, and have begun digging out a proper fortress. | ||
| + | |||
| + | ==Dealing with Threats== | ||
| + | |||
| + | Even on a nice embark, fun happens, so I'd be remiss not to include some general advice about how to deal with it. | ||
| + | |||
| + | If you are visited by something [[Elephant|unexpectedly unpleasant]], your first priority is to get that wooden hatch installed ASAP - assuming it isn't a [[Building destroyer]] - and get every dwarf inside as quickly as possible. In general, don't use squad orders for this, because as mentioned above active squads will attack enemies on sight (approximately 20 tiles). Civilians, on the other hand, will flee in terror, which at least gives them a small chance of running to safety, but more reliably will at least lead the aggressor on a merry chase around the map. Their noble sacrifice can buy the others enough time to get inside. Use burrows and [[Civilian alert]]s to achieve this outcome. If you're lucky, you may even have time to grab any supplies left on the surface or pasture some livestock inside. | ||
| + | |||
| + | If it's a building destroyer, your wooden hatch will barely slow it down (and may in fact serve as a lure) so you'll need to seal yourself in by using any mined stone to hastily construct walls across the front of the ramps on one of the levels, like so: | ||
| − | + | [[File: 11_wall_in.png]] | |
| − | |||
| − | |||
| − | |||
| − | |||
| − | |||
| − | + | This can take a while, so schedule this task as soon as you realise it is necessary. | |
| − | + | Once you're safely behind a barrier, you can prepare several countermeasures. Wild animals will eventually wander off the map, so you may choose to simply wait them out. If you have access to some wood and the invaders are not [[Trapavoid]], a better option is usually to use [[Trap#Cage trap|cage traps]], which are remarkably (indeed, cheesily) effective. Make sure you use them liberally to ensure success. | |
| − | + | Another approach is to use the [[Dwarven atom smasher]], if the creature is small enough. | |
| − | + | If none of the above are appropriate, you'll have to rely on [[Cave-in]]s, since they kill ''everything''. These are easy enough to engineer as a mechanical [[Trap design#cave-in trap|trap]] with a support. I recommend triggering the cave-in from behind a secure fallback position. Also, make more and bigger traps than you think you need. And if the invader is hanging around the walls you constructed to keep them out, for Armok's sake don't send some poor sod to deconstruct those same walls and get eaten. Breach the surface somewhere far away which allows the miner time to get safely behind a raising bridge somewhere. | |
| − | + | There's one final approach which on balance is probably more reliable, easier and safer than cave-ins: imprisonment. You could place a lure animal or a path with raising bridges on either side and simply trap the invaders when they enter. You can then deal with them [[Magma|appropriately]] at your leisure. | |
| − | + | If the threats are severe and constant, your only option may be to abandon the surface entirely and make a dash down to the [[Caverns]] for food and lumber. Just be careful down there: the caverns are dangerous, and you won't be able to risk breaching the surface to receive migrants, so you better hope your dwarves are romantically compatible. With luck and time, it's possible to forge them (and their inbred progeny) into perfectly-[[Adamantine|equipped]] cave-dwelling killing machines and reclaim the surface in a glorious battle against overwhelming odds, though not without certain [[Cave adaptation|handicaps]]. There's plenty of additional ways to prepare which stack the odds in [[Cave dragon|your]] [[Siege engine#Ballista batter|favour]]; get creative. | |
| − | + | In any case, we are putting the cart before the horse: this guide assumes a smooth embark experience, and we won't go into detail about responding to threats until later sections. | |
Revision as of 12:42, 20 March 2017
So you've chosen your civilisation, your site, and your embark loadout. You've arrived (and paused the game), and are ready to strike the earth. What should you do first?
Get the hell inside.
Well, first make an inside, then get the hell in there. Dwarf Fortress is one of those games where anything can happen, and it has no concept of "fair". It's perfectly possible to arrive at a nice-looking location and for all your dwarves to be almost immediately slaughtered. The danger could be wild beasts, bandits, the undead, hostile civilisations, monsters, you name it. Fortunately, none of them can dig. Now's a good time to skim the rest of that Defense guide, too.
Checking for threats
The earliest (potentially immediate) source of fun is dangerous wild animals, so the first order of business is check your surroundings for threats. Don't unpause! On a nice embark the animals will be reassuringly mundane, though some of the predators and larger species are still quite willing and able to send your fortress to an early grave, and others will pilfer your supplies given the chance. In savage surrounds, you should particularly beware giant versions of usually-harmless critters. If in doubt, check the wiki to assess the threat level.
Keeping tabs on the wildlife isn't much of an overhead, so you should make a regular habit of checking what's on the prowl under "Other" in the Unit list. Only one species of wild animal will appear on your map at a time, usually in small groups, and hang around for quite a while (of the order of months). Eventually, they'll wander off the edge and be replaced by something potentially much worse. In addition, if there's nothing currently roaming the surface, don't become complacent: rest assured, something will turn up before long.
If you have just arrived and there's already something scary on the map, you basically have three options:
- Monitor the threat but just focus on getting underground: this works for animals which are unlikely to cause big problems, either because they aren't very aggressive, aren't very dangerous, or aren't likely to wander into proximity. It can be a sensible gamble, especially if you tweak this guide a little to get things underground even faster (e.g. using the entrance ramps as stockpiles as soon as they're ready).
- Attack: if the animals are likely to injure a lone dwarf but will be easily outmatched when you gang up on them, consider just dealing with them immediately. But remember, your dwarves will usually flee from attackers unless you recruit them to an active Squad, in which case - in typically self-contradictory dwarfish fashion - even utterly green recruits will dauntlessly pursue any and all aggressors until no longer capable of doing so. In doing so, it's common for them to bite off more than they can chew. So be warned: once they get scent of an enemy, you have essentially no control over your citizens, either due to craven cowardice or unquenchable bloodlust. Generally this is not a good approach - for your founding seven, most animals are either safely ignored or too dangerous to take on (given that even minor injuries can be lethal or crippling in the absence of a hospital), with not a lot in the middle. Low-level threats are usually best monitored and dealt with reactively, and as for high-level threats…
- Run away: run like hell to the opposite edge of the map and dig your entrance over there. If the threat is this serious, you'll probably have to leave at least some of your supplies behind, which is extremely awkward and not to be done lightly, but if a comprehensive massacre seems likely this can save your bacon. Just be sure to prioritise grabbing your picks, some food and booze, and your axe (which can be achieved by placing the appropriate stockpiles far from the threat), otherwise survival is very unlikely.
To decide among these options, conduct a threat assessment based on the animal's number, aggressiveness, mobility and proximity (i.e. probability of hostile encounter), fighting abilities and size. Be guided by the wiki entry on the animal in question and - of course - a healthy dose of paranoia. There's a little more info about how to deal with threats at the end of this page.
Setting orders
Before we unpause, there are a few forward-thinking things to do.
- Designate your wagon for removal, so you can use its logs. This is a job for your carpenter, so don't go distracting them with any tree-felling jobs or anything.
- Turn off your miners' hauling labours - mining is going to be their highest priority for some time to come.
- Change some Standing orders:
- Only farmers harvest, so they level up faster
- No mix food, for easier tracking of supplies
- In the {{K|r}efuse section, dwarves should gather refuse from outside, including vermin remains. This creates a little extra work but keeping refuse tidied away reduces the Undead risk
- Going back out with Esc and then into the Forbid section, dwarves should claim used ammunition (p) and other death items. We want useful items and corpses squared away, and will ensure the surface is not be accessible during moments of danger anyway
- Finally, the Workshop orders: no auto loom, no auto collect webs. We want some thread left un-loomed for sutures, and collecting webs from the caverns is too dangerous. It will become feasible to change these options back later.
Finding the entrance
Still not ready to unpause, sorry.
When your wagon gets deconstructed your supplies will just be left strewn about, which is not very satisfactory, not least because food rots when it's not in a food stockpile. The miners will take a while to dig underground storage, so for now you'll stockpile everything outside the entrance. Of course, that means we now need to plan the entrance.
It makes sense to put the fortress entrance in the middle of the map, because then a) you're equidistant to all the resources the map has to offer, and b) your entrance is maximally distant from every map edge, where threats originate. Dig an entrance close to the map edge and a were-moose might be knocking down your door before you can say "Oh, shit…"
How to find the middle? The default size for an embark map is 136 tiles on a side, which makes 192 on the diagonal. So, starting with the most north west (i.e. top right) tile as tile number 1, count diagonally towards the centre of the map (to the south-east) until you reach the 96th tile (if you prefer to count in straight lines, Euclid tells us it's the 68th tile from each map edge). In the bottom-right corner of that tile, where it meets the vertices of three other tiles, is the middle of the map's latitude/longitude coordinates; that is, the centre of the x (east-west) and y (north-south) axes. We're going to call it the xy-origin, and it's in the corner between four tiles because the maps are squares with even-numbered side lengths: if the sides were an odd number of tiles, the xy-origin would be a single tile. There's an xy-origin on every Z-level, at the corner where these four tiles meet, so it forms a vertical axis running up through the middle of each layer, and we'll plan the fort around that. In addition, since the surface layer is z-level zero, the xy-origin on the surface is also the xyz-origin (you could also call it the global origin or map centroid), which is a single point (exists only on a single layer) and not a line.
Once you've found the four tiles which surround the map centroid, we can dig the entrance. Beginning at the south-east tile of the centroid (represented as a C in the following diagram), count two more tiles to the east, and designate a channel on that tile, like so:
As a side note, it's fairly simple to adapt this fortress design to tunnelling straight into the side of a slope, but read ahead first to make sure you understand the principles.
For now, that single channel tile defines what is inside and what is outside your fortress (Even as the fortress matures, it will make like an iceberg and be >90% below the surface). A narrow entrance causes a little congestion, but is easier to seal up, which is our current priority. Making a completely secure entrance will come later, because it requires mechanics and other things we might not have time for. For now, we just need to get underground and batten down the hatches as best we can.
Zones and stockpiles
We unpause in the next section, promise!
Now we have some coordinates by which to orient ourselves, we need to designate a few Stockpiles and Activity zones nearby.
First, find the flowing water tile nearest the map centroid (as instructed earlier, you should have embarked with a river or brook) and, on the single bank tile adjacent to the water tile, designate a water source. Until you install a well, this is the only clean water you have available.
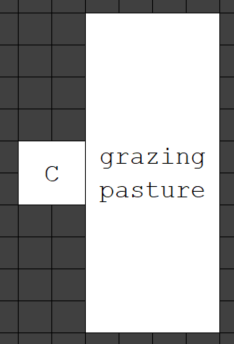
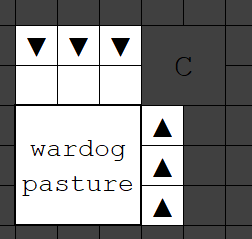
There are a couple more zones to create here on the surface. Your Grazers will need a pasture zone so they don't starve without Grass. Create a Pasture zone as shown in the following diagram, and assign your sheep and wagon-hauling beasts of burden to this zone. If your map doesn't have grass in the middle here, place the pasture over the nearest grassy area.
Yes, it overlaps with the fortress entrance, but that won't be a problem because pastures and creatures don't block movement. This size should be plenty big enough to prevent over-grazing, which can be a concern. Your animals will generally stay within its boundaries, though occasionally will wander (or get spooked) and need to be dragged back. Later, we'll move our livestock inside for safety.
There's one more activity zone to designate: a meeting area, where idle dwarves and animals without pastures will tend to congregate. Obviously we'd rather this was near the entrance, so they can quickly bolt to safety if needed. The easiest thing to do is just add "Meeting area" to the zone settings of your grazing pasture. Since we don't have many animals and your dwarves won't be idle much, there should be enough room to avoid over-crowding, which can cause animals to lash out.
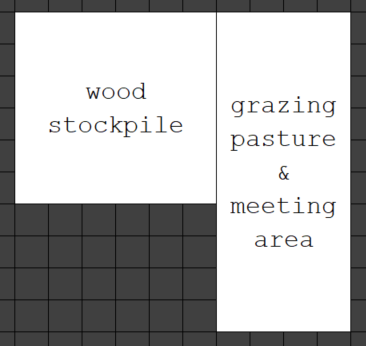
Now it's time for a few Stockpiles. Don't worry if a few trees get in the way - the stockpiles should be large enough to spare a few tiles, and we'll cut them down and re-designate the stockpiles soon enough.
First, you'll want a good-sized wood stockpile. In this diagram, the wood stockpile overlaps with the map centroid, so remember where that is:
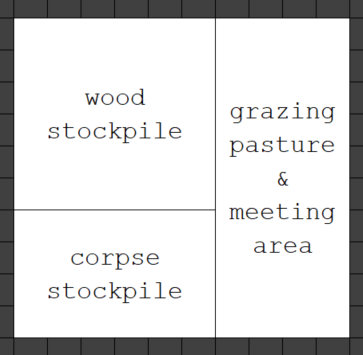
Next, we'll make a corpse stockpile, placed like so:
In addition, go into the corpse stockpile settings and enable the Refuse category. However, only some refuse is useless: turn off all refuse options, then turn on "Item Types", "Corpses" and "Body Parts". Under "Item Times", disable "Fresh Raw Hide", because this can be turned into leather and belongs near your tannery.
Garbage management is important. Items in refuse stockpiles slowly decay and disappear, which will keep useless body parts and enemy corpses from hanging around forever. It needs to be on the surface, because dead matter stored underground will rot, which makes your dwarves unhappy. Finally, this stockpile will also serve as a collection-point for the corpses of citizens in case we don't have any coffins prepared for immediate burial, and for slaughtered animals if we aren't able to butcher them all at once. Better to collect them somewhere nearby. Later, we'll secure the refuse stockpile against the threat of Necromancers.
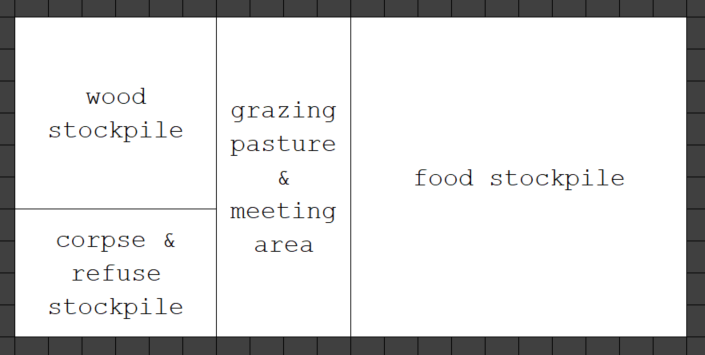
Finally, we want a stockpile for all the supplies from our wagon. Create a food stockpile, and place it like so:
Then go into the settings and enable "Furniture/Siege Ammo", "Finished Goods", "Weapons/Trap Comps", and "Cloth". This will be plenty of room for all the goods from your wagon, plus a few extra items we'll generate before our underground storage is ready.
Striking the earth
Alright, time to actually tell your miners what you want the fortress to look like. The design is quite complicated, but starts by digging down nice and deep.
Generally, it's a good strategy to leave a large buffer zone of un-mined layers between the surface and your fort, for several reasons. In the layer immediately under the surface, tree roots penetrate the soil and felled trees leave gaps which are security vulnerabilities. You can patch them up but eventually the whole roof of soil will get replaced with paving, and that means no more trees or plants for you to harvest. Also, undermining murky pools and rivers results in annoying announcements and designation cancellations. You can override these, but if you get forgetful later on you risk accidentally puncturing the roof and flooding your fortress. But the final, and most important reason, is flexibility. If you want to dig a moat around your fortress entrance - and we will - having a buffer of un-mined layers avoids extensive fortress remodelling.
The cost, of course, is time. Right now, your miners are at their least experienced, and progress through stone will be frustratingly slow. But unless - for example - there's a Giant lion bearing down on you right now, I think the benefits outweigh the costs.
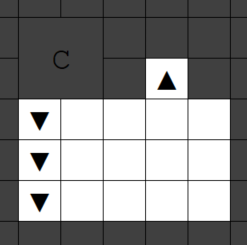
The layer below your entrance should look like this:
Note that the centroid is not excavated. Also, you don't have to explicitly designate the up-ramps: they will appear when the channel in the z-level above is completed.
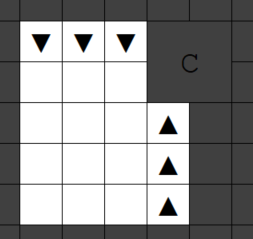
The next z-level down should look like this:
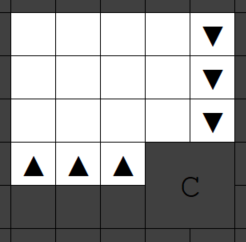
And the next like this:
Noticing a pattern? We're creating a spiral ramp around the xy-origin. Continue the spiral down to z-level number -10 (i.e. 10 levels below the surface).
This might seem like a lot more work than just digging a straight shaft from up/down stairs, but it has advantages:
- Trade wagons can get down the ramp into the safety of your fortress
- Falling dwarves fall right through stairs, but not ramps
- The spiral design ensures that there's no consecutive layers of mined tiles on top of one another, which means any accidental Cave-ins won't punch a hole right down to the bottom of the shaft
- Plenty of room for dwarves to move around one another
Again, a little extra digging now will save you time and remodelling in the long run. A stitch in time, as they say.
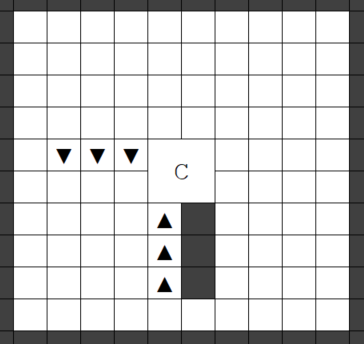
Once you've reached z-level -10, the designation is somewhat different:
Again, remember not to designate any mining actions on the up-ramp tiles - they'll appear when Channelled from above. In addition, don't mine the three tiles directly behind the up-ramps, which are needed as supports for the Ramps to work. We are, however, going to mine the tiles around the xy-origin.
As promised, you can unpause now. As an important aside, it's crucial to pause whenever you're ready to schedule more tasks, need to plan or think about something, and just generally whenever there's something you, as overseer, could be doing. As time in dwarf fortress marches on, the probability of a nasty visitor approaches 1, so try to always have a clear idea of your priorities and keep your dwarves busy.
Getting to work
When you unpause, your carpenter will begin deconstructing the wagon, and the others will begin dragging the appropriate animals to the pasture. Once the wagon is turned back into wagon wood, all your items will be strewn about. The miners will pick up their picks and start digging, while everyone else will start hauling items to the "everything stockpile" we designated to the right of the entrance. Your dogs, cat and peahens will make their way to the meeting area/pasture all by themselves. At the earliest opportunity, your woodcutter will pick up their axe and then resume hauling.
Once the wagon has been deconstructed, immediately use one of the wooden logs to build a carpenter's workshop abutting the wood stockpile. When your carpenter has made this, order up a wooden hatch cover, and when it's finished, install it over the single channel tile which is the entrance to your fortress. Congratulations! You now have a lockable front door, though it won't hold up to thieves or building destroyers.
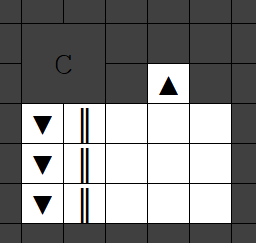
Your miners should dig the first layer out (z-level -1) pretty quickly, since it is probably in soil. Once that is done, create a pasture and assign the war dogs to it like so:
Your war dogs will hang around here to sniff out and see off any sneaking thieves, and they won't block access for trade wagons, which can (somehow) just roll right over the top.
If you have a particularly deep soil horizon or your wagon was particularly far from the map centroid, your miners may finish their work before everything is hauled to the surface stockpile. If so, skip to the next section. If not, a little busy-work will give you a head start:
- Designate all trees within a radius of about 11-21 tiles of the entrance for felling, and queue up wooden bins and barrels on repeat at the carpenter's workshop
- Designate all plants within the same radius for plant-gathering, so your herbalist can begin stockpiling supplies
However, don't get carried away, because your miners shouldn't take that long. A few idle dwarves are nothing to fear at this stage. In particular, don't designate massive areas because unfortunately dwarves aren't smart enough prioritise work from the inside out, and gravitate to the far corners. You can do this manually from the designation menu but it's overkill at this stage.
Getting inside
Soon enough, your miners should be finished with the large storage room on level -10. Make a 10 x 10 stockpile here which accepts food, furniture, finished goods, and cloth, and set it to "take" from the rightmost stockpile on the surface (we've excluded weapons from this underground stockpile because your picks and axes are now all safely in dwarven hands).
In addition, overlay this 10 x 10 storage room with a 10 x 10 zone. Make it a meeting zone and a Temple dedicated to no particular deity. In the surface zone which is a combination pasture/meeting zone, remove the meeting zone option. Your idle animals and dwarves will now hang out here, safely underground, and your dwarves have somewhere to pray or meditate when they feel the urge.
Cancel any tree-felling, carpentry or plant-gathering jobs and designations until everything is inside, and even temporarily re-enable hauling labours on your miners. Once everything is inside, disable hauling on your miners once again.
Congratulations, you made it - your dwarves and most of their possessions are now behind a lockable door, and have begun digging out a proper fortress.
Dealing with Threats
Even on a nice embark, fun happens, so I'd be remiss not to include some general advice about how to deal with it.
If you are visited by something unexpectedly unpleasant, your first priority is to get that wooden hatch installed ASAP - assuming it isn't a Building destroyer - and get every dwarf inside as quickly as possible. In general, don't use squad orders for this, because as mentioned above active squads will attack enemies on sight (approximately 20 tiles). Civilians, on the other hand, will flee in terror, which at least gives them a small chance of running to safety, but more reliably will at least lead the aggressor on a merry chase around the map. Their noble sacrifice can buy the others enough time to get inside. Use burrows and Civilian alerts to achieve this outcome. If you're lucky, you may even have time to grab any supplies left on the surface or pasture some livestock inside.
If it's a building destroyer, your wooden hatch will barely slow it down (and may in fact serve as a lure) so you'll need to seal yourself in by using any mined stone to hastily construct walls across the front of the ramps on one of the levels, like so:
This can take a while, so schedule this task as soon as you realise it is necessary.
Once you're safely behind a barrier, you can prepare several countermeasures. Wild animals will eventually wander off the map, so you may choose to simply wait them out. If you have access to some wood and the invaders are not Trapavoid, a better option is usually to use cage traps, which are remarkably (indeed, cheesily) effective. Make sure you use them liberally to ensure success.
Another approach is to use the Dwarven atom smasher, if the creature is small enough.
If none of the above are appropriate, you'll have to rely on Cave-ins, since they kill everything. These are easy enough to engineer as a mechanical trap with a support. I recommend triggering the cave-in from behind a secure fallback position. Also, make more and bigger traps than you think you need. And if the invader is hanging around the walls you constructed to keep them out, for Armok's sake don't send some poor sod to deconstruct those same walls and get eaten. Breach the surface somewhere far away which allows the miner time to get safely behind a raising bridge somewhere.
There's one final approach which on balance is probably more reliable, easier and safer than cave-ins: imprisonment. You could place a lure animal or a path with raising bridges on either side and simply trap the invaders when they enter. You can then deal with them appropriately at your leisure.
If the threats are severe and constant, your only option may be to abandon the surface entirely and make a dash down to the Caverns for food and lumber. Just be careful down there: the caverns are dangerous, and you won't be able to risk breaching the surface to receive migrants, so you better hope your dwarves are romantically compatible. With luck and time, it's possible to forge them (and their inbred progeny) into perfectly-equipped cave-dwelling killing machines and reclaim the surface in a glorious battle against overwhelming odds, though not without certain handicaps. There's plenty of additional ways to prepare which stack the odds in your favour; get creative.
In any case, we are putting the cart before the horse: this guide assumes a smooth embark experience, and we won't go into detail about responding to threats until later sections.
