- v50 information can now be added to pages in the main namespace. v0.47 information can still be found in the DF2014 namespace. See here for more details on the new versioning policy.
- Use this page to report any issues related to the migration.
User:Mixtrak/Strategy/5 food plumbing
Dwarves have hearty appetites for food and (especially) booze. Let's talk rationing: dwarves require about two units of Food and five of Alcohol per season, and the default embark loadout gives you 60 units of alcohol (60 / 5 / 7 = 1.7143 seasons) and 45 units of food (45 / 2 / 7 = 3.2143 seasons). Fortunately, your herbalist and cook are augmenting those supplies. Herbalism is a little dangerous, however, so in this section we're also going to talk about how to safely pipe water into the fortress for farm irrigation and set up a secure internal supply of food.
The first step in augmenting your food supplies is quite straightforward: find some fruit or nut trees near your fortress entrance and designate an orchard zone around them. Your herbalist will grab one of the stepladders your carpenter has made and pick the produce. Just make sure you don't trade away or otherwise lose the stepladder, though, or the herbalist can get stuck and die of thirst before you realise. If you want them to switch to brewing (or, indeed, any other job), you may need to temporarily deactivate the zone.
At first, our food industry will be purely dedicated to brewing whatever can be brewed, cooking whatever can't be brewed but can be cooked, and stockpiling the rest. As the fortress evolves, you're going to bring many other related industries online, including milling, pressing, other ways of processing plants, textile and paper industries. Our current priority, however, is to ensure a steady and secure supply of prepared meals and booze.
Finally, if things go pear-shaped and you do run out of food for whatever reason, you shouldn't hesitate to butcher your pack animals, or indeed, any of the other animals. They can be easily replaced through trade.
Middle layer
Eggs are one of the easiest parts of this industry. It'll be a while before your farms get going, so eggs will provide a substantial dietary boost in the meantime.
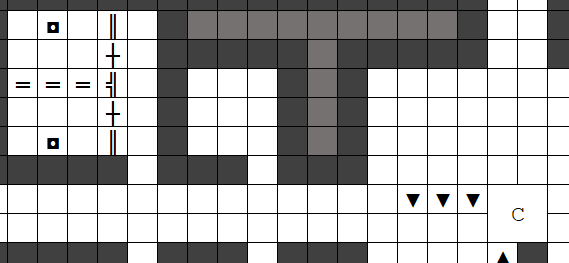
Egg-layers require a Nest box to lay eggs; your stonecrafter should have made a couple of these already (if not, make them now). Once laid, dwarves will automatically harvest the eggs and take them to a food stockpile; however, we want the ability to prevent this and allow the eggs to hatch, in case we want to expand our flock and increase our production of eggs or meat. There's a simple design which will allow this:
Again, the double-lines are walls (preferably made from stone blocks) and the crosses are stone doors. The boxy-shaped dark things are nest boxes. You can see whether they contain eggs by pressing t and moving the cursor over them. Create two pasture zones and assign one male and one female blue peafowl to each. The females will claim the nest boxes and eventually begin laying. Set the doors to "keep tightly closed" and, if you ever want to switch from egg-cooking to egg-hatching, simply forbid the doors and you dwarves won't enter.
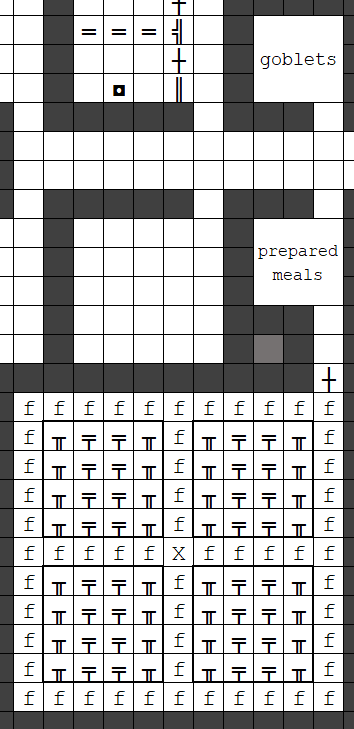
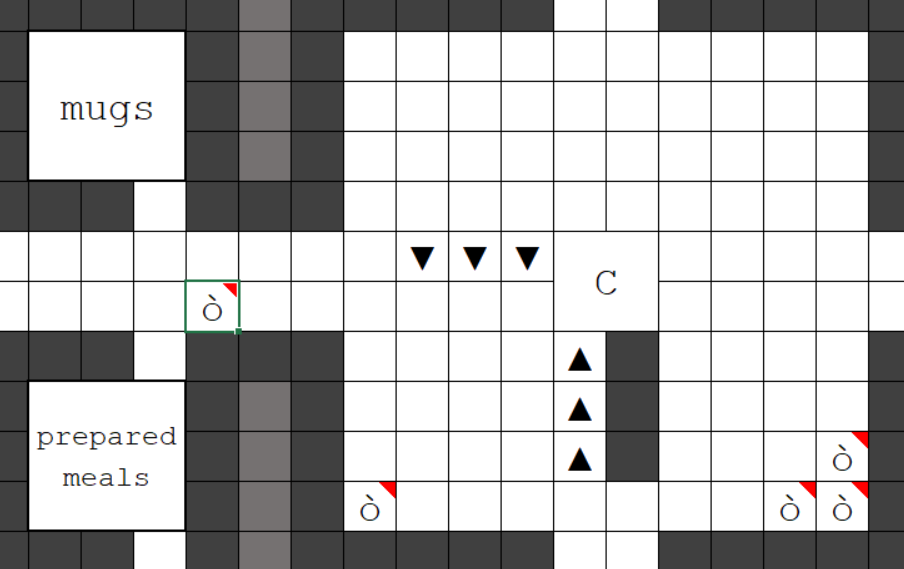
Next, we need a dining hall, since your dwarves prefer not to eat off the floor. We also need stores of food, booze, and mugs nearby for the diners. Lay this out like so:
The t-shaped symbols with vertical double-lines are chairs, and the ones with horizontal double-lines are tables. You won't have enough tables and chairs to fill this out just yet, but build them as they become available. It's important that each chair be adjacent to exactly on table, and vice-versa; your dwarves get shirty when forced to share a table or eat standing up.
Once you've got the stone door (plus-shape) installed, open the q menu and hover over one of the tables, then designate a dining room and resize it to fill the whole 11 x 11 area plus the door and walls (all rooms should include their surrounding walls and doors), then set "Meeting hall" to yes. Making this a Room means that all the furniture values count towards a single room value, and nice dining rooms make your dwarves happy. You can remove the meeting area in the middle rampway now - your idle dwarves may as well hang out somewhere nice.
The food stockpile surrounding the tables and chairs should be set to accept only booze (i.e. "drink (plant)" and "drink (animal)"). It doesn't really matter where dwarves drink, except that, again, they might as well do it somewhere nice. This will be your main booze stockpile, so monitor its levels carefully. Do not run out of Alcohol.
The "goblets" stockpile off the corridor should have the same settings as your "goblets" stockpile in the stone industry quadrant. It might seem sensible to set this stockpile to "take" from the one in the stone industry, but in fact it will then fill up and dwarves will have to traipse all the way over to the stone quadrant to put down their mug after drinking. Don't create any links for this stockpile and you'll soon find it reaches a fairly stable equilibrium of contents, though you may need to manufacture a few runs of mugs before this happens. If anything, set it to give to the pile in the stone industry if you find it filling up.
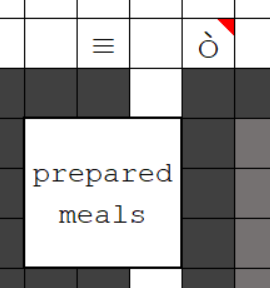
The "prepared meals" stockpiles are food stockpiles with everything disabled except prepared meals (using the hotkey u in the food stockpile settings, for some reason). Set the smaller stockpile to take from the larger one - it's placed at the entrance to the food quarter quite deliberately. Hungry dwarves will path to the nearest edible item, but we want them to eat the prepared meals and not the raw ingredients (because prepared meals are more likely to contain a preferred food); having a pile of prepared meals out the front of the food quadrant increases the probability that they will be the nearest edible item. Unfortunately there's not a lot you can do for the brewer and cook when they're working close to raw ingredients. Whenever you make a stockpile for raw edibles elsewhere in the fort, remember to put a small stockpile of prepared meals "in front".
We need a larger stockpile for overflow, because we're going to generate quite a lot of prepared meals; apart from anything else, they're a great way to use up leftover seeds from brewing and make nice trade goods.
Make sure to disable prepared meals in all other food stockpiles (unless otherwise specified) - this is very, very easy to forget. When designating a new food stockpile, it's always best to start by blocking everything and then only enabling what you need.
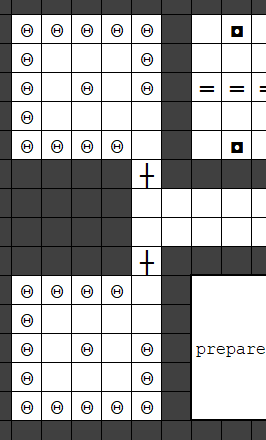
The final two rooms on this level of the food quadrant aren't actually going to be food-related at all: they're going to be dormitories. Build beds and doors in them, like so:
In each room, hover over a bed with the q menu and make a bedroom (again, all rooms should also include the surrounding walls and door), then make it a dormitory. Later, your dwarves will have individual bedrooms, but for now this should provide sufficient accommodation.
Upper layer
This is where things get rather complicated, because there's a dizzying variety of plants in Dwarf Fortress, they can be processed in several ways - cooked, brewed, milled, extracted and so on - and have different uses at each stage, including trade, oil and textiles. Our immediate needs, of course, are food and drink, so by focusing on that we cut through the complexity a little. The following arms of the food industry are too fiddly and not urgent:
- Milling, while eventually very important, requires a fair bit of labour and a supply of empty bags
- Some seeds can be milled into a paste (e.g. rock nuts) and then pressed to yield Oil (olives can be pressed directly) and a dry cake. The press cake can be cooked and the oil can either be cooked or used for soap (we'll use it for soap). This pipeline requires milling, in addition to jugs and screw presses and associated labours, so we'll skip it for now.
- Some plants can be processed into thread for the textile industry or slurry for the paper industry. That will crop up (heh) later in this guide.
- Valley herbs can be processed into golden salve, which is a useless but high-value trade commodity, providing you have glass vials available. You don't, so we'll stockpile them for now.
- Quarry bushes can be processed to bag, yielding rock nuts and cookable quarry bush leaves. This requires bags, so again we'll just stockpile the quarry bushes for now.
Having rule that out, we are interested only in the following use cases (which possibly overlap for each crop):
- Indoor farming of seeds of the underground crops.
- Stockpiling plants which can be processed to yield important substances (as described above).
- Brewing anything which has no other processing products. Booze is important in itself (dwarves drink more than they eat, and it's easier to satisfy booze preferences), can be cooked, and brewing leaves seeds which can also be cooked (cooking a plant directly destroys the seeds). Brewing takes priority over cooking.
- Cooking everything which does not otherwise have a use!
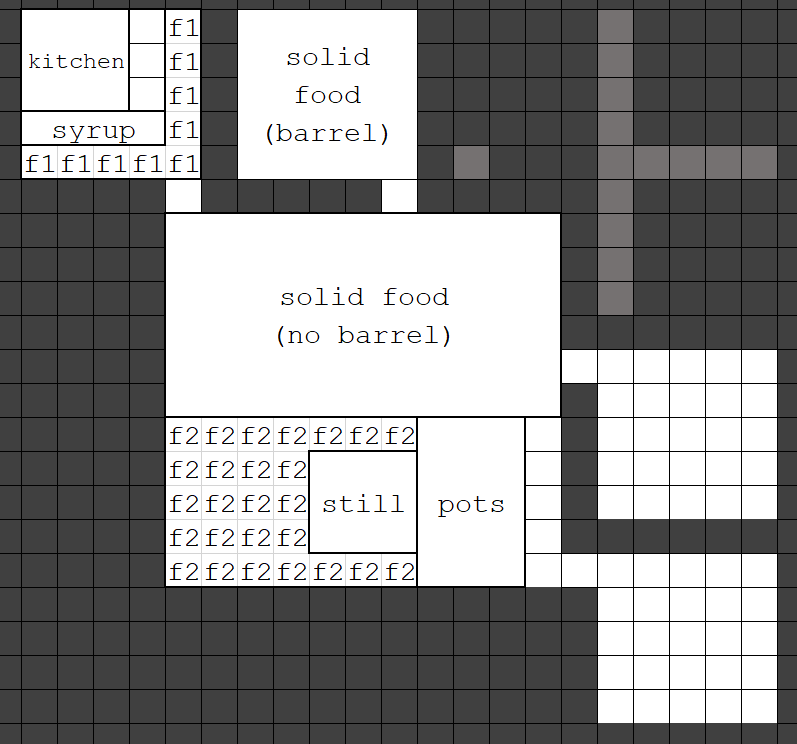
With that in mind, your upstairs will be dedicated to cooking and brewing:
The blank areas are primarily going to be used for your honey/wax industry later on. Let's walk through some of the components which need explaining:
- "syrup": food stockpile, accepts only dwarven syrup. Set this to give to the kitchen.
- "f1": a food stockpile accepting only booze. Set this to give to the kitchen and take from the main booze stockpile in the dining room. Keep an eye on your booze stockpile, so you don't cook it all away.
- "pots": a furniture stockpile set to only accept wooden large pots. Set this to give to the still.
- "f2" is a food stockpile set to accept only brewable plants, and giving to the still (details later).
- The two "solid food" stockpiles accept only cookable solid food items (details later):
- The no-barrel pile should have number of barrels set to zero and give to the kitchen
- The barrel pile is merely overflow storage, and should give to both the no-barrel pile and the kitchen
The barrel/no-barrel setup is designed to work around a rather awkward bug: cooks prefer solid ingredients in containers more than liquid ingredients, which means that even though technically liquids can be combined with solids to make meals, they never are. This limits the variety of your dwarves' diet and reduces their chance of eating a meal containing a preferred drink, which makes them happy. To get around this, we exploit the fact that cooks display equal preference for liquids in containers and solids outside of containers; as long as the liquids are closer, the cook will start with those and then add a solid to round out the meal (since at least one solid ingredient is required). The no-barrel pile should be closer for most haulers and therefore be preferred, but inevitably some items will get stored in containers in the barrel pile, which will get cooked first. Unfortunately your dwarves seem to have some very strong feelings about storing items in containers: they will do so whenever stockpile options permit and absolutely will not under any circumstances remove an item from a container unless it is a) required for a job or b) transferring it to another container. Additionally, since seeds are stored in containers (bags) even when a stockpile does not allow barrels, you should expect to produce a lot of seed roasts before producing any meals with liquid ingredients. Still, this is currently the best way to go about things.
As for exactly what is allowed in the "solid food" piles, it's somewhat involved. You should block everything, then permit all meat, fish, egg, cheese, milled plant except the dyes (at the bottom of the list), and pressed material (except honey bee wax cake).
Seeds (which category includes the various nuts) are only marginally more difficult: permit all seeds except the underground crops (found near the bottom: sweet pod seeds, rock nuts, dimple cup spawn, plump helmet spawn, cave wheat seeds, pig tail seeds).
The most complex sections of the food stockpile are "plant" and "Fruit/Leaves", partly due to a bug which makes certain plants unreliably useful, and partly because plants can now have different products with different uses. For example, dates can be brewed into date wine, but date palm flowers can only be cooked. In other words, you can't just go by species!
After considering that, here's a list of the "Plants" and "Fruit/Leaves" items which cannot be brewed or otherwise processed, and which we'll therefore cook. I've compiled this list by going through the Crop and Tree pages, though as mentioned above the behaviour might still be a little buggy. If you're finding that a particular plant is hanging around the brewery pile and cannot be brewed, try sending it to the solid cookable foods pile and see if the kitchen can use it.
Plants Alfalfa, bitter vetch, red spinach, elephant-head amaranth, asparagus, bambara groundnut, string bean, broad bean, bitter melon, cabbage, caper, celery, chickpea, chicory, cowpea, cucumber, eggplant, garden cress, garlic, horned melon, leek, lentil, lettuce, mung bean, muskmelon, onion, pea, peanut, pepper, red bean, rhubarb, soybean, spinach, squash, taro, urad bean, watermelon, winter melon, lesser yam, long yam, purple yam, and white yam.
Fruit/Leaves All leaves, any other growths for the species listed above, plus Cacao fruit, Cashew Apple, Coffee Cherry, Paradise Nut Fruit, Avocado, Lime, Pomelo, Citron, Orange, Bitter orange, Finger lime, Round lime, Desert lime, Kumquat, Date Palm Flower Stalk, Saguaro fruit, Feather Tree Eggs and Coconut.
It might not seem like it, but doing things this way is easier than assessing each new item of produce as they become available. Trading, in particular, can bring a great deal of variety to the diets of your dwarves all at once.
Which plants to allow in the brewing stockpile (f2)? Unlike the complex category of "cookable solids which don't have any other use", there's a handy list of brewable plants and fruits, so go through the "Plants" and "Fruit/Leaves" sections of the food stockpile menu to allow all of those.
Once this is all set up, set your brewer and cook to work with repeated "brew drink from plant", "brew drink from fruit" and "cook lavish meal" jobs. Lavish meals net less experience per ingredient, but the larger meals - five ingredients, as opposed to three or four for the other two types - have a higher chance of including an ingredient a dwarf prefers. A dwarf's assessment of food quality appears somewhat buggy at the moment: high-value, high-quality meals don't appear to generate happy thoughts unless they also contain a preferred ingredient.
You'll have to watch your herbalist/woodcrafter/brewer carefully to balance those three labours which are required to produce booze. Remember, designating a huge area for plant gathering can monopolise their time for months. If designating them as low-priority (level 7) doesn't make them reliably prioritise brewing and woodcrafting jobs, limit plant gathering designations to small runs of 10 - 15 plants at a time. And remember to keep checking the kitchen menu (through the z-status screen) to disallow cooking on all brewable items, and allow cooking on all seeds except the underground and oilseed crops. You'll have to do this repeatedly as new species become available.
Finally, don't be shy about prepared meals - we can always trade away the excess, so as long as you have the hauling capacity and booze to spare, try to fill the stockpiles. And it's probably a good idea to dig a connecting doorway between the kitchen and the adjacent room containing cookable ingredients in barrels.
Lower layer
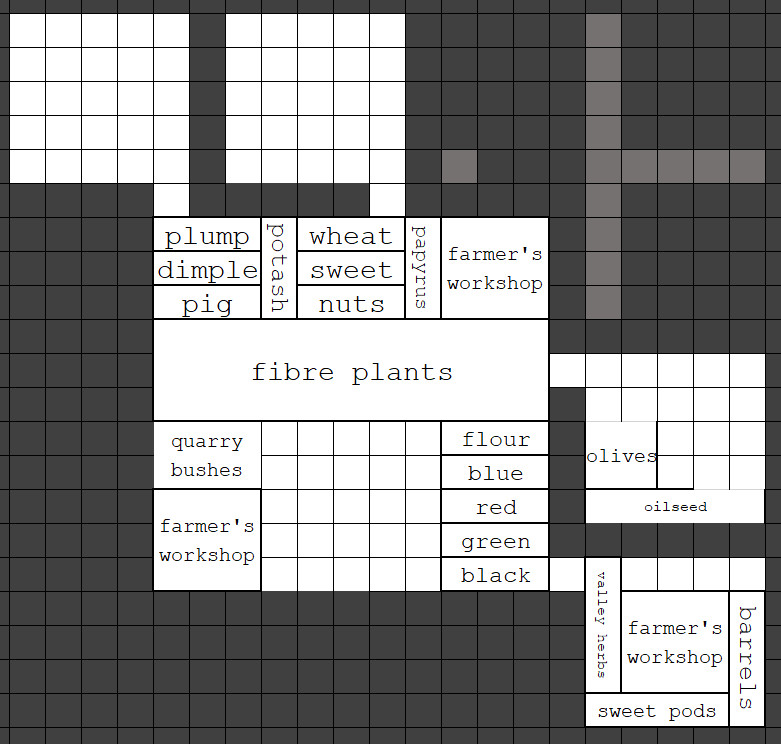
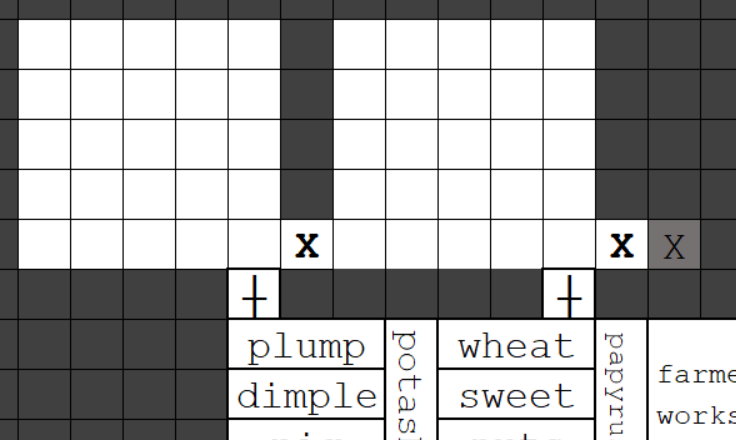
The lower layer of the food quadrant will be used for indoor farming and for non-brewing, non-cooking processing chains for plants. This includes milling, making fibre, processing to bags, and various slurries and extracts. Most of that will come later - for now, you're just going to set up farms and some storage.
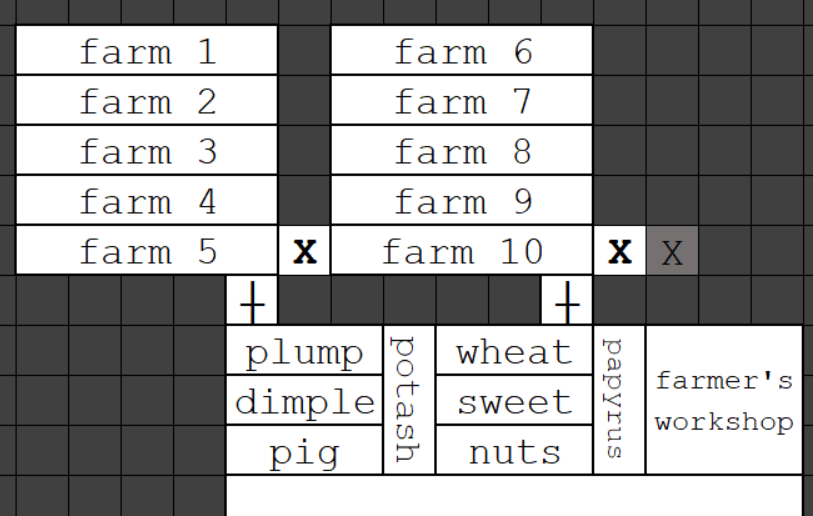
Begin with the following stockpiles and workshops:
There are a few things to explain:
- The empty spaces are primarily for farming (north rooms) and the milling/pressing infrastructure which will come later.
- The six stockpiles in the upper-left - "plump", "dimple", "pig", "wheat", "sweet" and "nuts" - are actually for the seeds of the six underground plants. Disallow barrels in these stockpiles - the seed cap is 200 per species, and each tile can hold a bag with 100 seeds.
- Potash is a bar used to fertilise farm plots and increase yields, produced at an ashery. We don't have one of those yet.
- "fibre plants" is a food stockpile set to accept the eight plants from which can be made thread and paper: pig tails, rope reeds, hemp, cotton, ramie, flax, jute, and kenaf. Set this to take from the booze plant stockpile - there are plenty of other plants which can be brewed. Set this also to give to the farmer's workshop above it.
- There are several other single-plant food stockpiles: "papyrus", "quarry bushes", "olives", "sweet pods", "valley herbs", "blue", "red", "green" and "black". Set the papyrus stockpile to give to the adjacent farmer's workshop, which will produce papyrus paper. Set the sweet pod stockpile to take from the booze plant stockpile and give to the adjacent farmer's workshop - this will produce dwarven syrup. The four colours are for the four dye plants: dimple cups, hide root, blade weed and sliver barb, respectively. Set the sliver barb pile to take from the booze plant stockpile. Sliver barb is only available in evil biomes, so this pile isn't actually useful until you feel like a challenge.
- To hold the dwarven syrup, "barrels" should be set to accept only wooden barrels and take from the barrel stockpile in the wood quadrant, and give to the farmer's workshop. There's a reported bug that large pots are not used for making sweetpod syrup, which I haven't confirmed.
- "oilseed" is a food stockpile set to accept only the seeds of cotton, flax, hemp, and kenaf. Later, we'll set up a mill and press to grind these and extract the oil. Set this to take from both the "solid food" stockpiles upstairs.
- "flour" is for the flour-producing plants, of which there is a long list. You should also allow sweet pods, since they can be milled into dwarven sugar which serves the same purpose, and take from the booze plant stockpile and the "fibre plants" stockpile.
At this point, you should disable all categories in your central rampway stockpile so it doesn't keep getting restocked. Examine the types of items still sitting there, then make sure the appropriate stockpiles elsewhere are taking from this one to clear it. Eventually, all that should remain is the cloth, ropes, and anvil - and we'll find homes for them soon enough.
All that remains now is to prepare the farms. Indoor farming is obviously much safer (if less varied) than harvesting from the surface, so it's essential. You can't farm directly onto stone - we need to muddy the floor first with water.
Plumbing
Water is essential for all manner of fortress needs, and the best source of clean, fresh water is your river or brook. There are two main risks when piping fresh water into your fortress: flooding and security. We will deal with both by a combination of floodgates (to control water access) and bridges (to control swimming building destroyer access), but at minimum it's probably a good idea to go read up about Pressure.
For safety, we'll start digging the pipes from the inside of the fortress and only break through to the river or brook at the last moment. Your miners may have a lot of other designations to get through; to get this section completed quickly, set digging priority to "3".
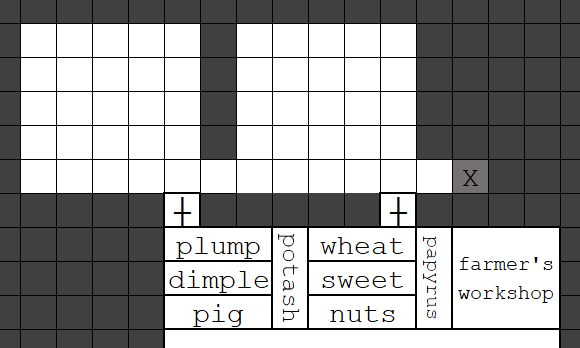
On the lower lever of the food quadrant, dig a connection between the farms, an up/down staircase (the X) and install doors like so:
We're going to partially flood those rooms, so the doors will contain the water. As mentioned before, the lighter grey tiles in these diagrams represent ducting and shafts. Water can happily flow through stairs, and by using those to excavate the pipes, your dwarves can move through the dry shafts for maintenance and excavation.
Dig another up/down stairs through the next z-level above (level -10), like so:
And one more, in z-level -9:
And a two more directly above, in z-levels -8 and -7.
Apart from your central rampway, there should be no other rooms on level -7 so you're free to dig straight over to your river. First, however, you're going to have to count some tiles.
Go to the nearest river tile - by which I mean flowing water tile - and then find the nearest tile (towards your fortress) which is not diagonally or orthogonally adjacent to water. It must be completely surrounded by eight tiles of good, solid earth! This should only be an issue if your river has a concave bend towards your fortress at this point.
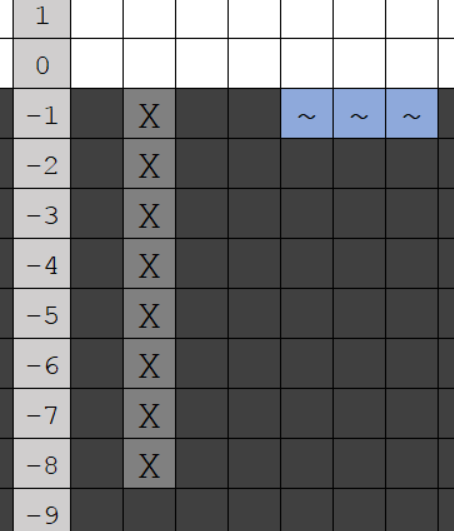
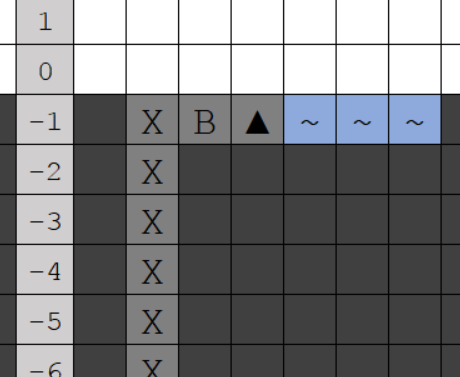
Next, count two more tiles towards your fortress. That is the xy-location of your vertical shaft. Beginning on z-level -1, designate down-stairs on this tile to level -8 (yes, that's a level below the riser coming from inside your fortress). Here's a side-view (all others are top-down unless indicated) of what I mean:
The z-level guide is in light grey (don't excavate this!), the plumbing shaft (up/down stairs) is in the familiar middle grey, solid earth is in dark grey, air is white, and the water tiles (~) are in blue. You must ensure there are two solid tiles between your shaft and any water tile, remembering that water can flow diagonally. We'll need one of these solid tiles for a bridge, and the other is the final tile you'll channel out to unleash the river.
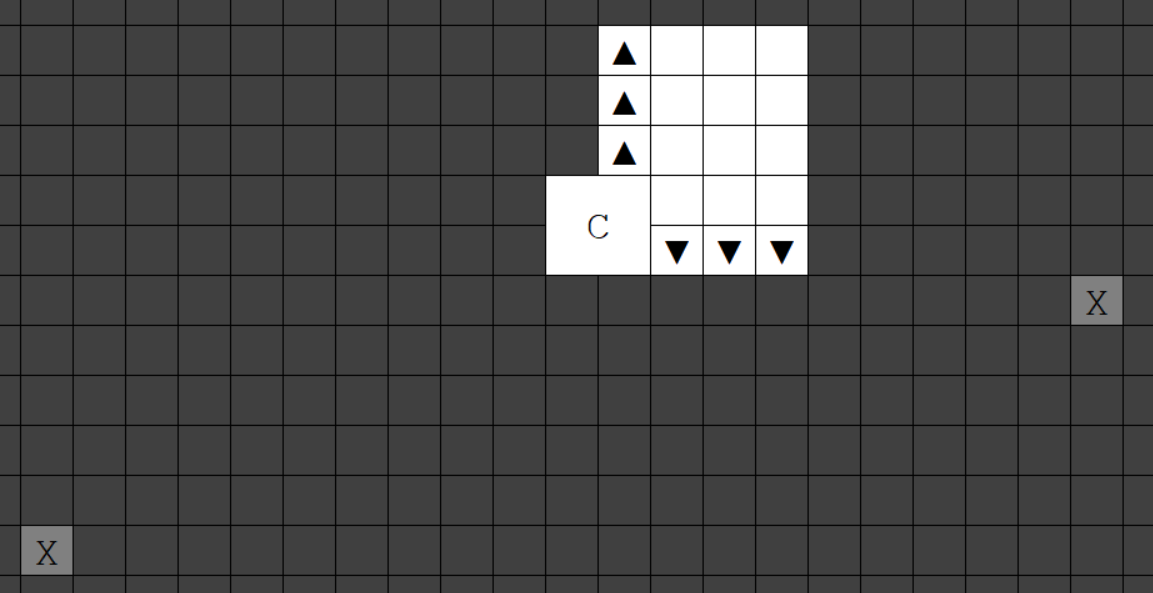
Here's how it looks for me on level -8 now:
In my case, the leftmost stairs is my riser coming from inside the fortress, and the rightmost stairs will be my connection to the river. On this particular embark, the river was quite close to the map centroid - of course, your nearest river tile may be much further away, and in any direction. It doesn't matter a great deal.
Once you've got these two guides in place, you can dig across to join them up, though we're adding a small kink in the pipe to install a grate which should exclude items (which can jam floodgates) and non-building-destroyer creatures.
From the bottom of the river-access stairs, on level -8, dig a single tile towards your internal riser (west, in my case), and then ramp up to level -7, like so:
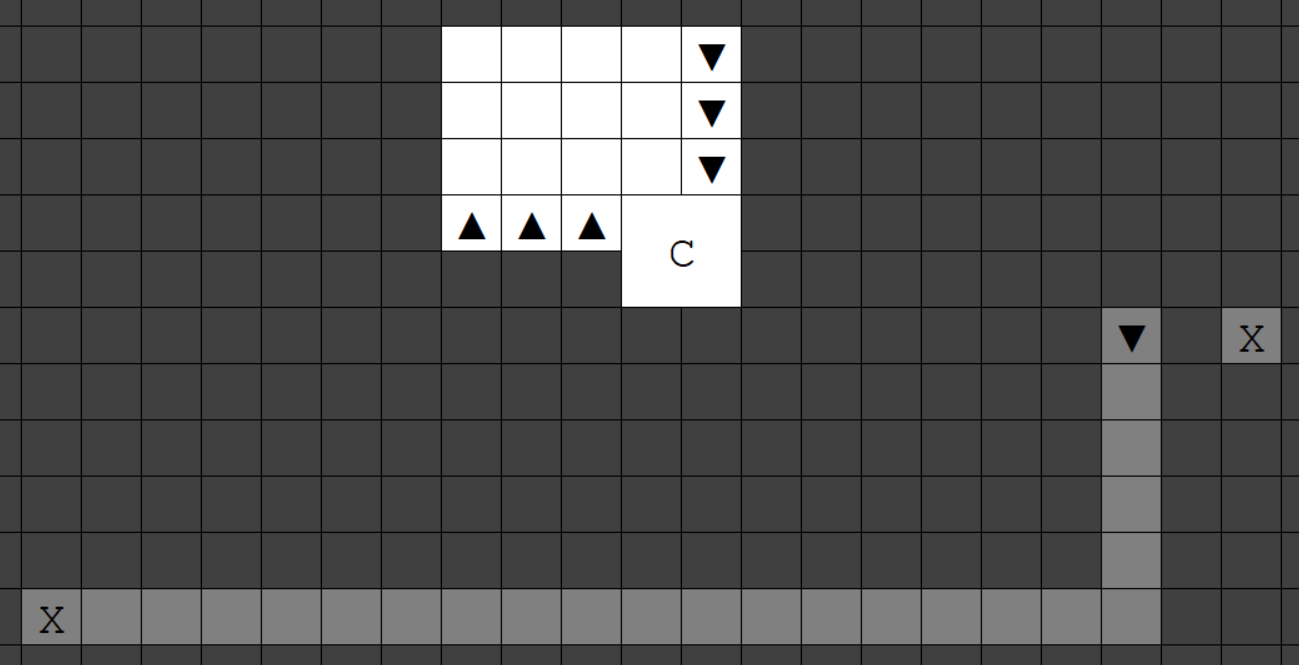
Now, on level -7. you can connect the two shafts. Try to stay away from the central rampway. Here's how mine looks:
That's the shafting done - all we need is some taps and security. Going back to level -1, from the up/down stairs, dig a single tile towards the river and build a single-tile bridge from stone blocks which raises away from the river - in my case, to the east:
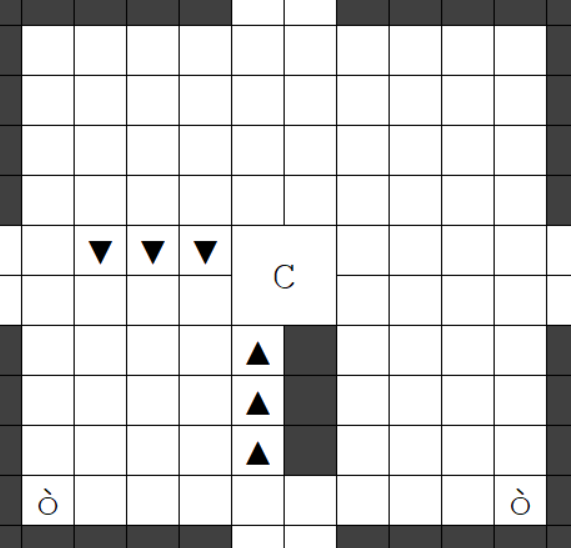
Build a lever in another corner of your fortress's middle room (you will first have to remove the stockpile on that tile) like so:
Link it to the bridge and write an informative Note on the lever to the effect of "Water outer bridge".
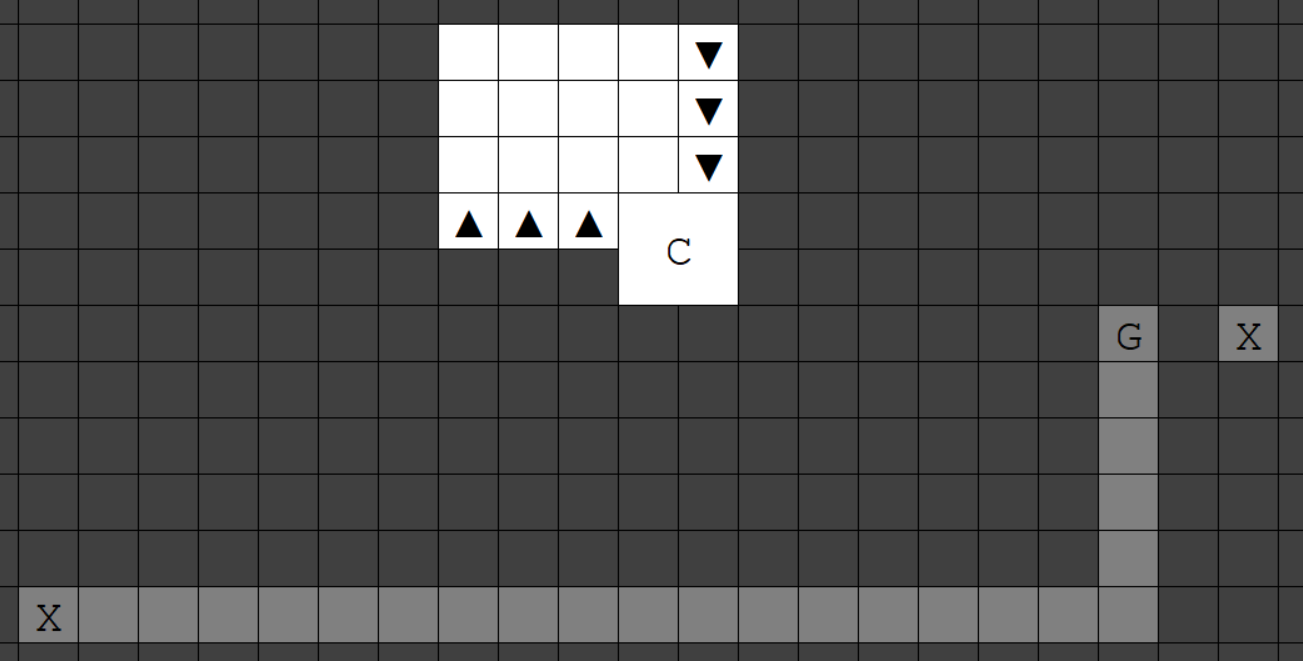
Next, we need a floor grate. Queue one up at your mason's workshop, and install it above the up-ramp where we put a kink in the plumbing, like so:
Where "G" is the floor grate on the tile which use to show a down-ramp. Build another lever in the central room next to the "outer water bridge" lever, connect it, pull it to open the grate, and label it something like "water mains floor grate". Grates and floodgates, unlike bridges, are installed in the "closed" position, so you may temporarily trap dwarves (usually miners) behind it while they wait for the lever to get built, linked, and flicked.
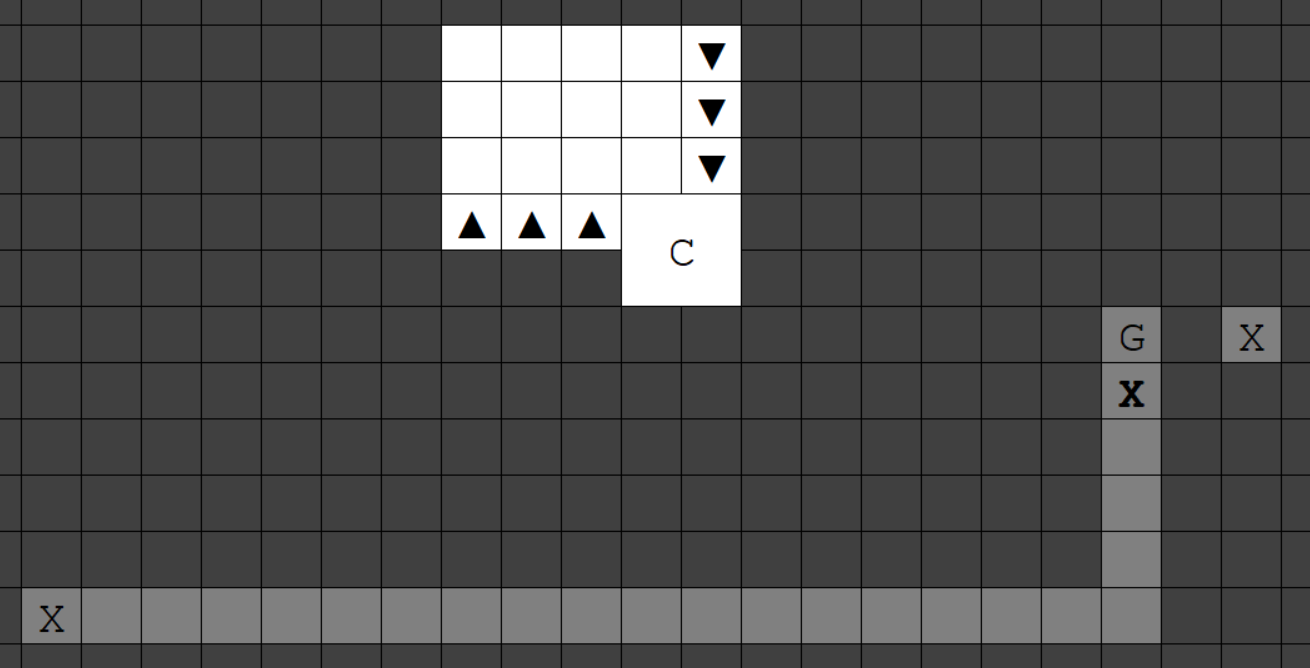
Likewise, build a stone floodgate (for all these items, get your mason to make them as needed) just inside the grate, build a lever next to the other two, link it to the floodgate and label it something like "water mains floodgate" and pull it to open the floodgate. Your shaft on level -7 should now look like this (floodgates use the same character as up/down stairs, so I'll show floodgates in bold):
Now your water shaft is fairly secure. You can raise the outer bridge to exclude water and all kinds of creatures (including building destroyers); in addition, the grate will exclude not only items which jam your floodgates but also any swimming creatures which might sneak into your pipes. There's a bit of a bug with grates in that creatures and items can be pushed through them by flowing water unless flow is upwards under pressure; hence the little kink in our plumbing. A grate like this should also exclude building destroyers due to a quirk of behaviour, since they need a valid path to the tile in which the building is located in order to destroy it, and if you raise the bridge in your rampway they should have no such path. That might be fixed at some point, which is why we have the outer bridge as well. The floodgates - which can be used to control the flow of water without using the outer bridge - are located safely behind these building-destroyer defences so nothing can break them and flood your fortress. It should be noted that artefact grates (and other buildings) are completely immune to building destroyers and are therefore immensely valuable in this kind of setup, allowing you to keep the water flowing with complete safety under all circumstances.
If your nearest river tile is quite close to the edge of the map, a building destroyer might be able to shimmy down your pipes before you can raise the outer bridge. If this is the case, it's probably worth installing a backup bridge in your pipes closer to the centre of the map.
Back to the farms. Dig a connection between the farms and install two floodgates as shown:
To make things easier to remember, it might seem reasonable to place the lever right next to the floodgates.
Under no circumstances should you do this.
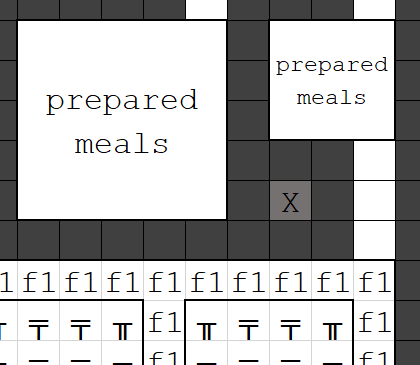
Flowing water pushes dwarves around and can get deep alarmingly quickly; it's very possible that they won't be able to fight the torrents of water to pull the lever again and shut off the flow, which risks flooding your fortress. We've installed a mains tap upstream, which gives us a backup, but it's still very easy to flood an entire level while you're distracted. As a rule, it's best to place floodgate levers where they can still be accessed in case of flooding. With that in mind, put the lever for the farm floodgate in the corridor on the level above (i.e. the middle fortress layer):
Note that suddenly we have five levers in the fortress. Label this new one something like "farm floodgates", connect up the two floodgates, and pull the lever to open the floodgates.
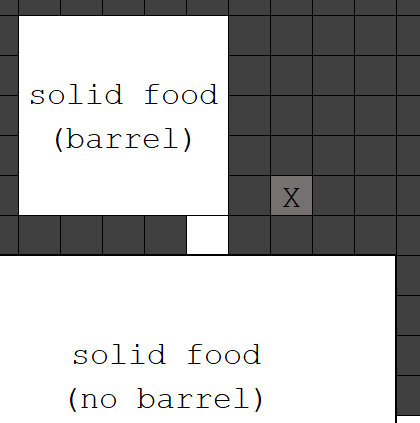
The final job before flooding the farms is to clear the pipes of any debris which might jam the floodgates. It's too slow and unreliable to wait for your dwarves to clear the stone by regular use (since stone in the shafts is rapidly deprioritised by new excavations), so we'll dump it instead. Create a 1-tile garbage dump zone (zones are represented by three parallel horizontal bars) in the corridor near the lever, like so:
Then go through the pipes and designate every square for dumping using d-b-d. Stone can be hidden by features such as ramps and stairs, so make sure you designate every square, and don't designate over any dwarves - all their clothing and items will be marked for dumping. You should also mine out and dump any gems or ore in the plumbing walls and replace them with constructed walls, because once it's flooded you won't have an easy time recovering them.
Slowly, your dwarves will haul any stone in the shaft out to the dump, at which point you can reclaim it with d-b-c. Once all your dwarves are out of the shaft, close all the floodgates, the grate, and the bridge. They shouldn't be tempted to use it as a shortcut to the surface, but you may need to close one of the barriers - say, the grate - to force them to abandon it entirely. Then set the two farm doors to "forbid passage" and "keep tightly closed" so no dwarves or pets accidentally open them. Finally, on the surface level (level zero), channel out the solid tile between your bridge and the river, like so (side view):
The water should fill this tile with the ramp, but not go past your bridge. You should cover this partial hole in your defences by constructing a floor over the ramp (on level 0), using a stone block.
Now you can flick the bridge lever and watch the water fill the shaft all the way to the mains floodgate. Then you can flick the mains floodgate lever and watch it fill the shaft all the way to the farms, and finally flick the farms floodgates. Every tile in the farm rooms has to be touched by water, but you don't want too many tiles with a depth of more than 1/7 or it'll get messy. There's a bit of a lag involved in operating floodgates, so flick the farm floodgate lever back a little before the rooms get completely covered, using the "Do task now!" urgency option on the lever-pulling job (n). Keep a close eye on the water depth on various tiles. Water in Dwarf Fortress is actually fairly viscous and slow-flowing, so be aware you're likely to have a couple of tiles of 7/7 near the shaft but still have plenty of dry tiles in the corners of the rooms. After this, I'd recommend closing off the bridge and the mains floodgate as well, juuuust in case. Call it "reasonable paranoia".
Un-forbid and allow pet passage on the farm doors. Water of depth 1/7 will eventually evaporate on its own, but deeper water won't; remove the farm doors if you have deeper water so it can spread out.
Congratulations! You now have arable stone. More importantly for the longer-term, you have a secure supply of clean water, and the plumbing to get it where it needs to go. This is essential for any fortress, but can be tricky to engineer so most players leave it until it's too late. We're eventually going to do a lot more with reservoirs, waterfalls, fishing holes, wells, hospitals, bathtubs and swimming schools, but that's quite enough plumbing for now.
Dirt farmer
Once the water is (mostly) dry, build ten farm plots, each a 1 x 5 strip, like so:
Small farms give you more granular control over what is produced. In addition, farming is very productive - particularly with a skilled planter and fertilisation - so this should be enough for the foreseeable future.
The following table lists the six underground crops, their growing season, and what we will be using them for (for much more info, see the tables on the Crop page).
| Plant | Growing season | Early-fort uses |
|---|---|---|
| Dimple cups | All seasons | Nothing yet: plant all seeds, wait for textile industry |
| Pig tails | Summer & autumn | Brew dwarven ale; later, paper & textiles |
| Cave wheat | Summer & autumn | Brew into dwarven beer; later, mill to flour |
| Sweet pods | Spring & summer | Brew into dwarven rum; make dwarven syrup; later, mill to sugar |
| Quarry bushes | Spring, summer & autumn | Nothing yet; plant all seeds and wait for bags |
| Plump helmets | All seasons | Brewing into dwarven wine |
Go to the z-menu and select "Kitchen" to make sure none of these crops are allowed to be cooked, and the four brewable species are permitted for this use.
We're going to have 5 different seasonal rotations, which are duplicated in each room. You'll notice this setup is rather heavy on the pig tails: since these are used for brewing, textile and paper, they are quite versatile.
| Plot | Spring | Summer | Autumn | Winter |
|---|---|---|---|---|
| 1 | Sweet pod | Pig tail | Pig tail | Dimple cups |
| 2 | Quarry bush | Pig tail | Cave wheat | Dimple cups |
| 3 | Sweet pod | Pig tail | Pig tail | Plump helmets |
| 4 | Quarry bush | Pig tail | Cave wheat | Plump helmets |
| 5 | Dimple cups | Pig tail | Pig tail | Dimple cups |
This growing pattern shouldn't need much tinkering with as the fortress expands, but if you find an excess of something and a shortage of something else, change the crop rotations accordingly.
Experienced farmers harvest larger stacks of plants, which yields enormous efficiency returns as those stacks are funnelled through various processing chains. For this reason, in the workshop orders we already set "only farmers harvest" to maximise their skill gain. If, however, you find they're not keeping up and crops are withering, turn this off again.
You're done! The food industry is one of the more complex aspects of Dwarf Fortress, but with this approach you've balanced your immediate needs with preparing the ground for more long-term industries. Having safe access to clean water is serious business, too.
You now have a completely uninterruptable supply of food and drink, and can completely seal up the fortress at will. Your security from (external) threats is assured! However, while a defence based purely on passive barriers may be an efficient way to preserve your dwarves, it will not preserve your control of the surface. Losing access to trees and migrants, and allowing the slaughter of Diplomats by your enemies can be very fun. You need a way to take the fight to the enemy, a flexible and powerful security solution which can be deployed at will - in short, you need an army.
In the next section, we supplement the food industry with animal products, and begin stockpiling equipment for your military.
