- v50 information can now be added to pages in the main namespace. v0.47 information can still be found in the DF2014 namespace. See here for more details on the new versioning policy.
- Use this page to report any issues related to the migration.
Difference between revisions of "40d:Screw pump"
(→Notes) |
m (Added note revealing that the front of the pump is on the output side.) |
||
| Line 22: | Line 22: | ||
* In order to build pumps in a "hanging" state, as in the stacked screw pump example, one of its tiles must be able to connect to a nearby machine; either already existing or designated to be built. | * In order to build pumps in a "hanging" state, as in the stacked screw pump example, one of its tiles must be able to connect to a nearby machine; either already existing or designated to be built. | ||
* A hatch on the input tile makes a useful on/off switch. | * A hatch on the input tile makes a useful on/off switch. | ||
| + | * The front pump tile is on the output side. | ||
* The rear pump tile does not block creature movement. The front of the pump does block creature movement. | * The rear pump tile does not block creature movement. The front of the pump does block creature movement. | ||
* The front pump tile blocks liquids flow. The rear of the pump does not block flow. | * The front pump tile blocks liquids flow. The rear of the pump does not block flow. | ||
Revision as of 12:17, 18 January 2009
|
b-M-s | |||||||
| |||||||
| Job Requirement | |||||||
|---|---|---|---|---|---|---|---|
| Construction | |||||||
| Materials | Jobs | ||||||
| |||||||
| Power | |||||||
|
Needs 10 power. | |||||||
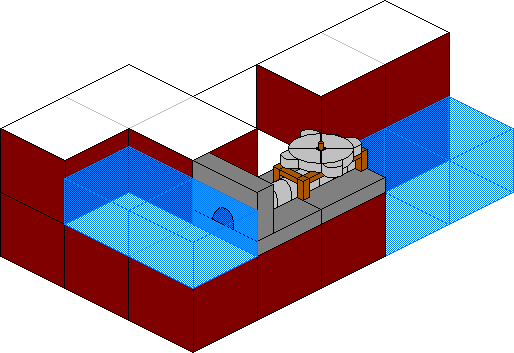
A screw pump can lift liquids (water or magma) from below onto the same Z-level as the pump. It is two tiles by one tile in size, and it can be either manually operated by a dwarf with the pump operator job or by using gear assemblies connected to water wheels and/or windmills. The direction you want the water to travel must be chosen at the time of construction.
Construction
Building a screw pump requires an enormous corkscrew, a block, and a pipe section. The light green X must be next to the liquid source and the dark green X is where the liquid exits the pump. Having specified the direction of travel, you must ensure that the source side of the pump is placed adjacent to and above (in the z-axis) a liquid. The screw pump will draw the liquid up from below, and distribute it out of the other side of the pump. Screw pumps are buildings that can be removed to recover the materials.
Notes
- The source of the pump must be directionally adjacent to "Open Space" that is directly above a filled pool of liquid. The adjacent space cannot be a floor, stairway or wall suspended over water. Screw pumps can pump water through a grate or floor bars.
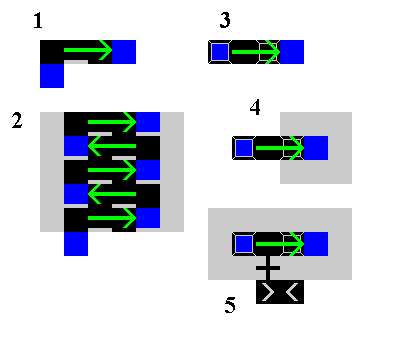
- In order to build pumps in a "hanging" state, as in the stacked screw pump example, one of its tiles must be able to connect to a nearby machine; either already existing or designated to be built.
- A hatch on the input tile makes a useful on/off switch.
- The front pump tile is on the output side.
- The rear pump tile does not block creature movement. The front of the pump does block creature movement.
- The front pump tile blocks liquids flow. The rear of the pump does not block flow.
- Dwarves must be able to access and stand on the rear tile of the pump in order to be able to operate the pump manually and even to buid it.
- Active mechanisms connected to the pump will automatically start the pump; to prevent this either restrict liquid flow using floodgates, or put in a gear assembly linked to a lever to disconnect motion.
- Pumps can also be used in conjunction with a water wheel or a windmill to become self-powered.
- Pumps can not push liquids up additional Z-levels. That is, if you direct the output of a screw pump into a 1-square space surrounded by walls, the water will not "overflow" the walls.
- Consequently, a pump will refuse to move liquid if the level it is pumping to is completely filled.
- In order to pump magma, you DO NOT need to build pump out of magma-safe materials, unless the rear (not blocked) tile is going to be submerged in magma. Note that wooden components will wear out quickly when used to pump magma.
Example layouts
Single Pump
Multiple Levels
Stacked pumps
See Diagram 2. This example is from a Bay12 forum thread.
- Side view of the basic pump unit. Water is moved from the lower floor to the upper; notice how the front of the pump does not need a floor.
- Side view of stacked screw pumps. Power is transmitted vertically through the missing floor tiles under the fronts of the pumps - no need for gearboxes in this design. The screw pump front prevents the water from flowing diagonally downwards.
- Top view of the basic pump unit.
- Top view with walls in place to prevent the receiving area from spilling out. If this is all it needed, these units could be stacked on top of each other, but it's missing one thing - dwarf access. There's no stairs/ramps, and no good place to put them either that wouldn't interfere with the adjacent levels' water containment.
- Solution for a freestanding tower - fire escape! Sure, you could consolidate the up and downstairs into a single up/down stair tile, but I like the zigzag and symmetrical arrangement this one presents. Just build these on top of each other, flipping horizontally each time, and bam. Minimal yet aesthetic multi-level water pumping.
L-shaped Tunnels
Instead of using dwarves to work the pumps you can create a pumping system around a central gear column, and use waterwheels at the base to create power for the entire structure.
The L-shape's purpose is to stop water leaking back down the system. Note that either level may be used as the base and tessellated appropriately.
Phase I - Dig out the basic shape of the structure
Digging

Level 1    Level 2      Key
######     ######      # Undug wall
#    #     #   _#      . May be wall, cleared, or stairs.
# ####     # # ##      _ Channel
#   ..     # # ..
#_#...     # #...
###...     ###...
Phase II - Construct the screw pumps and driver gears.
Construction

Level 1    Level 2      Key
######     ######      % Output side of pump
#    #     # %%_#      % Input side of pump
#%####     # #*##      * Direct drive gears
#%* ..     # # ..
#_#...     # #...
###...     ###...
Phase III - Dig out the vertical channel for the power transfer column.
Digging

Level 1    Level 2      Key
######     ######      _ Channel for transfer gear.
#    #     # %%_#
#%####     # #*##
#%*_..     # #_..
#_#...     # #...
###...     ###...
Phase IV - Finally place the power transfer gear:
Construction

Level 1    Level 2      Key
######     ######      ˜ Water on z-1
#≈≈≈≈#     #≈%%˜#      ≈ Water on current z
#%####     #≈#*##      * Power Transfer Gear
#%**..     #≈#*..
#˜#...     #≈#...
###...     ###...
Phase N - Hooking up to water wheels:
Placing water wheels in the water source can be used to power the whole system. Just add more wheels as neccesary.
######....            Key
#≈≈≈≈#....             |  Horizontal axle (North-South)
#%####....            HHH Water wheel
.%**===*..             =  Horizontal axle (East-West)
.˜.|...|..
.˜HHH˜HHH˜
..........
Running a pump with a windmill
First, build a windmill anywhere aboveground (note that it won't do anything yet).
Then, build the pump. The end you selected to 'pump from' will suck water up from the level below, then pump it out of the other end. Build with this in mind. If you want to pump from a river, the 'pump from' end should be on the river.
Both the pipe and corkscrew can be built by a carpenter, (the corkscrew is listed as something like 'enormous wooden cor' if you are using the single-width screen, but hitting Tab to expand the screen should reveal the full text).
Connecting windmills to pumps:
Note that it's much easier if the centre of the windmill lines up with the pump.
- Dig one level below the windmill and put a gear assembly directly beneath the axle (at centre of windmill). The windmill will start turning.
- You're probably going to want to bring your power up to the surface. To do this, dig away from the first gear until the surface is clear above. Place another gear here.
- Connect the gears together using a horizontal axle.
- Get a miner to channel on top of the second gear.
- Build a third gear in this channel. You should now have a turning gear on the surface.
- If you thought ahead, you should only need one axle to connect the surface gear to the pump. A pump can be powered from any side.
I recommend that you connect a lever to one of your gears beforehand. The pump will start pumping as soon as it has power.
You can change stuff around as the situation dictates, but that should get you started.
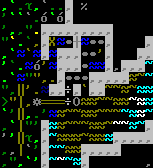
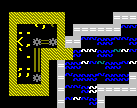
The pictures aren't lined up - the far right gear in the second picture is the one below the surface gear.
Alternative uses
Pumps can also be built with no actual pumping in mind but as dwarven exercise machines. This is an excellent method to train haulers for better strength and agility or for future soldiers.
Screw pumps also act to desalinate any water which is pumped through them. This is very useful for providing a source of potable water in otherwise entirely salt-water regions. However, if desalinated water comes into contact with saltwater, or passes through a saltwater aquifier level (even if it has been walled off), the water will be resalinated.
Screw pumps can be used to "reset" water pressure, preventing a surface water source from flooding a fortress through a well or fishing hole.
External links
- DFMA Ingame Videos featuring screw pumps: (Movies with Pump in the title)


