- v50 information can now be added to pages in the main namespace. v0.47 information can still be found in the DF2014 namespace. See here for more details on the new versioning policy.
- Use this page to report any issues related to the migration.
v0.31:Screw pump
| This article is about an older version of DF. |
Template:Human Note: Pumps will transfer power vertically as they did in 40d. It is confirmed they function in all respects as they did in the previous version. For information on vertical power transfer see Pump Stack below.
|
b-M-s | |||||||
| |||||||
| Job Requirement | |||||||
|---|---|---|---|---|---|---|---|
| Construction | |||||||
| Materials | Jobs | ||||||
| Power | |||||||
|
Needs 10 power. | |||||||
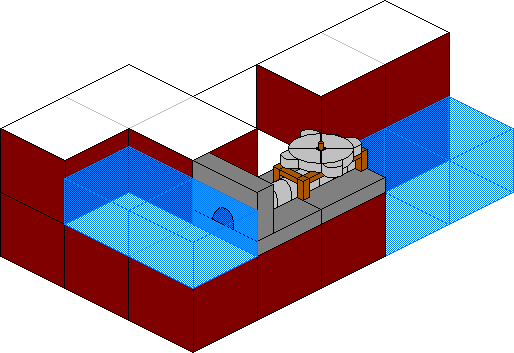
A screw pump is a small Template:L that can lift liquids (Template:L or Template:L) from one level below onto the same Template:L as the pump. It is two tiles by one tile in size, and it can be either manually operated by a Template:L with the Template:L job or by being Template:Led by Template:Ls and/or Template:Ls.
The direction you want the fluid to travel must be chosen at the time of construction. Pumping only occurs in a straight line, and involves a total of 4 tiles in a row - the liquid source, two for the pump, and the output. The "rise" in levels occurs on the first tile, the intake side, from one level below up to the level of the pump*. Pumped fluids can and will flow immediately after being pumped, as normal for that fluid. Pumped fluids will have a Template:L equal to the exit Template:L - a pump never "forces" water to a higher Template:L than the output tile.
- (* A DF pump can best be imagined as a simple archimedes screw.)
Salt water pumped through a pump will become drinkable if then kept separate from natural walls, natural floors, other salt water or an aquifer.[Verify]
For a basic overview of how the different machine parts work and work together, see Template:L.
Construction
Building a screw pump requires an Template:L, a Template:L, and a Template:L. The construction itself is completed in two stages. First a dwarf with the Template:L labor must design it. Then a dwarf (the same or a different one) with the appropriate labor must complete the building. This could be Template:L, Template:L, or Template:L, depending on the material of the block.
It's important to choose the proper orientation for your pump, where it will draw water from and where it will deliver the water. This is determined before placement with the u, k, m, or h keys, and the text at the top of the sub-menu will change to confirm your choice. The default (as shown above in the sidebar), "pumps from the north" (top). The light green X must be next to the liquid source and the dark green X is where the liquid exits the pump.

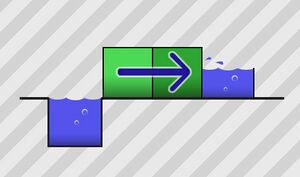
This pump "pumps from the west", from left to right. The area to the right may fill to the top of that level, but no more (See Template:L; see Template:L). Note that the entire space required is 4 tiles long by 1 tile wide, not including any retaining walls for the outflow. If pumped manually, the Template:L stands in the light-colored area, as the dark-colored is impassable to both fluid and movement.
(Although the "liquid" is shown as blue, this can work for Template:L as well, with the Template:L.)
X X
This example "pumps from the west" (left) to the east (right), the h option. If pumped manually, the dwarf stands on the light-colored tile, as the dark-colored is impassable.
The orientation is visible after placement by using query over or near that pump or during placement, using UMKH to select the direction of input. Orientation of a pump cannot be changed after being constructed, but, as with any building, it can be deconstructed into its component parts and rebuilt as and where desired.
Having specified the direction of travel, you must ensure that the source side of the pump is placed adjacent to and above (in the Template:L) a liquid. The screw pump will draw the liquid up from below its level, and distribute it out of the other side of the pump.
Notes
- The source of the pump must be directionally adjacent to "Open Space" that is directly above a source of liquid. The adjacent space cannot be a floor, stairway or wall suspended over water. Screw pumps can pull water through a Template:L, floor Template:L, or a Template:L Template:L on the Z-level below.
- The light pump tile is where a pump operator will stand (if the pump is not powered mechanically). Liquids to be pumped must be 1 level below the (empty) area adjacent to this tile.
- Dwarves must be able to access and stand on the light tile of the pump in order to build the pump and then to be able to operate the pump manually.
- The dark pump tile is on the output side. Liquids will appear in the tile adjacent to this.
- The dark pump tile blocks liquids flow and creature movement, and can be built into a wall to create a solid barrier. The light tile of the pump does not block flow or movement.
- Pumps can also be used in conjunction with a Template:L or a Template:L to become self-powered.
- Active mechanisms connected to the pump will automatically start the pump; to prevent this either restrict liquid flow using floodgates or hatches, or put in a Template:L linked to a Template:L to disconnect the Template:L.
- Adjacent pumps automatically transfer mechanical power to any other adjacent pump(s), no Template:L or Template:L is required. If too many pumps are adjacent, there may be insufficient power to power them.
- A hatch above the input tile (on the same level as the pump) that is linked to a trigger (a Template:L or Template:L) makes an effective on/off switch for that pump.
- In order to build pumps in a "hanging" state, as in the stacked screw pump example (below), one of its tiles must be able to connect to a nearby machine, either already existing or designated to be built. If, when the screw pump's construction is completed, the supporting mechanism has not yet been completed, it will promptly collapse into its component parts.
- Pumps do not push liquids up additional Z-levels above them. They only deliver water to their own level. That is, if you direct the output of a screw pump into a 1-square space surrounded by walls, the water will not "overflow" the walls. Consequently, a pump will refuse to move liquid if the level it is pumping to is completely filled. Higher levels can be achieved using a "pump stack" (below). (See Template:L)
- In order to safely pump magma, you do not need to build a pump out of Template:L materials, unless the open tile is going to be submerged in magma.[Verify]
- Exception: Wooden parts Template:L out fairly quickly when used to pump magma, eventually causing the pump to break down into the non-wooden parts. This is due to the magma heating the adjacent tiles to a temperature at which wood takes heat damage.[Verify]
- Magma, which normally has no pressure, will behave like pressurized when pumped. For example, when pumped into an U-turn, magma will come out at the other end. Normal (non-pumped) magma would just pool at the lowest level. This may be either very useful (can be used to build pressure towers for magma) or deadly (forge level flooded with magma, because someone tried to pump magma into a volcano).
- Pump's pseudo-pressure doesn't work across diagonals. If there is a diagonal-only passage in your tunnel, liquids will seep slowly through it, instead of bursting through above their normal maximal speed, like they would if there was good passage.
Common mistakes
- Orienting a pump incorrectly, and/or not having a proper open liquid source.
- Pumping water into an area with a path to other parts of your fortress. (The pump may work perfectly - the fortress quickly floods.)
- Expecting water to rise up above the same level of a pump.
- Building a wall attached only to the light tile - this leaves a diagonal leak between the wall and the dark tile unless sealed there. (If that's not a problem, don't worry about it.)
- Having stairs as input tile. Stairs block input tile, thus rendering the pump useless, even though liquids usually ignore stairs. Output tile can be any liquid-passable tile.
Example layouts
Single Pump
Pump Stack
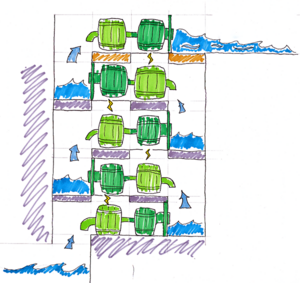
A Pump Stack is a method used to draw water or magma vertically across multiple z-levels requiring a minimum of parts. The basic functionality is possible because the Output (dark) side of the pump can be built over open space with a machine component located directly below, in this case another Screw Pump. Note that for power to properly transfer the intake (light) side of the pump must line up with the output (dark) side of the pump on the floor above it through a space in the floor, as in the illustration.
A pump stack minimizes the amount of machinery required to lift water or magma by allowing for power to be supplied directly to only the most accessible pump (typically the topmost) which in turn allows the player to operate a stack limited only by how many windmills/water wheels they can fit into the area.
Typical applications for a pump stack include moving magma from a lower level up to a convenient level for forges and furnaces, extracting water from a flooded fort, raising water for a decorative waterfall (and extracting it afterwards), or any other purpose that requires water/magma on a z-level significantly above its current location.
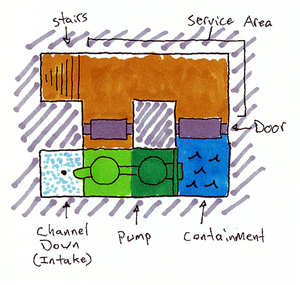
The Illustrated Top View of a Pump Stack Layer shows a basic section of a pump stack. Only the door (or a floodgate) on the Containment side is strictly necessary in order to prevent flooding. Two doorways are used here, each lining up with the solid ground within the pump assembly, in order to prevent workers from trapping themselves after digging channels or assembling the pump.
| Rooms |
Barracks • Bedroom • Dining room • Dormitory • Jail • Meeting hall • Hospital • Office • Sculpture garden • Tomb • Zoo |
|---|---|
| Furniture |
Animal trap • Anvil • Armor stand • Bed • Bin • Box • Bucket • Cabinet • Cage • Coffin • Restraint • Seat • Statue • Table • Weapon rack |
| Access | |
| Constructions | |
| Machine & Trap parts |
Axle • Gear assembly • Millstone • Screw pump • Water wheel • Windmill • Lever • Pressure plate • Trap • Support |
| Other Buildings | |
| Related Articles | |


