- v50 information can now be added to pages in the main namespace. v0.47 information can still be found in the DF2014 namespace. See here for more details on the new versioning policy.
- Use this page to report any issues related to the migration.
Screw pump
v53.10 · v0.47.05 This article is about the current version of DF.Note that some content may still need to be updated. |
|
b-m-p | |||||||
| |||||||
| Icon | |||||||
|---|---|---|---|---|---|---|---|
| Job Requirement | |||||||
| Construction | |||||||
| Materials | Labors | ||||||
| |||||||
| Power | |||||||
|
Needs 10 power. | |||||||
A screw pump is a small building that can lift fluids (water or magma) up to the same Z-level as the pump and can be either manually operated by a dwarf or powered by machinery. Pumping salt water or stagnant water can also produce clean water.
Layout[edit]
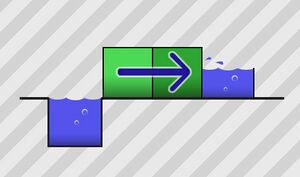
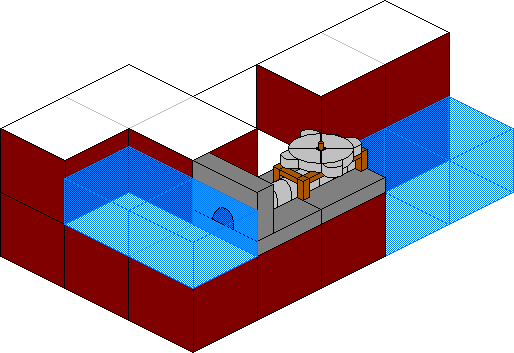
This pump "pumps from the west to east", flowing from left to right. The area to the right may fill to the top of that level, but no more (See pressure; and pump stack). Note that the entire space required is 4 tiles long by 1 tile wide, not including any retaining walls for the outflow. If pumped manually, the pump operator stands in the input side, as the output tile is impassable to both fluid and movement.
(Although this "liquid" is shown as blue, this can work for magma as well, with the appropriate precautions.)
A pump is two tiles by one tile in size, though since the pumping only occurs in a straight line, it requires a total of 4 tiles in a row: the fluid source, two for the pump, and the fluid output (see diagram, "Basic Side View of a Pump", right). The direction you want the fluid to travel must be chosen at the time of construction.
The two tiles of the pump are the input side where the fluid enters the pump, which is also where a pump operator stands, and the output side where the fluid exits the pump. In premium Graphics mode the input tile has many gears, and the output tile has jutting pipes, while in ASCII mode the input is the light-colored tile and the output is dark-colored.
The fluid is taken from one level below the tile next to the input, and moved to the tile next to the output. Pumped fluids will start flowing immediately after being pumped, as normal for that fluid, and thus the output tile of the pump is impassable so it won't flow back into the pump. Pumped fluids will have a pressure equal to the exit z-level - a pump never forces fluid to a higher z-level than the pump itself.
When operated manually the pump operator will need to be able to path to the input tile. When powered mechanically, the screw pump both accepts and transfers power using either tile of the pump, in all orthogonal directions, including above and below, meaning a properly aligned pump stack only needs one power input.
Construction[edit]
Building a screw pump requires an enormous corkscrew, a block, and a pipe section. These can be made of any material if the pump is intended to move water, but each component must be magma-safe if the pump is to be used to move magma. As with construction of other buildings, a dwarf first brings all materials to the planned site, then construction can begin. Both bringing the materials and the construction labor requires that the dwarf is allowed to do carpentry, metalsmithing, or masonry, depending on the material of the block. The constructing dwarf will finish the labor by standing on the input side of the pump, and so will require access to that tile. Deconstructing a screw pump requires the same labor as it took to construct it.
To build a pump, open the build menu, select machines/fluids and then Screw pump. When clicking the map to choose a location for a pump, the tile you select will be the output side of the pump. It's important to choose the proper orientation for your pump (to specify the source and destination tiles) using the sub-menu that appears in the upper-right of the screen. In Dwarf Fortress Classic v50, the arrows on this menu point in the direction of the source of the pump's fluid, not in the direction the fluid will be pumped (for instance, if you click on the →→ symbol, the machine will be built to pump from east to west). These same buttons in Dwarf Fortress Premium show an icon that more intuitively displays the movement of fluid by the machine, and are in an opposite layout. The default (as shown above in the sidebar), "pumps from the north", which is the center-bottom button in Dwarf Fortress Premium, and the center-top option in Dwarf Fortress Classic.
Having specified the direction of travel, you must ensure that the source side of the pump is placed adjacent to and above (in the z-axis) a liquid. That end of the pump is not directly over the source - it is one level above but adjacent to it. The screw pump will draw the liquid up from below its level, and distribute it out of the other side of the pump. It's easy to allow that output liquid to drain away to lower z-levels, but it starts on the same level as the pump, 1 z-level above where it came from. It's also possible to use walls to prevent the liquid from spreading, and this is recommended if you do not have a reliable drain system.
Construction of a screw pump can be prohibited with a "needs screw trap component" message if your enormous corkscrews are in a bin which has any current tasks attached to it (such as the relocation of a newly constructed corkscrew, or a military member moving a weapon). One workaround is to create a separate weapon stockpile for your corkscrews, and for best effectiveness, disallow the use of bins in that stockpile. This will force your corkscrew storage to work as smoothly (and space-consumingly) as a furniture stockpile. The use of a minecart quantum stockpile should also be possible, if the input stockpile is only allowed to take from the workshop.
After construction is complete, orientation of the pump will be displayed by clicking on the pump. Orientation of a pump cannot be changed after being constructed, but, as with any building, it can be deconstructed into its component parts and rebuilt with a new orientation, and/or a new location.
Notes[edit]
- Dwarves must be able to access and stand on the input tile of the pump in order to build the pump and then to be able to operate the pump manually.
- Liquids to be pumped must be 1 level below the (empty) area adjacent to the input tile.
- The space above the fluid source cannot be a floor, stairway or wall. Screw pumps can pull water through a grate, floor bars, or a constructed fortification on the Z-level below.
- Liquids will appear in the tile adjacent to the output side of the pump.
- The output tile blocks liquid flow and creature movement, and can be built between wall segments to create a solid barrier. The input tile of the pump does not block flow or movement.
- Pumps can also be used in conjunction with a water wheel or a windmill to become powered by these machines, rather than by a dwarf.
- Actively-powered mechanisms connected to either pump tile will automatically start the pump; to prevent this, either restrict liquid flow using floodgates or hatches, or build a gear assembly linked to a lever to disconnect the power.
- If a pump is powered, the pump will also output power to connected machines (gear assemblies, axles, other pumps, etc.).
- Adjacent pumps automatically transfer mechanical power to any other adjacent pump(s); no axle or mechanism is required. If too many pumps are adjacent, there may be insufficient power to power them. In this case, all pumps (and other items) connected to that power network will fail to work. By clicking on a powered pump, axle, gear assembly, windmill, or water wheel you can see the "Total Power" and "Total Power Needed" in the system.
- Dwarves operating pumps do NOT generate power. Thus, one cannot use a single pump operator to power an entire pump stack or anything else that accepts or transfers power.
- In order to build pumps in a "hanging" state, as in the stacked screw pump example (below), one of its tiles must be able to connect to a nearby machine, either already existing or designated to be built. If, when the screw pump's construction is completed, the supporting mechanism has not yet been completed, it will promptly collapse into its component parts.
- Pumps do not push liquids up additional Z-levels above them. They only deliver water to their own level. That is, if you direct the output of a screw pump into a 1-square space surrounded by walls, the water will not "overflow" the walls. Consequently, a pump will refuse to move liquid if the level it is pumping to is completely filled. Higher levels can be achieved using a "pump stack" (below). (See Pressure)
- In order to safely pump magma, you must use magma-safe materials, though magma-unsafe metals have been observed to be safe unless the input tile is going to be submerged in magma. Wooden parts (except for nether-caps) will burst into flames the instant the pump is activated, and magma-unsafe stone blocks melt after a short time. Despite the requirement for magma-safe materials, the exterior of the pump does not heat up, and dwarves do not mind operating a magma pump directly.
- Magma, which normally has no pressure, will behave as though pressurized when pumped. For example, when pumped into a U-turn, magma will come out at the other end. Normal (non-pumped) magma would just pool at the lowest level. This may be either very useful (can be used to build pressure towers for magma) or deadly (forge level flooded with magma, because someone tried to pump magma into a volcano).
- The pump's pseudo-pressure doesn't work across diagonals. If there is a diagonal-only passage in your tunnel, liquids will seep slowly through it, instead of bursting through above their normal maximal speed, like they would if there was a clear orthogonal passage.
- The liquid in a pump's intake tile must have a depth of at least 2/7 for the pump to be able to remove any amount of liquid from it.
- If a pump's intake tile on the z-level below the pump becomes blocked (e.g. cave-in, magma cooling into obsidian, or a sapling maturing into a tree) the pump will still run but not pump any fluid.
- If a pump's output tile contains magma and the pump is pumping water or vice versa, the output tile will be turned into obsidian.
- Pumps operate in the reverse order in which they were built-- the most recently built will try to pump, then the next recent, and so on. You can use this to your advantage for mist generation, to maximize fluid throughput, or for advanced repeater design.
- Screw pumps continue to operate for a short period (49 ticks) after losing power-- that is, a screw pump supplied power for exactly 1 tick will actually pump for 50 ticks.
- Screw pumps attempt to pump everything from the inlet tile to the outlet tile on every turn (so long as there is more than 1/7 liquid in the square). Actual pump rate tends to be slower than this, due to liquid needing to flow to the pump inlet, which can take a few turns depending on the source. A pump whose input tile is pressurized (e.g. at the bottom of a tall water tank) can move liquids at an alarmingly high rate.
- In previous versions, in adventure mode; if you brought your adventurer to a site with working pumps, the pumps would run as long as you were close enough to the fortress, but once you moved far enough away, the site got offloaded, causing the pumps to stop.
Common mistakes[edit]
- Orienting a pump incorrectly, and/or not having a proper open liquid source.
- Pumping water into an area with a path to other parts of your fortress. (The pump may work perfectly - the fortress quickly floods.)
- Expecting water to rise up above the level of a pump.
- Building a wall attached only to the input tile - this leaves a diagonal leak between the wall and the output tile unless sealed there. (If that's not a problem, don't worry about it.)
- Having stairs in the liquid of the intake tile. Stairs block the intake tile, thus rendering the pump useless, even though liquids usually ignore stairs. The liquid output tile can be any liquid-passable tile.
- Not channeling below the impassable tile of an individual pump in a pump stack. This is how power is transmitted to the pump below.
- Pumping magma into a lower z-level (same as the source) and then being surprised it is forced back up to the pump's z-level further down the line (where you were planning your magma forges, for example.)
Example layouts[edit]
Single pump[edit]
Pump stack[edit]
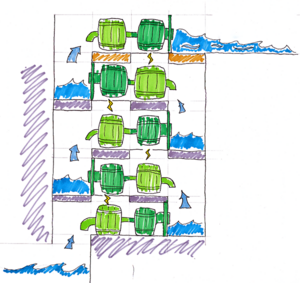
A pump stack is a method used to draw water or magma vertically across multiple z-levels requiring a minimum of parts. The basic functionality is possible because the output side of the pump can be built over open space with a machine component located directly below, in this case another screw pump. Note that for power to properly transfer, the input side of the pump must line up with the output side of the pump on the floor above it through a space in the floor, as in the illustration. While pumps can transfer power to and from either tile, you need flooring below the pump's input side, because that's where the dwarf stands to construct the pump.
A pump stack minimizes the amount of machinery required to lift water or magma by allowing for power to be supplied directly to only the most accessible pump (typically the topmost) which in turn allows the player to operate a stack limited only by how many windmills/water wheels they can fit into the area. The price of optimal parts density is fragility: each pump relies on the pump below it for support. If anything breaks a pump in your stack, every pump above it will be disassembled. This means that a single pump accidentally assembled with non-magma-safe parts can cause an entire magma pump stack to spontaneously disassemble.
To prevent such a disassembly cascade, you can "anchor" each pump with a mechanism or stable horizontal axle. For water applications, placing this axle on the output tile of the pump also conveniently prevents plant growth; for magma applications, the axle must be protected from the magma, unless you are using nether-cap.
Typical applications for a pump stack include moving magma from a lower level (often the magma sea) up to a convenient level for forges and furnaces, extracting water from a flooded fort, raising water for a decorative waterfall (and extracting it afterwards), or any other purpose that requires water/magma on a z-level significantly above its current location.
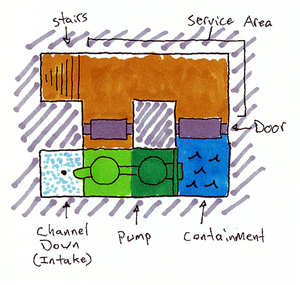
The 'Illustrated Top View of a Pump Stack Layer' shows a basic section of a pump stack. Only the door (or a floodgate) on the containment side is strictly necessary in order to prevent flooding. Two doorways are used here, each lining up with the solid ground within the pump assembly, in order to prevent workers from trapping themselves after digging channels or assembling the pump.
Be warned: pump stacks move water fast. If you are pumping from a large reservoir into an open area, be prepared for a huge outflow, roughly akin to the kind of water dump you'd get if the whole reservoir was balanced above the pump output and then released. If you are using pumps to empty a large underground reservoir (or, say, a flooded fortress) onto open land, use an aqueduct or some other method to make sure the pump system outlet is a good distance away from anything you wouldn't want to get drenched.
As an alternative to a large reservoir, it is also possible to combine a Dwarven Atom Smasher with the top layer of the pump stack to create a "vacuum cleaner" of sorts.
Tips[edit]
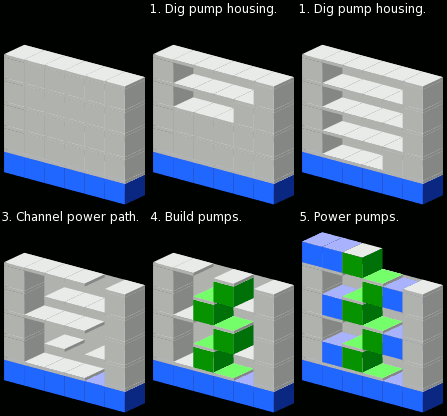
- Ramps can be used in place of channeling. Liquids will transmit through ramps, unlike stairs, and when pumps are constructed they annihilate the ramp they're built on much as walls do. Power will still be transmitted, so they don't need to be removed by miners prior to pump construction. Ramps make it virtually impossible to strand your miners and allow the stack to be dug out using only access doorways on the input side of the pump, so no construction or doors are later needed to eliminate leaks. A pump stack can be very rapidly carved out with this method as even if a miner/builder is trapped on the containment side of a pump, they can walk up the ramp to the intake side of the pump above and walk out.
- Power can be transmitted to the stack by channeling out the tile directly above the topmost pump and mounting a gear assembly. If the gear assembly is supported by an adjacent gear assembly or horizontal axle on a stable floor (be careful to not have that adjacent gear assembly disengage via lever), this will allow the stack to hang from the gear assembly. If a lower pump needs to be removed, or should self-destruct, the problem of the entire pump stack disassembling described above is eliminated. Further, if the supported gear assembly is built first, the pump stack can be built both from the top and bottom simultaneously, halving construction time, assuming that sufficient attention is paid to make sure that the pumps will align with the proper orientation when the two partial stacks meet. Properly channeling/ramping out the stack should ensure this.
- While expensive in both power and mechanisms, it is also possible to power a pump stack horizontally with a gear assembly or power source connected directly to the side of the pump (preferably to the input side). This is most useful when you are building an above ground pump stack. You can attach an axle or gear assembly to the side or end of the screw pump's output tile, but it's generally not a good idea because they do not block fluids, which would allow the pump's outlet fluid to leak along a diagonal. Unless that's your plan.
- When pumping water, make sure all tiles on the containment side of the stack are covered with a ramp, road, or fortification to prevent subterranean trees from growing and blocking flow of the stack. Fortifications have the added advantage that, when used with water, they will never become muddy.
- When using pumps to empty a large body of liquid, make sure that the pump outlet is properly isolated from the intake, otherwise the liquid can flow backwards into the pump's walkable tile and cause problems (such as flushing the dwarf operating it into the body of liquid being drained).
- The order in which the screw pumps were constructed matters. If built from lowest to highest, they will be able to transfer liquids one z-level per tick. However, if built from highest to lowest, they will transport liquids all the way from the bottom to the top in just one tick.
Improved magma pump stack[edit]
Because a pump stack pumping magma is known to cause significant lag, a new type of pump stack was developed by NecroRebel that causes a much smaller drop in FPS. Changing the single tile magma chamber at the output of every pump from a 1 x 1 to a 3 x 3 area reduces the lag to 1/15th of that caused by the original pump stack. The designer hypothesizes that the larger chamber requires many fewer temperature calculations when magma is pumped in or out; that also implies that there will be no FPS improvement for water pumps by using this design.
Newer magma pump breakthroughs[edit]
Newer breakthroughs in magma pump design have since made the 3x3 reservoir design obsolete. Testing has found a 1x3 head-over-tail variation (which is very similar to the typical 1 by 1 pump stack) as well as a 2x3 head-over-head variation. Both of these new designs require less space and work as effectively as his original 3x3 reservoir head-over-head design, with no significant drop in FPS. The 1x3 head-over-tail design has the advantages of requiring the least amount of space and being simple to refit from the standard 1 by 1 water pump stack.

|
This article or section has been rated D for Dwarf. It may include witty humour, not-so-witty humour, bad humour, in-jokes, pop culture references, and references to the Bay12 forums. Don't believe everything you read, and if you miss some of the references, don't worry. It was inevitable. |
- From the components used in construction, a DF pump can be imagined as a simple archimedes screw. However, given its effect on contaminated water, the lack of pump components *in* the water itself, and general dwarven mechanical aptitude, it seems more accurate - and more dwarfy - to infer the speed of rotation to be high enough that the building actually operates as a turbopump using the principle of vacuum distillation to simultaneously transfer and purify water. Some Dwarven historians say that ancient screw pumps were also used as a torture device used to interrogate goblins and hippies.
| Furniture | |
|---|---|
| Tools | |
| Access | |
| Constructions | |
| Machine and trap parts |
Axle • Gear assembly • Lever • Mechanism • Millstone • Pipe section • Pressure plate • Roller • Screw pump • Support • Trap • Water wheel • Windmill |
| Other buildings | |
| Related articles | |
