- v50 information can now be added to pages in the main namespace. v0.47 information can still be found in the DF2014 namespace. See here for more details on the new versioning policy.
- Use this page to report any issues related to the migration.
Difference between revisions of "v0.31:Bentgirder"
Strangething (talk | contribs) (crafting & trading edits) |
|||
| Line 413: | Line 413: | ||
==Tighten your defenses== | ==Tighten your defenses== | ||
| − | + | Build a {{L|Barrack}}s, set up {{L|Scheduling#Alert_Levels|alert}}s, organize {{L|Scheduling#Schedules|training schedule}}s, Build a Castle with a moat, Dig a {{L|well}}, make {{L|steel}} weapons and armor... | |
==Climb the social ladder== | ==Climb the social ladder== | ||
Revision as of 17:28, 23 July 2010
Bentgirder is a Dwarf Fortress package for beginners. With it, you skip Template:L, finding an Template:L, and Template:L. Just unzip the Bentgirder package to the same directory as Dwarf Fortress, and play along with this tutorial.
You can get Bentgirder here: Download
| This tutorial is still under construction! Be warned, there are still some important parts missing. If you are an experienced player, and want to add to this guide, please feel free. --Strangething 21:17, 13 July 2010 (UTC) |
Lesson One: Getting Started
Starting the game
At the main menu, choose to continue a game. It will ask you to pick a game region, but there should only be one choice: region0, the location of future outpost Matthob, aka Bentgirder.
Setting up your screen
| Used keys | |
|---|---|
| Zoom in and out. | |
| Tab | Toogle mini-map and command menu. |
| ↑ ↓ ← → ( + shift) | Move around. |
| F11 | Toogle fullscreen. |
| F1 | Zoom to starting location. |
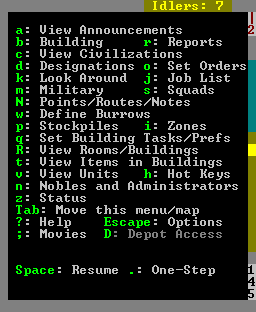
The default screen setup is a little crowded. The actual game view is on the left hand side. You can use the tab key to hide the mini-map and the command menu. Just keep tapping tab to cycle through different configurations. You might want to keep the command menu visible for easy reference. That seems like a lot of commands, but some of them are more useful than others.
In the most recent versions of Dwarf Fortress, you can re-size the window with the mouse, and zoom in and out with the mouse wheel. Also, you can toggle the full-screen mode with F11, but that will make it harder to read this as you play.
You can use the arrow keys (↑ ↓ ← →) to scroll around the map. To move 10 tiles at once, use shift+ direction. If you get lost, press F1 to center the screen where you first embarked.
Game Options
Esc brings up the game options menu, which includes things like volume control, and the quit & save option. Note there is no save & continue option. Dwarf Fortress is hardcore. If your fortress goes south, you don't go back to your last save, you have to struggle through, or abandon and start over. Remember, losing is Fun!
When in doubt, pause the game
The game starts paused. Use the space bar pause and unpause your game. It might be best to leave it paused for now. Without any orders from you, your dwarves will only mill around and eat.
Looking around
| Used keys | |
|---|---|
| k | Look around. |
| ↑ ↓ ← → ( + shift) | Move around. |
First, lets make sense of this jumble of characters that is the main screen. Press k to activate the look mode. The pauses the game, and puts a yellow X in the middle of the screen. That X is your cursor. Use the arrow keys or number pad to move it around. The right side of the screen will show a list of what is in the selected tile. It also shows that the ground below is made of.
The screen will be centered on a 3x3 brown square. That's the wagon full of supplies to get you through the year. Nearby, you will see your seven dwarves, a few animals, and lots of trees and shrubs. To the right, there's a brook. The dark blue patches that show up as "empty space" are ponds.
Opposite the brook is a hillside. You'll see that the green up-arrows are upward slopes, so your dwarves can walk up this hill easily. Beyond that is a silt loam wall. That's just a kind of dirt. It's called a wall because the whole tile is full of dirt.
Press Escape to end look mode.
Moving up and down
| Used keys | |
|---|---|
| < > | Move one z-level up or down. |
Dwarf Fortress is a three dimensional game. Anywhere you can use the arrow keys to move a cursor or the map, you can use < and > to move vertically. Each step is called a z-level. You can only see one z-level at a time, so undiscovered earth is blacked out, while above ground show as light blue empty space. In the bottom right of the screen, there's a display of the current z-level. On the right is also a scroll bar that shows where you are relative to sky (light blue) and earth (dark). The wagon is parked on level 146.
If you move the display up one step, (to 147) most of the map will appear light blue indicating empty space, but the hill to the left now looks normal. Conversely, if you go down to 145, all you can see is the bottoms of the ponds and the brook (dark blue). If you follow the brook south, there's a valley at the bottom edge of the map. From level 146 it appears as empty space, but on 145, it is normal terrain.
View creatures
| Used keys | |
|---|---|
| v | View creatures. |
| ↑ ↓ ← → ( + shift) | Move around. |
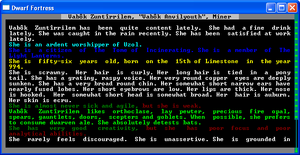
k is good for looking at the map itself, but to get more information on creatures (including your dwarves) use v. This works a lot like "k-mode", but the right side menu now shows detailed info on the creature closest to the cursor. If you're between creatures, or if there's more than one in a tile, press v again to cycle between creatures.
There are four sub-sections here: general, inventory, preferences, and wounds. For your dwarves, general shows what skills that dwarf has. Inventory shows what items the dwarf is carrying and wearing. Preferences shows what labor the dwarf will do. (This will be important later.) Wounds shows the creature's injuries as color codes. Healthy body parts are shown as bright white.
Secondary selection keys: +, -
In many modes, you can scroll though the information in the right-hand menu with the secondary select keys, + and -. For example, scrolling through lists of skills when viewing a dwarf.
Unit List: U
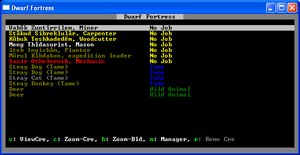
Press u to bring up unit list. This shows every living thing on the map. That's your seven dwarves, two dogs, two cats, a donkey, and some wild deer. ("Stray" animals are tame, but not attached to any individual dwarf.)
There are several useful functions here. Use v to get more info on the highlighted creature. For the animals, this jumps straight to a description. For dwarves, there is an intermediate screen showing the dwarf's owned objects.
Use c to go back to the map, centered on the highlighted creature. For example, we could find out where those wild deer are hiding. This puts you into the view creature mode, just like the v command, above.
Fortress Status: Z
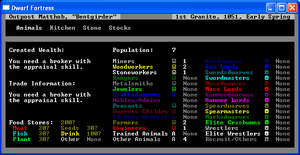
Instead of scanning around the map, you can press z to get an overview of the whole fortress from the status screen. This screen has a lot of information:
- Current date In the upper right corner.
- Dwarven population Sorted by profession, civilians in the center, soldiers on the right.
- Food and drink In the lower left corner.
- Fortress wealth including created, imported, and exported wealth, on the left side.
Since your dwarfs don't know how much stuff is around (without a Template:L) or how much stuff is worth (without a Template:L), the food and wealth information is not helpful. (More on that later.)
Lesson Two: Meet Vabôk the Miner
She may not look tough, but Vabôk is your only miner and that makes her very important.
Designation Menu: D
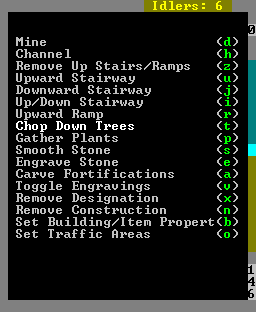
Enough looking around, let's start Template:L! Press d to bring up the designations menu. This gives us the cursor, and a list of options, each with a letter.
Let's go straight down, right next to the wagon. For that we need downward staircase. According to the window, that's j. Press j and downward staircase becomes highlighted.
The designation mode assumes that you want to mark a rectangular area. To make a designation, press enter to mark one corner, move the cursor to the opposite corner, and press enter again. You can also use the mouse, which is easier for small designations, like the one we're about to make.
Since we only need a small staircase, just click one square. The square is now marked with a > sign. As soon as we unpause, Vabok will walk to the tile, and carve a staircase into the dirt.
One problem, though. A designation doesn't cross z-levels. If you look at the level below, you'll see that the square below is exposed, but does not contain a staircase. We need to designate an upward staircase (u) in that square before we can dig any further.
Once that's taken care of, we can the regular dig designation to dig horizontally. We need some space for shelter and storage, so make a tunnel north or west, and then expand it into a big underground room.
Note that in designation mode, any tile that's next to water will blink blue. This is warn you against mining into water and flooding your fortress. If you dig north of the wagon, you might get a damp stone warning for no obvious reason. There are a few tiny ponds on this hill above, which triggers the damp stone warning, but isn't really a risk if you dig into it. Just don't try to dig upwards from there!
Removing designations
If you make a designation by accident, you can remove it from the designation mode. Choose remove designation, (x) and mark the tiles you want to un-designate. If Vabok has already mined it out, You'll need to construct a wall to fill it back in. More on that once we get to Meng the mason.
You have struck gypsum!
Template:L just disappears as it is mined out, but Template:L is left behind in big chunks. There is an outcropping of stone nearby, north and west of the wagon. Template:L is a type of stone that can be made into Template:L. There is also some useful Template:L nearby, a Template:L for your forge, and clusters of agates, a type of low-value Template:L.
Announcement list: A
Most of these discoveries will be announced by a message at the bottom of the screen
Press a to see previous announcements. As you fortress grows, these come up more and more often, so it's easy to miss them. Also note that you can zoom to the location of an announcement from here.
Experience
The more Vabok digs, the more Template:L she gets in mining. As her skill increases, she'll dig squares out quicker and destroy less Template:L, Template:Ls, and Template:L, as she goes.
This is true of all skills in Dwarf Fortress. Dwarves improve their skills through practice. More skill means higher quality work, done faster. Keeping your dwarves working and learning is the key to a thriving fortress.
Other Designations: cutting trees, gathering plants
While we're waiting for Vabok to finish our new digs, (pardon the pun) we can put our other dwarves to work with other designations.
Choose the "chop down trees" designation, and mark a big swath around the wagon. Then do it again with "gather plants." Your dwarves will quickly go to work on these tasks.
That's three out of seven dwarves hard at work. Not bad for just knowing one command! Try to keep Vabok busy expanding and exploring as you continue this tutorial.
Lesson Three: Meet Stâkud the Carpenter
Building: B
To get any carpentry done, we need the appropriate workshop. Press b for the build menu. There are three pages of things that can be built here, and some of these entries lead to sub-menus. You can use the secondary select keys here, and each entry has a shortcut key as well. We are looking for workshops. Press w for the shortcut. The carpenter's workshop is on the first page here, with the shortcut c.
Now it's time to place the workshop where we want it. Since there's not much room underground, lets build it on the surface for now. It's trivial to break down a workshop and build a new one, so it doesn't have to be perfect.
The last step is choosing the materials to build it out of. Like most workshops, it can be built out of wood, metal, or stone, and it only takes one unit of materials. Our woodcutter has been hard at work, so there is some wood lying around, and there are a few tower-cap logs on the wagon, just in case. If Vabok has hit usable stone, that will appear here as well. Materials are sorted by distance, and they are all equally good, so just take the first one.
Stâkud will haul the selected building materials to the chosen location and start building his workshop.
Workshop Control: Q
Press q for the view room mode. This works a lot like view creature mode. Move the cursor near a room, and you'll get some options listed in the right panel. The only rooms so far are the new carpenter's workshop and the wagon. The wagon's only option is to tear it down, but the workshop has the all important "add new task" option.
This brings up a list of things that can be built at this workshop. For now, lets build some beds. Our dwarves are going to get tired eventually, and beds can only be made from wood. Note that you can't specify what material to build the beds out of. Stâkud just grabs some nearby wood and starts working.
Stockpiles: P
Kubuk has been leaving cut-down trees all over the place. Why don't we move them all closer to the carpenter's workshop so Stakud doesn't have to drag them so far?
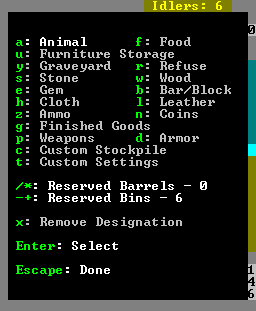
Press p for the stockpiles mode. Making a stockpile works just like a designation, but with no mouse control. We want a wood stockpile, so press w to highlight wood. Then mark the opposite corners of a small rectangular area near Stakud's workshop. The area is filled in with = signs. As soon as the game resumes, all your dwarves will run to fill the stockpile with logs.
Why stop there? The beds that Stakud is building are just cluttering up the workshop. Lets make a furniture stockpile on the opposite side. Note that there is some furniture on the wagon: an anvil, a bucket, and a few empty bags. (Empty bags and buckets are stored in the furniture stockpile.)
Vabok should be about done clearing space underground, and all these rats are making me nervous. Create a big food stockpile in the cleared space.
You can use k to look at the contents of your stockpiles. Take a look at your new beds, the enormous quantity of booze, and the barrels of revolting organ meats.
Eventually, you will want to move all your workshops and stockpiles underground. There are creatures that will steal your things. Moving everything underground is safer. Building them on the surface is just to get started quickly.
Quality symbols
Notice that your new creations have symbols around their names, like -pine bed- or +cedar bed+. These are quality indicators. Items with no symbols are minimum quality crap. As a general rule, more lines mean more quality, which means the item is worth more money.
- -double value-
- +triple+
- *quadruple*
- ≡five times≡
- ☼twelve times☼ -- This is called a masterpiece, and you get an announcement every time one is made.
Placing Furniture (beds)
Dwarves can't sleep on a bed while it's in the stockpile. To set up a bed properly, use the build mode again. Bed is the second option, shortcut b. This is just like how we built the workshop, but instead of a log, the only component is a bed. If there isn't an unused bed in a stockpile (or the workshop itself) you get the cryptic message, "Need bed". Beds and other furniture needs to be constructed at a workshop before it can be built on the map.
A lot of the things in the build menu are pieces of furniture that can be created at your carpenter's workshop: Tables, chairs, doors, hatch covers, and so on.
Bins and Barrels
Two of the most important things a carpenter will make are Template:Ls and Template:Ls. Barrels are used to hold food and drink. Bins are used to store nearly everything else. Try to keep a few extras of each.
Lesson Four: Meet Ïteb the Farmer
Ïteb has already been working on the surface, gathering useful plants, but his main function is to plant a farm.
Irrigation
All the seeds you have are for dwarven crops that grow underground. They don't grow in dirt, they only grow in mud. To get some mud in your new home, you need to dump some water. Doing so can be done in many ways.
Dig an area for your farm, one z-level below the surface and near the brook or a pond. A three by three area will easily feed all your dwarves. Make it four-by-four if you want a big one.
Now go to the surface and channel one tile, right above your future farm. Channel (h on the designations menu.) digs a down into the ground. If the layer below is solid, this create a ramp down, but since you already dug out the area below, it just makes a hole.
Activity Zones: I
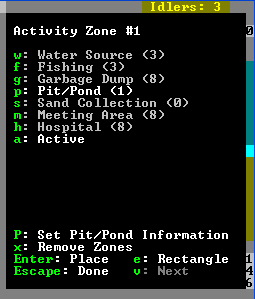
To get your dwarves to dump water down this hole, you need to create a zone. Press i to enter zone mode. Like with designations and stockpiles, you use the arrow keys and enter to mark a rectangular area. Unlike those other modes, you choose a zone's settings after you mark the area.
Make a 3x3 zone around your new hole. Press p to make it a pit/pond zone. (Pit/pond is an awkward combo of a place to dump water and a place to dump animals.) Then Shift-P to open the pit/pond settings. Here there is a list of animals to drop into the pit, but more importantly, here you can press f to toggle "Is pit" and "Is pond" modes. Set this to "Is pond" to start watering your future farm.
As soon as you exit zone mode, your dwarves will start carrying buckets of water from the nearest source, and dumping them down the hole. This can take a while, but you can speed things up a little by making a few extra buckets. You can use K to see the progress of your irrigation efforts. Even a "dusting" of mud is enough to grow your crops. You might also see something like "Water [1/7]". The number indicates how much water is in the tile. Anything more than 1/7 is too much to build a farm in. Just wait a while for the water to spread out and evaporate. Once you've got enough mud, go back into zone mode, and turn off "Is pond." You're ready to make a farm plot.
Creating a farm plot
Now that you've got a nice muddy area, it's time to build a farm plot. It's in the build menu, and the shortcut is p. Changing the size of your plot with u,m,k, and h. u and k make it larger, hand m make it smaller. (This awkward method is used a very few places in Dwarf Fortress.) As soon as you exit build mode, Ïteb will build the new plot.
Once your plot is constructed, use q to view its settings. Here, you can use the secondary select to choose a crop to grow for the current season. You can also use a-d to plan other seasons of the year. What to grow first?
Plump Helmets: the staff of life
Plump helmets are the best thing to grow in a new fortress. They can be eaten raw, with no preparation required. They can also be brewed into dwarven wine, but more about that later. You have a bag of seeds for nearly every dwarven crop in your starting supplies, but none are as immediately useful as plump helmets. You can experiment with the other crops once you have more population.
Once you make your selection, Ïteb will start bringing seeds (called "spawn") to plant. If you made a big farm, you might get an alert that Ïteb is out of plump helmet spawn. Don't panic. That is just temporary. Every time a dwarf eats (or brews) a plump helmet, two spawn get spat onto the floor. Eventually, these seeds get gathered back into your food stockpile, with the rest of the seeds.
Lesson Five: Meet Meng the Mason
A mason's workshop is very much like the carpenter's workshop, only it makes things out of stone. Since you will soon be neck deep in stone, it's a very attractive choice for building material. A mason can build a lot of the things that a carpenter can, plus a few that can only be made from stone.
What's in a name?
Some items have different names, depending on what material the item is made out of. Stone chairs are called "thrones" and stone chests are called "coffers". Don't get confused! They work exactly the same.
What's Template:L?
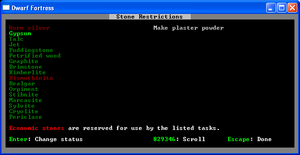
One of the options under the Template:L screen is Template:Ls. (Remember, bring up the status screen by pressing z). This is where you direct your dwarfs which stones are reserved for special uses and which can be used to makes any old thing (Template:L, Template:Ls, Template:L, etc). This prevents a future engineer from taking a very valuable (say Template:L) stone and making a Template:L mechanism out of it. Gypsum is reserved as a component of Template:L, but we have an abundance. Go ahead and hit enter when gypsum is selected to change it from red (unavailable for general use) to green (available).
Build a trade depot
Your fortress is not isolated. Merchants will come to trade several times a year. This is a great failsafe. If you need more food or drink, if you need another pick or ax, if you need thread or cloth or even a bag of sand, you can trade for it. But the merchants will not stop if you don't have a trade depot.
Start one from the build menu, shortcut shift-D. Since merchants need to access it, I suggest building it on the surface. It's a big 5x5 room, and it takes three units of building materials. It's also one of the few buildings that need to be designed before being built. This means a building designer has to work on the area before the actual building process begins. Fortunately, Meng has this skill as well as masonry.
Actual trading is handled by the fortress broker, a position to which you can appoint any dwarf.
Assign Nobles: N
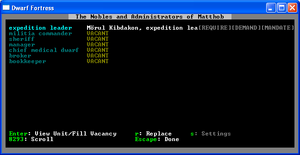
Press n to bring up the nobles and administrators screen. We need to assign a broker, so use the arrow keys to move the highlight to broker, and press enter. This brings up a list of dwarves. We have one dwarf with the Appraiser skill: Mörul Kibdakon. He is already our expedition leader, but that's OK. Mörul also has medical skills, so you could set him up as chief medical dwarf. (More on medicine when we get to him.)
While we're at it, let's appoint a bookkeeper, to fix all those annoying question marks in the status screen. Sadly, none of our starting seven have the proper skills for this job. You can assign an unskilled dwarf to this position, but it will take much more work for your records to be made accurate. If you've gotten any migrants by now, you could appoint a useless peasant to this role. If not, then one of the seven founders can take the job for now.
Notice that once you select a bookkeeper, the nobles screen will show a red "REQUIRE" warning on that line. If you highlight that line and press enter, it shows you what that noble or administrator needs. In the case of the bookkeeper, that's a "meager office".
Make an office
All an office really needs is a chair. Adding a table is customary, but optional. If you want to make a nice, permanent office, dig out a 3x3 room with stone walls. If you're impatient, you can set up a temporary office anywhere. By now you should know how to construct and place a chair.
Use q to view the chair. The only option will be "r: make throne room or study." Choose this option, and you'll get the option to choose the size of the "study" with the secondary select keys. Notice that it conforms to walls and doors. Press enter once you've got a nice size. The last step is to assign the chair to our new bookkeeper.
Note that any furniture within that area is considered part of the office, so if there's a bed there, it belongs to the bookkeeper now, and only she can sleep in it. If there's a chest or cabinet there, she might start keeping her things in it.
This is a common method in Dwarf Fortress, of placing a piece of furniture, and expanding a room around it. Chairs turn into offices, tables turn into dining rooms, beds turn into bedrooms, coffins turn into tombs, statues turn into statue gardens, and nearly anything can be turned into a barracks.
Make a mass tomb
More often than not, some of your dwarfs will meet Template:L. Dwarfs like to bury their comrades properly. Have Meng build at the mason workshop a few Template:Ls. At the same time, have Vabôk mine out a small 3x3 area. Once the coffins are done, have them built (b and then n) in the area that you mined out. After the coffin is installed, designate the coffin for use by your dwarfs by (q and then b). Nobles demand (and rightfully belong in) Template:Ls, which are coffins made into rooms and assigned to them specifically.
Making a dining hall
Template:L are simple - a few tables and chairs in a room. Have a larger 5x5 area mined out close to your food stockpiles. Then, have four or five stone Template:Ls (thrones, remember) and Template:Ls made. Arrange the tables and chairs in the room as you like, making sure that every table has a chair next to it. Don't worry about blocking doors, as dwarfs don't believe in manors and will walk over most furniture if needed. Now, designate the room for use as a dining room by pressing q , then selecting the table. You can also designate the room as a Template:L, which means dwarfs will hang out there if they don't have any jobs to do. This also means they can celebrate weddings and have Template:L there, too!
Construction
Oops! You mined out the wrong square. Or, "Boy wouldn't a lookout tower be nice so my Template:L can pelter the enemy with bolts?" These are possible with Template:L. You can designate what to construct under the build menu, capital C. (b-C) You'll need to determine what you want to build, and the material that will be used. (The material determines who will build it - a mason for rock, etc.) Now you can build Template:Ls, Template:Ls, Template:Ls to finish whatever Template:L you have in mind.
Lesson Six: Meet Sazir the Mechanic
Sazir has two jobs: He's a Template:L and a Template:L. The former task requires a Template:L, and the latter calls for a Template:L.
Traps
Template:Ls are the easiest way to defend your fortress. Your dwarves, and friendly visitors like the merchants, can walk across traps without danger, but they are devastating to hostile creatures and wildlife.
To build traps, you need mechanisms. A Template:L is a abstract collection of gears, pulleys and widgets that can be used to make machines. Mechanisms are made from stone, at a mechanic's workshop, and stored in a furniture stockpile. There are lots of fun things you can do with mechanisms, like a Template:L that raises with a pull of a lever. This lesson only covers the easy ones. Advanced Template:L is to big a subject to cover here.
Once you have a few mechanisms created, you can build traps using the build menu, traps/levers sub-menu. (b-T) The most basic trap is the stone fall trap, a simple stone suspended above a tile. To build one, you need one mechanism. Once the trap is built, it needs to be loaded with a lump of rock. When an intruder steps into that tile, the rock falls on him. Crude, but effective. The trap will then have to be reloaded. You can forbid the trap to make sure it isn't loaded while the enemy is still around.
Somewhat classier is the cage trap. These capture intruders alive with great efficiency. (What to do with Template:L is another question.) They are built just like the stone fall trap, but instead of a rock, you need a Template:L. Wooden cages can be created at the carpenter's workshop, glass terrariums in the glass shop, etc.
Notice that cages don't get stored in the furniture stockpile. Instead, they go the the animal stockpile. If you catch something in a cage trap, or you buy an animal from the merchants, the cage and its occupant are brought back to this stockpile. It's a good idea to keep some empty space in this stockpile, if you're using cage traps.
Trade Goods: Bentgirder Memorial Collectable Mugs
As a stone crafter, Sazir can turn common stone into valuable Template:L. The idea is to fill up a few bins of useless gewgaws, then trade them for more useful stuff from the merchants. The best place to start is stone mugs. Mugs are the most efficient trade good, since each lump of rock always turns into three mugs. (This is true of wineskins, cups, goblets, and flasks, too.) If mugs are too dull, swap to Template:Ls, which are randomized, and often produce interesting figurines.
More on Stockpiles
Trade goods can take up a huge amount of space. Make a big stockpile for finished goods, and keep making bins. Each bin can hold around twenty small items. Bins will not only improve storage, but also make it easier to move the goods to the depot when the merchants arrive.
You might want to make a stockpile for everything. For example, you need to make a weapon stockpile to move the extra pick off the wagon, and a cloth stockpile to store the cloth and thread supply. There are a few pitfalls here:
- Stone Don't make a large stone stockpile, or your dwarves will spend too much time hauling stone. There is simply too much of the stuff.
- Graveyard Don't use this stockpile to take care of bodies. Build Template:Ls instead.
- Refuse Thing in this stockpile will Template:L, by definition. To avoid clouds of miasma, build it outdoors.
Lesson Seven: Meet Mörul the Expedition Leader
Mörul is the most multi-talented member of your group. He will be your fort's leader, broker, brewer, and doctor.
Brewing
Brewing is essential to dwarven society as all dwarves need booze to get through the working day, as displayed in their profiles. Mörul, in addition to his other skills, is a brewer. The brewer's workshop is called a still. To make drinks, all he needs are some brewable plants and a barrel to store it in.
Your most common drink starting out, will be dwarven wine, which is made from brewing plump helmets. Always be sure to have a decent stock of plants to brew, as dwarves drink about three times as much as they eat. As a plus, brewing leaves the seeds behind, so your food can be brewed into drink while the seeds go right back into the ground.
Trading
Trading is also under Mörul's authority. He will be meeting merchants at your trade depot up to three times a year, in Spring for the elves, Summer for the humans, and Autumn for the dwarves.
When the merchants arrive, you'll get an announcement, the game will pause, and the screen will center on the newly arrived merchant. To prepare for trading, use the room control on the Template:L, and choose move goods to depot. From this screen, you can use the arrow keys and enter to select anything in the fortress to be moved here for trading. This is an awful lot to scroll through, but you can press s to type in a partial name of the item you're looking for. If you search for "goo," it will show all the finished goods bins in the fortress. Press enter to stop typing.
Each item has a weight and value, and the better your trader, the better deals you'll be able to get. Additionally, since Mörul starts skilled in appraisal, he will also be able to judge the value of items set for trade. One thing to look out for is that you also include some weighty materials as well while also giving a large number. Too much weight and you'll overload the pack animals (causing the trade to be impossible) and taking too many objects while giving very few, even valuable items, will annoy the trader as well. Traders will never trade at a loss, so keep your crafters going.
Dwarven Medicine
Before a dwarf will treat an injury, there must be a hospital zone set up. A hospital is created in the opposite way from rooms like offices. First you create the zone, then you build furniture in it. A hospital needs beds for patients to rest in, and chests (or bags) to store medical supplies. Once those are placed, dwarves will automatically stock the containers with cloth, thread, splints, crutches, and buckets. If you have any soap or plaster powder, that gets stored here as well.
Lesson Eight: Meet Kûbuk the Axedwarf
We've seen Kûbuk at the very beginning, chopping down trees, but she is also your fortress's first line of defense. As a trained axedwarf, she can chop down goblins and kobolds as easily as trees.
Military screen: M
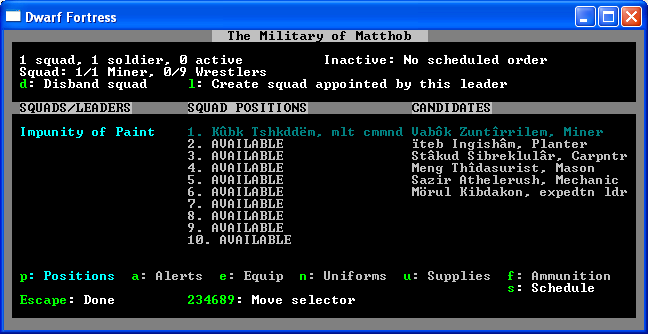
Open the military screen with m. First create create a new squad. When you create a squad, the game will prompt you to choose a uniform for the new squad. Choose anything other than archer. You can specify equipment later on, once you have some armor for her to wear.
The squad will be given a random name, and you can now add Kûbuk to it. This will make her the militia commander, as the first military dwarf of the fortress.
Exit the military screen. By default, squads are set as inactive, so Kûbuk will continue with her civilian woodcutting duties. If you have a barracks set up, she'll do some basic training in her free time.
Squad Command: S
You can give specific commands to your military through the squads command. Press s to enter squad control mode. Be aware that the game does not pause in this mode! You can pause and unpause with space, as normal.
Press a to select the first (and only) squad in the list. To post Kûbuk in a specific place, press m for the move command, and select the location with the arrow keys and enter. To send Kûbuk after a specific creature, press k for the attack/kill command. This lets you chose your victim with the cursor, or select one from a list.
Combat Reports: R
To get the details of what's happening in combat, press r for Template:Ls. This starts out blank, but once the first thief stumbles into your fortress, things can get pretty gory.
Lesson Nine: Meet the Migrants
The first wave of migrants will often double your population. Providing food, drink, and beds for them all can be a challenge, but the extra hands make the fortress run more smoothly, and let you branch out into new fields.
As the new dwarves come in, check their skills and what labors are enabled. Some jobs are part of an industry of interlinked tasks. For example, a blacksmith needs a furnace operator to provide raw materials. Sometimes you luck out and get the migrant you need, sometimes you have to train an unskilled dwarf from scratch.
Future of the Fortress
Improve your dwarves' lifestyle
Individual bedrooms, Build a statue garden or Zoo, Build a prison, Farm above ground, cook meals,
Tighten your defenses
Build a Template:Ls, set up Template:Ls, organize Template:Ls, Build a Castle with a moat, Dig a Template:L, make Template:L weapons and armor...
Climb the social ladder
Dealing with nobles, The Dwarven Economy
Dig deeper
Do something stupid
FAQ
- What's with all the vomit?
If your dwarves spend too much time underground without sunlight, they develop cave adaptation. This essentially means that sunlight makes them sick, and they'll get negative thoughts from this. The vomiting is caused by prolonged cave adaptation.
- What's with the dead rats?
Cats are vermin hunters - they kill vermin (rats and other small animals/insects) and leave the corpses wherever they want. If you have a refuse stockpile, they'll go there instead.
What is this purple stuff?
That's miasma. It appears when something rots indoors. It gives your dwarves bad thoughts, but isn't otherwise harmful. Anything that can rot is refuse. Building an outdoors refuse stockpile should prevent any more miasma.
- What are "The Tome of Incinerating"
That's the name of the dwarven kingdom that you are a part of.
- What is "The Light Lanterns"?
That's the name of your expedition. Basically, anyone who's an inhabitant of Bentgirder is also a member of the Light Lanterns.
What are these parentheses on item names?
Quality markers are explained above. Normal (parentheses) mean the item was not created at Bentgirder, and does not count towards your created wealth. Curvy {brackets} mean the item is forbidden to your dwarves. You can toggle this with the f.
The <<double angle brackets>> mean the item is decorated. Decorated items often have two sets of quality markers. The outer marks are for the quality of the decorations, and the inner marks are for the item itself.
A dwarf just withdrew from society, got possessed, or was taken by a fey mood.
This is GOOD. Your dwarf has taken a strange mood, and will eventually make an artifact - a very valuable item that cannot be traded. See the pages on strange moods and artifacts for more details. Also, there are two other moods that only happen when your dwarves are unhappy - fell and macabre moods. Just make sure you have all the materials they need for the artifact, or...
What is berserk / stark, raving mad / melancholy?
...that'll happen. If a dwarf fails a mood or suffers too much, they'll go insane. An insane dwarf is useless, as they will not do jobs or anything productive. Berserk dwarves, though, will attack anything and everything they can reach. Mad dwarves are harmless, and will simply run around naked. Melancholy dwarves will seek any possible passive means to end their miserable existence, usually by jumping off high platforms.
A dwarf just threw a tantrum
This is a sign of extreme unhappiness. Invest some time in giving your dwarves good thoughts. If a dwarf stays unhappy long enough, he might go insane.
Why are there dead animal/fish in my fortress?
One of your dwarves is hunting or fishing, but there is no butchering or fish processing set up. Build a butcher's shop or a fishery. If you lack a dwarf with that skill, turn on the appropriate labor on another dwarf. Or just find the hunter/fisherdwarf and turn off that labor.
An animal stole my stuff!
Yes, that happens. There are thieving raccoons in this area. Try to keep your stuff underground, and out of their reach. Try posting a soldier or a Template:L near your stockpiles to scare them off. (See Kubuk the Axedwarf for more information.)
A thief or snatcher appeared!
Read the section on Kubuk the Axedwarf, if you haven't already. If a thief gets away with something valuable, your fort will attract more and more thieves in the future. Template:L near entrances or entrance doors tied to levers also cut down on thieves.
A squad of goblins appeared!
That's an ambush. Hopefully, by the time your fort is wealthy enough to attract ambushes, you will have some Template:L set up. Ambushes often appear with a Template:L, so hopefully you will have caravan guards helping you against the ambushers.
What's a vile force of darkness?
Uh oh. That's a goblin siege. A siege only appears when you have a certain population or wealth.
A dragon/colossus/hydra/titan/forgotten beast appears!
You are about to have a lot of fun. A megabeast is a threat to even the most well-established fortresses. Good luck.
Other Commands
There are still more commands in Dwarf Fortress, even some very useful ones, that are not covered in this tutorial. There is detailed information at Template:L.
Hot keys: H Points and Routes: shift-N Burrows: W Job Manager: J Items in Room: T Options: O Trade Depot Access: shift-D Local Civilizations: C Artifact List: L Room List: R The (Questionable) Manual: ?
